Most owners of private territory dream of placing garden gazebos on it with their own hands. Drawings and design options show that the style of the planned structure can be completely different and completely depends on the preferences of the owner of a private house. We will provide several options for building garden gazebos with your own hands. Photos are also provided for each of them, so that each reader can understand the final version of the entire description.
DIY garden gazebo options
Frameless gazebo.
Frameless garden gazebos involve the construction of brick walls on monolithic insulated slabs or on strip foundations. Building blocks for frameless gazebos are most often taken from aerated concrete; their height is often up to two meters. A maximum of a couple of walls can extend directly to the roof of the structure. The remaining walls are formed with the help of columns, on which, in principle, the entire planned structure rests.
Depending on how the walls are laid, they are planned external finishing. If the brick is laid carefully, then most likely finishing will not be required at all. Such options for garden gazebos look very organic in a spacious area and represent a certain mystery.

If frameless garden gazebos are built from foam blocks, then their finishing is the same as that of a house built from this material. That is, a metal mesh is applied, and plaster is applied to it. Already on the leveled wall you can apply either stone or decorative plaster.
It is worth noting that frameless garden structures are often glazed if they are made of brick, foam blocks and stone. In this case, they will be as warm as possible in winter.
The roof for such buildings is made to fit their shape. These may well be single-pitched, double-pitched and four-pitched rectangular gazebos. For gazebos with more complex shapes, you will have to cover the tent roof.
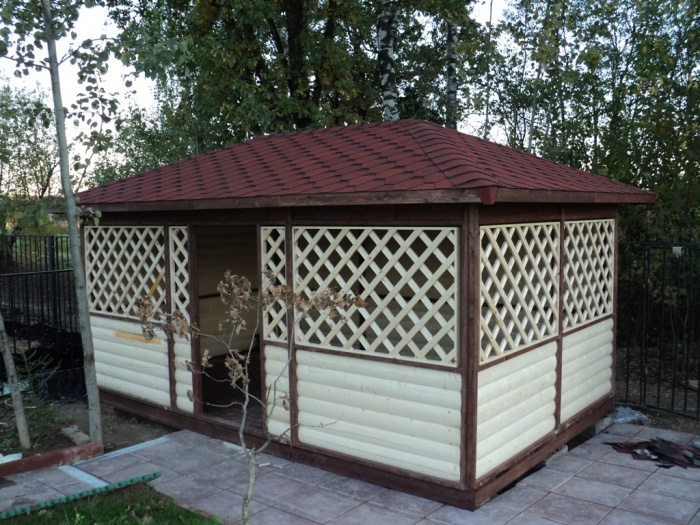
Classic wooden gazebo (with lattice wall).
Classic wooden garden gazebos are in greatest demand, as they are easy to design and easy to build. Also, such designs will be an ideal decoration for the garden; they will look organic with trees, shrubs and herbaceous plants.

The drawing of a garden gazebo is based on the measuring unit inch, which is equal to 2.54 cm. At the beginning of construction, it is necessary to carefully measure all materials so that they accurately measure correct parameters and the design turned out to be uniform. Then you need to carefully mark the area chosen for the building. To check the markings for correctness, it is necessary to pull the diagonal ropes from the corners; they should be equal to the square markings.
Then it is necessary to fix the points for plumb lines, the center of the structure, and temporary structures. Next, you can begin installing the central floor block, trim strip, floor plank, additional, main joist and header, metal brackets and load-bearing and guide beams, taking into account the dimensions indicated in the photo.
When connecting elements, you must use a level, and when the lower part is ready, you can begin to work on the sides and top.
We finish the gratings, install cornices and connect the ends of the beams with the crown and cornices. It is advisable to impregnate the finished wooden building with special products that will protect it from rotting and give it a refined shade. If the structure will be painted in the future, then first it must be coated with a special oil-based primer for wood.
Design of garden gazebos made of metal and polycarbonate.
Structures designed for relaxing in the garden are popular due to their strength and high stability. In order to make such a gazebo with your own hands, you first need to draw up the correct drawing, such as this one.
Depending on his preferences, the owner must enter information about the dimensions of the roof and frame and required quantity all materials (you can also use the numbers in this figure).

The initial stage of building a gazebo made of polycarbonate and metal involves laying a foundation. Since our planned structure is lightweight, laying the foundation will only require removing part of the top soil and filling it with crushed stone. The crushed stone must be poured on top with one layer of concrete.
After completing the previous stage, we immediately proceed to constructing the frame. For him, it is advisable to opt for pipes with a rectangular cross-section, which are inserted into the foundation and connected by transverse strips. The transverse and vertical components of the frame can be connected using bolts or welding. Roof components should also be in the form of metal pipes.

If the owner of the garden is well versed in welding, then you can make images of arcs from metal pipes; if not, you can always use the services of professional welders.
Polycarbonate is laid on the roof, joint to joint. It is attached to a metal frame using self-tapping screws. The seams formed between the metal and polycarbonate are treated with sealant.
Wooden gazebos with a main wall.
Projects of garden gazebos with a main wall are quite interesting option for every homeowner. They are quite resistant to all adverse factors. external environment and have good strength. The process of building such a structure consists of several stages, one of which is shown in the figure.

First, you should thoroughly clear the area of debris and mark the site on which the building will be located. To do this, you need to dig a shallow hole of the required dimensions and fence it with any boards (that is, make formwork). Then the marked area is filled with cement.
When the cement has hardened, a lower frame is constructed from timber, to which the racks are attached. The racks are connected to each other by horizontal wooden components (beams). Then the main walls and roof themselves are erected.
Design of a garden gazebo with a metal roof.
Metal gazebo - ideal option for any garden. It will decorate it perfectly and will also serve its owners for quite a long time. you can make a gazebo according to the presented drawing, based on below is description .

When building a room above the described one, the following materials will be useful: hollow pipes with a square or rectangular cross-section of at least 2-4 cm, mounting brackets, metal rods, material for covering the roof and walls. You will also need tools such as welding machine, screwdriver, building level, hammer drill and grinder. You will also need sand, cement, electrodes, metal drills, a brace, and self-tapping screws. To finish metal elements, special paint is required.
We choose a suitable area for the gazebo, from which there will be a beautiful view of anything. Now you need to decide on the size of the doorway. Typically, a height of about two meters and a width of about a meter are selected. Let's start laying the foundation.
If the owner of the dacha still has it somewhere paving slabs, then the foundation can be laid out of it on a base of sand. Well, if not, then cement comes to the rescue. For a cement foundation, you need to make formwork and wait until it hardens (3-5 days).
Now we make marks using a brace on which the support pillars will be located. After this, we directly install the latter and connect them with transverse metal parts. Then we start making the roof. It is made from sheet metal (corrugated sheets or metal tiles).
So, you can see that there are many various options gazebo design. You need to select them for yourself based on taste and the expected cost of the project.
Gatherings with guests, dinner with your family in the fresh air, relaxing after work in the garden - an economy class summer gazebo will be very useful to you in any of these situations. It is not always advisable to make it large-scale and spacious; in most cases, a small and budget building is enough, which will delight you and your guests.

Classic sizes of a summer gazebo
The optimal size of a small summer gazebo is 3 by 3 meters. This is enough for both a family circle and a small group of people.
Today's problems sound like this:
- How to build a budget summer gazebo with your own hands?
- What materials can be used to make a summer structure with at the lowest cost?
- How much would such construction cost?
This publication will discuss step by step process construction with photos and videos of a small gazebo made of timber with dimensions of 3 by 3 meters. This option is one of the cheapest and most practical for construction, but if for some reason it does not suit you, at the end of the publication I will provide links to similar articles on construction.
Before taking active steps, I suggest studying the final result of the work and its technical characteristics.
Most budget gazebos are built according to the same principle, the cost of materials is also approximately the same, but I would still like to emphasize this - it is important to understand what and from what we are going to build.
Technical characteristics of the finished gazebo
The photo is shown to the right of the characteristics. When you click on the photo, it will open in a larger size.

The final result of construction
- Material: Beam 100 by 100 mm;
- Dimensions: 3 by 3 meters;
- Foundation: columnar (made of bricks);
- Roof: single slope;
- Roof: euro slate (ondulin), but you can use a more budget option - corrugated sheeting;
- Wall cladding: oriented strand board (OSB);
- Floor: board 40 by 100 mm “magpie”;
- Painting: antiseptic Senezh Ultra in 3 layers.
The materials used for construction are the simplest and cheapest. However, they are quite enough for a reliable and strong building that will last for many years and withstand hundreds of rains.
Foundation
For such a structure it was chosen columnar foundation. It consists of nine brick pillars, which are the basis for the entire gazebo. The foundation construction process is as follows:
- 9 holes are dug with a depth of 70 cm;
- The first 30 cm are covered with sand (ideally, put some crushed stone at the bottom) and compacted;
- The remaining 40 cm is filled with construction waste and filled with concrete;
- Two bricks (ideally fired red ceramic bricks) are laid on top of the concrete;
- A layer of bitumen is applied on top of the bricks and, ideally, a sheet of roofing felt is laid.

Ready-made foundation pillars
Such a foundation is extremely reliable for small buildings. A summer gazebo is an ideal building for such a foundation. Therefore, it was he who was given preference during construction.
Bottom harness
A lower frame is laid on top of the foundation, which consists of wooden blocks fastened together. The beams are fastened to each other “into the floor of the tree.” The connection must first be treated with an antiseptic or bitumen. Four self-tapping screws are screwed onto the connections for security.


In addition to the four beams around the perimeter, one additional one is installed in the center - the so-called “log”. In the future, it will be needed to attach the floor board to the frame (more on this in the chapter on flooring).

Finished bottom harness
Posts and top trim
Pillars are installed on the lower frame, which will serve as the basis for the walls and the top frame. Four posts are installed at the corners of the gazebo, and one additional post is installed next to the entrance at the height of the railing.
The height of the front pillars is 230 cm, the height of the rear pillars is 200 cm. This is done for the further construction of the roof slope.

Fastening poles to metal corners
The top trim consists of two beams installed parallel to each other on top of the pillars. The fastening is identical to the bottom trim - into the floor of the tree.

Installed poles and top trim
Erection of the roof and laying of the roof
The whole process will be more clearly described in the form of a step-by-step approach:
- On top of the bottom trim we attach 9 rafters in increments of 30 cm;
- We install 9 boards parallel to the rafters, also in increments of 30 cm;
- If you did everything exactly according to the instructions, then you should have a roof in the form of lattice;
- We lay sheets of ondulin or corrugated sheets on top of the roof, depending on your capabilities.

Rafters

Lathing
The rafters are attached to the frame using metal corners and screws. It turns out quite reliable design, which can withstand not only the roof, but also winter snow.

Finished roof
Floor
After installing the pillars, you can begin laying the floor. You will need about 30 3m long boards, some of which will need to be fitted to fit the posts. The floor is attached with self-tapping screws to the bottom trim and the joist in the center.
The secret to a level floor is to place the first board level. If you succeed, then the process will be more fun.

Finished floor
Railings and OSB cladding
For the railing, a beam with a section of 50 by 50 mm is used, which is attached to a height convenient for people. In addition to the timber, it will be necessary to install additional supports on which the oriented strand board will be attached in the future. All this is clearly shown in the photographs that will be presented below.

Fastening railings to corners

Finished railings
The OSB board is fastened with self-tapping screws, plus it is additionally pressed down with bars in the center. This creates not only reliability, but also additional aesthetics.

Laying the first OSB boards
A few words about antiseptic and paint
The proposed version of an inexpensive gazebo turned out to be extremely beautiful and effective. The main secret lies in a well-chosen color, which plays in contrast between the dark and light shades of the wood.
You can use your own options for protecting the tree, but the owner of this building recommends antiseptic Senezh Ultra, which is applied to three layers. This will allow you to achieve reliable protection wood and beautiful appearance.
Video
I express my deep gratitude to the user of the channel with the name “ Vasya Vasin" It was he who prepared this video on construction, and also commented on some of the questions that were asked to him in the comments.
If you have any questions, you can ask them both in the comments to his video and in our feed after publication. We can forward your questions to him, and then receive and write you his answer.
Photos of summer gazebos

Wooden gazebo with decor for summer holidays
In one of the publications on our website, we examined in detail the variety of summer gazebos made not only from wood, but also from other building materials.
View options with different types and design, as well as pick up some idea for your dacha, you can follow the link below.
Options for building other structures
For various reasons, this construction option is not suitable for everyone. In view of this, I offer you construction instructions similar in writing style, which also clearly and clearly explain the process of building a gazebo with your own hands.

Several links are provided below.
Among the presented options, all buildings are made of wood and in a fairly budget format. Any elite building materials like decorative plaster or wild stone are not used here.
Drawings of the gazebo, as well as its sketches and 3D models must be included in the project without fail. When developing these diagrams, plans and drawings, you need to maintain the proportions of the structural elements, as well as indicate their exact dimensions. In this case, during the construction of the building there will be no problems that could lead to additional time and financial costs.
What are the rules for drawing up drawings and sketches of gazebos, and how should they be drawn? This is what our article is about.
Gazebos with 8 sides


General rules for drawing up drawings
Drawing up drawings of a gazebo for a summer house will allow you to accurately plan the location of various important structural elements - lamps, doors, windows, perhaps, or. Besides this exact diagrams and sketches will help determine the amount of building materials needed.

How to make gazebos with your own hands (drawing, photo)
There are rules for drawing up drawings with your own hands that should be followed:
- First of all, you need to measure the space on the site allocated for. The dimensions of the structure in the drawing should not exceed its area.
- Next, a sketch is drawn.

A sketch of a wooden building or its 3D model clearly shows how it will look in the end
- Then the frontal and profile projections of the building are drawn, indicating the dimensions. For complex structures with barbecues or massive furniture, you will also need to attach a plan (projection from above) to the set of drawings.
- Next, a separate diagram of the foundation is drawn, which can be.

Columnar foundation diagram
- After this, walls and large elements (barbecue, table, etc.) are drawn. At the same stage, you should note the locations of windows and doors.
- Then, on the finished drawing, mark the dimensions of all frame and cladding elements.

Drawing of the frame of a summer building with the indicated dimensions
- At the next stage, a roof diagram is drawn up with dimensions and angles.
- The locations of the lamps and the electrical wiring diagram are noted.
- If necessary, draw a barbecue with a foundation and a chimney (oven, barbecue).
- Next, you will need to “arrange” the furniture on the plan.

The plan should also include furniture
Important: If it is planned to build a closed structure, it is necessary to indicate the location of all ventilation openings.Examples of drawings with explanations
Wooden structure for rest
Structures on a timber frame are currently the most popular. It is not at all difficult to draw up a drawing of a design such as a rectangular one.

A small garden gazebo on a timber frame, designed for family recreation
First, we draw a drawing of the structure in two projections indicating the dimensions.

DIY simple rectangular summerhouses. Frontal and profile drawings
Important: The project must also include small detailed diagrams indicating the methods of fastening and the sizes of elements in the connection nodes.
Diagram of connection points of various structural elements
Next, according to the rules, we draw the foundation. Of course, you first need to decide what it will be like. On weak or unstable soils it is better to build a pile grillage, on soils with good bearing capacity - a strip one.

Detailed drawing of the columnar foundation of the gazebo

Drawings of a garden gazebo, made by yourself. Frame railing diagram
At the next stage, we draw a diagram of the rafter system. You should start by developing a drawing of the top trim and Mauerlat.

Layout of elements of the upper trim and mauerlats of the building

Drawing of the rafter system gable roof indicating the step width between the rafters and their length
The drawings must also be accompanied by a table of specifications of elements indicating the types of building materials required for the construction of one or another part of the gazebo, their sizes and quantities.

Table listing design details
After all the drawings are ready, you can go to the building materials store and purchase everything you need.
Advice: Buy materials with at least a small margin. Some elements may be damaged during the construction process. And no one in our country is insured against purchasing defective goods.Log structure with barbecue
In the courtyards of large residential buildings, log trees are often erected. In this case, or are usually installed inside them. Below we present to your attention a project of such a convenient and high-quality structure.

Drawing of a wooden gazebo equipped with a barbecue
For such a rather complex structure, it is better to additionally draw up a plan.

Scheme of the first crown of the building with a barbecue and its general appearance
Drawings of gazebos with barbecue
A more complex construction is. Such options for yard structures are also quite popular. On the grill you get very tasty kebabs, as its thorough brick walls able to retain heat for a long time. Plan of a gazebo for a summer house with barbecue:

Plan of a gazebo with barbecue
Important: The set of drawings of the gazebo with barbecue must include a diagram of the foundation of this structure, as well as the chimney.
Foundation diagram of a gazebo with barbecue
IN in some cases can be installed in the middle of the structure. the design is heavy, massive and dimensional. That’s why they always place it against a wall or in a corner. Another original design of a gazebo with barbecue:

Sketch of an original building with a barbecue
And the diagrams for it:

Schemes of a gazebo with barbecue
The set of drawings of a structure with a barbecue must include a drawing of the barbecue itself.

Drawing of a barbecue for a gazebo indicating the dimensions of all elements
In addition, an order must be attached to the project. The same goes for fireplaces.

Arrangement of the gazebo barbecue
Gazebo kitchen
Designs that combine a gazebo and a kitchen are considered very convenient. In such a building you can not only spend time pleasantly, enjoying closeness to nature, but also organize lunches and dinners.

Plan of a gazebo for a summer house, equipped with a sink, barbecue, dostarkhan, stove, table and benches
In the video below you can see original design gazebo complex – summer kitchen made of brick and wood.
Metal structures
Of course, not only wooden gazebos are built at dachas (the drawings of which are presented above), but also structures made of other materials. A very popular option are, for example. Of course, it is also necessary to draw drawings before their construction. Make diagrams of the gazebo from profile pipe as simple as a wooden one. Structurally, they are usually even simpler and it is not necessary to draw complex drawings for them.

What could be a drawing of a metal gazebo? Photo of the simplest design 3x4m with diagrams showing the main dimensions
Very often on summer cottages multifaceted metal gazebos are installed. The design of a 6 coal building is a little more complicated than that of a simple rectangular one. But such structures are also built quite quickly and simply.

How to build hexagonal gazebos with your own hands. The drawings of these structures are quite simple to draw.
A design such as an octagonal gazebo made of metal profiles, wood or polycarbonate is also quite simple to assemble.

Drawing of an 8-sided gazebo indicating the dimensions of the frame and roof
Sketches of a large brick garden gazebo
Gazebos with cathedral stove structures
In closed gazebos, prefabricated structures can be installed, including a barbecue, stove and other similar equipment.

Sketch of a complex for a gazebo, consisting of a Russian stove, barbecue, smokehouse and hob
Advice: If a grill, barbecue or stove is installed in the building, the woodshed should be installed directly under them. This will make using the structures more convenient and save space.As you can see, it is quite simple to draw up projects for structures such as gazebos with your own hands using drawings. If you don’t want to waste time on this procedure, you can order finished drawing in an organization engaged in the design of small architectural forms. However, of course, this will entail additional costs.
Before starting any construction, you need to prepare for it project documentation. Building a gazebo with your own hands at the dacha is no exception; it also requires diagrams, dimensions, sketches, which together will allow you to get a complete picture of the future structure.
You will understand what materials are needed for construction, as well as where and how certain structural elements will be placed. The most important thing is that you will be able to draw up an estimate in order to avoid unnecessary costs.
Country gazebos are simple and beautiful
Today, many modern construction and finishing materials. Consequently, it is possible to move away from using conventional building materials and create unique gazebo designs with your own hands. In the understanding of many people, a gazebo is simply a place where you can relax. Indeed, this is so. But now kitchens, beds, swings and even barbecues are being created in gazebos.
Due to the fact that modern building materials They are light and elegant; you can assemble the gazebos yourself. Complexity is determined only by your own ideas. On the Internet you can find a huge number of photographs that will inspire you to create a unique gazebo on your site:
Design of a gazebo at the dacha, photo:

 Portable design
If we take into account the various characteristics of gazebos, we can conditionally divide these buildings into groups. So there is:
- open gazebos (easy to build, used mainly in summer),
- closed gazebos (structure with walls, windows and doors),
- portable gazebo (easy to disassemble and assemble).
There are a huge variety of building materials that can be used to build gazebos with your own hands. So, wooden, metal, glass and plastic objects are used. In addition, stone is actively used. Stone gazebos have become popular recently. Even raw materials that no one uses at all can be used here: plastic bottles, pallets, trees, as well as others. It all depends on what kind of imagination the owner has.
 Drawing of a gazebo for a small area
 As for the size of the future gazebo, everything is determined by the area of the site itself. If there is not a lot of area, then you should not create a very large gazebo. The configuration can be square, rectangular, round, hexagon, octagon. Sometimes they create gazebos in the shape of an oval.
Advice! If this is your first time creating a gazebo with your own hands, then you need to use photographs, drawings, and expert advice. All information can be found on the Internet. This will allow you to avoid mistakes in the future.
The roofing materials for gazebos are slate, corrugated board, flexible tiles, cell phone or monolithic polycarbonate. If we take into account that many of these materials are very plastic, then it is possible to make not only single-pitched, but also multi-pitched, as well as spherical, arched, domed and other roof shapes. Gazebos with climbing green plants as a roof are common.
Particularly popular today are gazebos in which summer kitchens are equipped. Barbecues, fireplaces or barbecue areas are also built in there. Remember that to create such structures you will need to fulfill certain requirements. And again: it is necessary to have drawings, sketches and designs not only of the entire gazebo, but also of a stove, fireplace, for example. This will allow you to get the job done accurately and also spend a minimum of money.
 Gazebo with open barbecue
 Building gazebos with your own hands
How to create DIY summerhouse? On the Internet, as mentioned earlier, there are many projects and drawings of gazebos. If you are not sure that you can create your own project yourself, it is strongly recommended to use the projects of those gazebos that can be found on the Internet.
 Drawing of a wooden structure with dimensions
 So, creating a gazebo project consists of several stages. First you need to create a sketch of the future building and draw up working drawings. Diagrams and sketches will allow you to plan the location of the structure at this stage and outline the placement of equipment and furniture in it. If communications are needed in the gazebo, in addition to light, then their supply system is also determined. There are clear recommendations that will allow you to properly prepare the project.
 Open design diagram
 So, initially we decide on the type of gazebo - open or closed. Then you think over the style of the dacha gazebo, which should be combined with other buildings on the site. The building materials that will be used in the work are determined. Finally, you need to allocate a place on the site for a gazebo. All dimensions must be clearly reflected in the drawing and coincide with the site on the ground. If the gazebo at the dacha is of a closed type, then it is definitely worth creating ventilation system. For massive gazebos, the type of foundation is determined:
- tape,
- columnar,
- slab base.
Now you can move on to the description of the structural units. Here the installation locations for windows, doors and stairs are marked. The roof layout is a separate job. The technology for constructing each of the structural elements of country gazebos is determined separately, which must be reflected in the project. It's time to mark the electrical and plumbing wiring. The plan shows the installation locations of furniture, equipment, and lamps. It should be noted that this is not all the work; there are nuances that should be taken into account when creating a gazebo project with your own hands.
 Photo of a rectangular building project
 The more carefully the project is worked out, the more accurately the calculations of building materials will be made, the easier it will be to carry out the construction itself. The most important thing is that errors are practically eliminated. The design will be strong and durable.
Video: garden gazebo made of wood, step-by-step instructions
DIY construction of a wooden gazebo
So, when it comes to choosing a material for building a gazebo, many people prefer to choose wood. The fact is that this material allows you to create a summer house gazebo that fits into the interior of any area. In addition, wood is an environmentally friendly material that is environmentally friendly and durable. Wood is easy to process and timber, logs, boards and other elements are used to build gazebos.
 Winter construction of wooden gazebos, photo
 Rectangular gazebo
The easiest option for self-construction is the use of a rectangular design. This is an open structure for summer use. Will be open support posts, roof and fencing. The drawing should show only the dimensions of the structure, height, and a sketch of the structure.
As a rule, a drawing of a profile and frontal projection of the gazebo is created. The foundation is displayed as a separate diagram. As a rule, they give preference columnar base. Here you need to indicate the dimensions of the pillars, the height and depth to which they will be dug.
Advice! To make the work more convenient to carry out, you can attach to the project detailed diagram installation of technical components, indicating options for fastening to each other.
As for the roof drawing, it is appropriate to display the rafter systems here, indicating the fastening of the upper trim, the lower support for the rafters, and also indicate the pitch between the rafters. Once all the drawings are ready, you can immediately begin construction work. So, we prepare and mark the site for construction. Stakes tied with rope are used. Once the perimeter is marked, we begin to build the foundation.
 Simple drawing wooden gazebo do it yourself for the dacha, sizes
 To create a foundation, a pit should be dug according to the drawing. Although the hole can hardly be called a pit if it is 80 centimeters deep. However, everything should be called according to the building code. A layer of sand is laid out at the bottom. Supports are placed, which are then concreted. Be sure to check with a level the evenness of all supports, their distance from each other, as well as the level in height.
 Photo initial stage works
 Now let's move on to creating the lower trim and constructing the floor from logs. Used wooden beams. Once the floor frame is ready, you need to create a flooring from boards or ready-made floor coverings (see website). Then the top trim is fixed and the roof frame is assembled. The frame is sheathed with boards and covered with roofing material.
 Construction stages
 Once the gazebo structure is in place, fencing can be created. Initially, fix the horizontal bars, which will also serve as railings. Then vertical racks are installed. If the project provides for a wooden lattice, then it is necessary to create a frame from timber, and then the lattice is stuffed inside it.
 Wooden structure, dimensions for construction
 Gazebo with barbecue and grill
Before you start creating a project for a gazebo with a barbecue, fireplace or barbecue, you need to create a sketch that shows the location of the gazebo on the site. The fact is that such gazebos will be supplied with gas and water. Therefore, the layout must be perfect. Consider the direction of the wind, in which smoke from the stove will not spread to other buildings.

Wooden gazebos with barbecue, stove or fireplace, as a rule, replace summer kitchens. It is noteworthy that the structure can be open or closed type. So, closed gazebo can be used even in winter. Therefore, at the design stage, you need to take care of insulating the room, as well as creating a high-quality ventilation system.

Note that create gazebo project with barbecue, barbecue or oven - this is quite a difficult job. Here, not only the structure of the gazebo and the foundation are taken into account, but also elements such as a stove and fireplace. Remember that stove equipment is made of stone, which is heavy. As a rule, it is created strip foundation, and under the stove or fireplace - tiled.
Advice! To prevent cracks from appearing in the concrete base, it is necessary to lay reinforcement under the grill or fireplace.
The drawings need to show the dimensions of the future gazebo, as well as the location of the fireplace or barbecue in it. The diagram of the foundation and chimney is indicated separately. The project will include the grill itself, the shape of the brazier, the number of firing points, and the laying of stone in rows.

When developing a gazebo plan, you need to carefully consider the zoning of the room. It is necessary to provide the safest location for the table, to ensure free access to the fireplace or barbecue. Don’t forget that you will have to clean the stove, fireplace, and so on. It is extremely important to designate in the project the area within which fireproofing material will be laid around the fireplace.

If your gazebo with a fireplace or barbecue will be used as a summer kitchen, then it must be supplied with water, light, and gas. Therefore, the project needs to provide for appropriate communications, electrical wiring, water, and so on.
Let us note once again that difficult work lies ahead not only during the creation of the project, but also during construction. Therefore, now you should draw up the project as carefully as possible, so that later you can avoid unpleasant “surprises”.

Very often, in addition to wood, metal is used to build gazebos. It can be aluminum or simple iron. The good thing about the material is that it does not need to be specially treated, like wood. Connections are created using a welding machine. It is noteworthy that models of metal gazebos can be not only stationary, but also prefabricated/dismountable. In the second case, bolts are used to connect structural elements.
Advice! In order for the metal structure to last as long as possible, it must be treated with anti-corrosion material and also occasionally painted.
When you plan to create a metal gazebo, carefully choose a location on the site. The fact is that metal gets very hot in the summer. Therefore, metal structures of gazebos, as a rule, are created in an open type and in the garden.
 Simple design from a profile pipe
 Before you start creating a project, it is better to think about the design of the building, which will match the style of the exterior. The dimensions included in the drawings depend on the number of people who are expected to be inside the gazebo. In addition, you should take into account the amount of furniture, equipment, and so on.
Usually people use ready-made schemes for building metal gazebos. It is not difficult to find photographs and designs on the Internet. The simplest design is rectangular in shape, measuring 2.5 by 3 meters. In this case, the gazebo will not be bulky. At the same time, you can easily install several seats and a table in it.

Due to the fact that the profile pipe has a number of advantages, many people use this particular material to build gazebos. The structure is not only easy to build, but also easy to maintain. The fact is that metal is not very susceptible to environmental influences and has relatively high durability. Profile pipes are not expensive and have a neat appearance. Before starting construction, you should decide on the type and shape of the structure. In addition, drawings are prepared and the availability of materials and tools that will be used in the work is checked. So, you can create a rectangular, round, square, hexagonal and other gazebo shapes.
Advice! If you do not have enough experience working with a welding machine or are creating similar structures like a gazebo for the first time, it is better to choose the simplest designs.
You can create your own drawing, sketch of a gazebo. All dimensions are indicated in the drawings, the remaining calculations are carried out as accurately as possible, since the further appearance and durability of the gazebo depends on this.

So, to build a gazebo from profile pipes with your own hands, you should use the following materials: concrete, primer for metal processing, roofing material, as well as the actual profile pipes. Tools must include a welding machine, a level, an angle grinder, drill bits, and fasteners. As soon as the place for the construction of the structure is chosen, you need to start arranging the pits. Their number is determined according to the project - by the number of supports. The pits are up to 60 centimeters deep. The height of the racks is taken into account with this size. As supports, it is allowed to use a profile of 80 by 80 mm, as well as with a wall thickness of 3 mm. Support heels are welded to the posts. This will increase the degree of rigidity of the structure.

Crushed stone is poured into the bottom of the prepared pits. After that, the litter is compacted, stands are installed and concrete is poured. Here you should monitor the verticality of the racks as accurately as possible. As soon as the concrete begins to harden, the evenness of each post is checked again. After this work has been carried out, you need to wait about two days until the concrete “sets”.
Now you can start creating the bottom harness. Here a profile of a smaller cross-section is used, welding the material to the supports at a certain height above the ground level. As a rule, the harness is made at such a height that you can enter the gazebo as comfortably as possible.
The stage of creating the roof begins. Created from profile rafter system according to drawings. If the shape is gable, then the profile is welded at an angle of 15 degrees. To make it more convenient to attach the roofing material, a profile pipe is welded onto the frame as a sheathing, the pitch of which is 45 cm. That’s all - the frame of the gazebo is considered assembled.
 Metal and polycarbonate construction
The main advantage of polycarbonate is that it has a transparent structure. In addition, it combines well with other materials. Polycarbonate gazebos can decorate any yard. It is noteworthy that polycarbonate can be used not only for roofing, but also for fencing.
- Shapes of gazebos
There are a huge number of forms of polycarbonate gazebos. This can be explained by the plasticity of the material, low weight, and ease of installation. The design can be oval, round, rectangular and even spherical. The structure can be open or closed.
 Polycarbonate must be closed at the ends. When moisture gets into its honeycomb, destruction begins.
 The roof can be single-pitch or gable, arched, hipped, and so on. Since polycarbonate is sold in all sorts of colors, you can create a unique atmosphere inside the gazebo. Everyone chooses the color of the material according to their tastes. Polycarbonate can be combined with any material: stone, metal profile, wood, plastic, and so on.
Video - original construction project
Photos of gazebos: simple and beautiful
 Photo of a simple and beautiful brick gazebo
  Photo of a gazebo made of rounded logs with metal-plastic windows

 Photo of a brick building with glass inserts

Regardless of what material is used to create a gazebo, you need to check the quality of the structure upon completion of the work. So, we make sure that the edges of the materials are processed and not sharp. In particular, polycarbonate must be closed at the ends. When moisture gets into its honeycomb, destruction begins. Created DIY gazebo from any building material will be strong, reliable, functional and durable if the design documentation is drawn up correctly. What kind of building to create depends only on your preferences, as well as financial capabilities.

At the dacha, it is not customary to sit in the house when it is sunny and warm outside. Only during bad weather can a summer resident take refuge under a roof. However, you can resort to another option. You can stock up on great experiences outdoors if you build your own gazebo.
Such a building will become a decoration garden plot, as well as a place for pleasant communication with family and friends. There are many ready-made schemes light gazebos. If you assemble the structure yourself, its cost will be 50% lower than that of a finished building. The simplest gazebo can be assembled with your own hands quickly enough. If you work slowly, it can be built in 2-3 days.
Materials and designs
Cheap and practical option– a gazebo made of wood. This material looks beautiful and is easy to process. If wooden elements are impregnated with special solutions, they can last quite a long time. In addition, the construction of a summerhouse will not take more than 3 days, even if you do the work slowly.

Another material that is used to construct such structures is metal. When the frame is made from a profile pipe and steel corners, the gazebo can last for many decades. You can build it yourself. The work is completed quickly enough, and the materials are quite cheap.
DIY gazebo
How to build a simple gazebo with a minimum of cost and effort? To build such a structure, you will need to create a frame and floor. If it is wooden, the base is made of beams. Flooring constructed from planks. It is better to pour a concrete screed as a base. This foundation option will be simple and affordable. Before work, you need to choose the right location for installing the gazebo. The site for concreting should also be leveled.

Important! For the simplest gazebo, you should not combine wooden and metal frame elements.
Practice has shown that even when wooden supports are protected with roofing felt or bitumen, when placed in concrete, the elements begin to rot. Subsequently, this may cause their destruction. For this reason, it is better to immediately exclude contact between wood and concrete.

For this purpose you should:
- Concrete round metal pipes.
- Then screw wooden posts to them. Metal rods should come out of concrete base by 30 cm.
- Holes are made in them for fastenings.
A gazebo can stand on such supports for decades. Any roof can be mounted on the resulting supports. It is quite simple to build a wooden structure with your own hands.
For an ordinary light gazebo, there is no need to erect brick fences. You can limit yourself to a simple fence made of eurolining. Its height usually does not exceed 90 cm. Such a fence is attached to longitudinal bars. The gazebo will help you hide from the scorching rays of the sun, and will also allow you to avoid blowing your back strong wind. The fencing for the walls of the structure is fixed to wooden supports using self-tapping screws.
Eurolining can be replaced cellular polycarbonate. This material looks great and does not overshadow the space of the gazebo. It is also easy to install. The material is not afraid of sudden changes in temperature and high humidity.
Roof
For the roof frame it is better to find 50x50 mm timber. It is necessary to create a frame from it, on which the sheathing will be installed, and then the roofing material. The frame is installed on the top frame. The roof is covered with the following materials:
- ondulin;
- metal tiles;
- slate.

When choosing the optimal roof width, it is worth calculating it in such a way that when installing the roofing covering you do not have to cut the sheets. To do this, you first need to measure the dimensions of the panels used, and then subtract the overlaps of the sheets over each other, which will be done during installation. The result obtained will be taken into account when calculating the length and width of the roof. It is also worth considering the side overhangs and end overlap. You can make a gazebo with your own hands quite quickly. The main thing is to choose the right materials, including for roofing.

For example, for slate with 8 waves in each panel, the length of the arbor is chosen as a multiple of 1 meter. The length of the slopes can be equal to 1.75 m. If several panels are laid along the slope, the estimated length of each of them is reduced by 15 cm - this is necessary to create an overlap.
Choosing best option for roofing, special attention should be paid to polycarbonate.
Distinctive features of the material:
- It is an excellent option for the construction of lightweight structures.
- Fencing is also made from it.
- Polycarbonate is a transparent plastic with low mass.
- A metal profile is often used in combination with it.

Such gazebos are especially attractive and practical if they are located in the shade of trees. If there is a translucent roof and shade created by dense foliage, the atmosphere in the gazebo will be as comfortable as possible for relaxation.
Garden gazebos made of polycarbonate are simple and affordable. To create them, you need to have several tens of meters of steel angle, as well as polycarbonate panels and a steel strip. Also, before constructing such a structure, it is worth preparing planed boards, which will be needed for making benches and a table. Original photo the gazebos can be seen below.

Manufacturing stages
To understand how to make a gazebo with your own hands, you should get acquainted with the main stages of the work. It's better to choose the simpler option. First you need to equip the foundation. The support posts of the gazebo are concreted in it. After this, they should be scalded with a 25x25 mm corner. After this, 2 corner belts are welded to the racks. One of them is placed in the middle of the supports. The second one should be placed on top - the roof will rest on it.
Polycarbonate sheets have the ability to bend perfectly. For this reason, they can be used to create arched roof. For this purpose, it is necessary to weld steel strips, which have a width of 50 mm, to the racks. They are installed on support posts. And then holes are made in them to fix the polycarbonate. You can assemble a simple gazebo for your summer house with your own hands (as in the photo) quite quickly.

Also roof covering often made from tiles. For the base, OSB sheets should be prepared. The material does an excellent job of holding bitumen shingles on the roof. The thickness of such sheets can be 10-12 mm. It has fairly high strength and rigidity. That is why it does not have to assemble a spatial frame from wooden elements. You just need to firmly attach it to the harness.
Features of simple gazebos
A simple gazebo for a summer house does not have to be made with a frame frame. The foundation for it is a concrete screed, which is reinforced with steel rods. You can put a barbecue on such a surface. The safety of this design is quite high, because concrete floor Hot coals are not scary. In the case of the winter option, it is better to equip the floor with planed boards, and cover the area around the grill with steel sheets. This winter design looks simple and beautiful.

Inexpensive to construct and easy to install is a columnar foundation. In order not to overpay when building a gazebo for your dacha with your own hands, you can prepare red brick. To install the foundation, you need to dig holes for the support pillars and then lay them in brickwork, place the reinforcement and pour concrete. 20 cm anchor bolts are placed in the masonry. There should be a thread at their free end.
Supports are placed on the pillars. It is better to make the frame from 50x100 mm timber. If you put antiseptic boards on it, you can get an excellent heated floor. Subsequently, the gazebo can be equipped with an open fireplace. With this decoration, you can relax comfortably in the room even during severe frosts.
To figure out how to build a gazebo, you should get acquainted with the main features of simple structures, as well as learn more about popular materials. You should also understand the sequence of construction of simple gazebos.
Conclusion
As you can see, build simple design you can do it yourself, without the help of professional builders. First, an exact drawing is made, and then everything is carried out in accordance with it. necessary work. It is important to consider the capacity of the gazebo, its location and materials. In order to avoid mistakes during the work process, it is worth performing the correct calculations.