With the widespread use of new generation septic tanks that provide deep biological treatment of sewage, the level of comfort in country house almost equal to living conditions in urban conditions. For example, the active zone of septic tanks for a Topas dacha is capable of separating and filtering 99% of water to a biologically safe level. You cannot drink the water that has been purified by the Topas septic tank, but it is absolutely safe for the environment and humans. Under one condition, if service maintenance“Topas” and the connection diagram are made in accordance with the manufacturer’s requirements.
Installation of a septic tank "Topas"
Structurally, the Topas septic tank models from the 4th to the 20th model have an identical structure, the main difference is the volume of the working chambers, therefore the installation of Topas 5 and Topas 20 and their maintenance are carried out according to the same scheme.
Structurally, the Topas septic tank consists of several chambers combined in one building:
- Primary chamber installation of a septic tank, or a container for receiving the bulk of sewer water, primary and fine filtration occurs here, trapping the largest particles that are too tough for bacteria;
- The second chamber is the main box of the installation, or a container for the biological processing of organics; most of the active substances are oxidized in it, so air is needed for normal life. To make the reaction in the installation more intense, the mixture of the active medium and sewage organics is mixed with bubbling air bubbles supplied by the installation’s compressor;
- Last capacity installation - a pyramidal settling tank in which the liquid is clarified and separated into sediment and clean process water.
Important! The sewer pipe system supplying wastewater to the inlet pipe of the Topas installation must have at least two wells with settling tanks that retain heavy and bulky objects that can block the entrance to the first chamber of the septic tank.
The design of the installation includes a top cover that provides access to all cameras and control systems. Here, if necessary, you can check the performance of the compressor unit and clean any of the septic tanks.
How to properly install and connect the Topas station
Despite its apparent simplicity and clear operating principle, the Topas installation requires compliance with a number of conditions that guarantee stable and high-quality water purification:
- It is recommended to install and connect local treatment facilities “Topas” no closer than five meters to residential premises and locations of people. Despite the absence of high-pressure pipes and containers in the device, the manufacturer of the Topas septic tank suggests taking measures to prevent the consequences of the release of contaminated and biologically unsafe liquid;
- The standard installation scheme involves placing the Topas septic tank in a prepared pit in the ground according to the diagram shown in the figure. On the opposite walls of the Topas installation there are receiving flanges to which sewerage pipes and purified water drainage are connected;
- The most serious attention should be paid to the power supply to the septic tank installation and the arrangement of a grounding system in accordance with the requirements of the Topas manufacturer and the operating instructions for the unit.
Advice! If you do not have the appropriate experience in connecting electrical wiring, entrust the repair of the power supply and compressor part of the Topas installation to specialized specialists.

The sequence of installing “Topas” in your own yard
At the first stage of installation, a pit is dug according to the installation dimensions of the septic tank. Part of the soil will need to be saved to fill the gaps between the formwork walls and the Topas body. For example, to install Topas-4, you will need a pit with a depth of 170 cm and sides of 160 cm. The walls of the pit for the installation of Topas are covered with boards, after which a layer of roofing material is laid on the formwork. A gravel cushion is poured onto the bottom of the pit, a geotextile sheet and a layer of sand of 100-150 mm are laid. The layers must be leveled horizontally and compacted using a hand tamper.
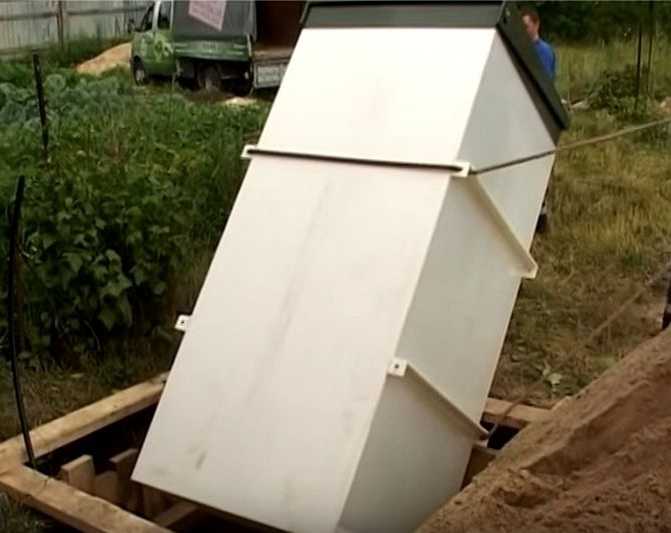
The weight of the lightest Topas-4 is at least 215 kg, so when installing a septic tank in a prepared hole, it will be more convenient to use a winch or a small crane.
When arranging the bottom cushion, it is necessary to take into account the location of the outlet and outlet pipes. In some installation options for the Topas septic tank, it is allowed that the inlet sewer pipe is located not on the side, but on the top. This supply method is used if the Topas installation is below the level recommended by the manufacturer. To connect the sewerage system to the entrance to the septic tank, it is used plastic pipe at 110 mm. The installation of supply lines is carried out from the inspection well to the inlet pipe of the septic tank with a slope of the standard 2° - 5°, ensuring reliable flow of viscous liquids.
After all inlet and outlet communications have been installed, it is necessary to seal the joints and seams at the junctions of the pipes. The most reliable seam is made from deposited polypropylene soldering material.
Before connecting the electrical wiring, make an additional grounding loop according to the standard scheme from four pieces of corner No. 50, 70-90 cm long, connected to each other by a steel bus with a cross-section of 20x5 mm. Most the best option Electrical wiring will be supplied by air. If this is not possible on the site, lay a 3x2.5 PVA cable in a polypropylene pipe and bury it to a depth of at least 60-70 cm. Replace the final section of the pipe with a corrugated hose. In the body of the septic tank there is a hole with a sealing sleeve into which you need to pass the cable and connect it to the terminals on the connection box of the unit according to the connection diagram.
At the last stage, the installation position is balanced on a sand bed. The septic tank body is filled with water and at the same time the space between the walls of the pit and the septic tank body is filled with sand.
Maintenance of the Topas septic tank
To avoid clogging of the septic tank pipelines, it is recommended to rinse and clean the coarse filter in the primary chamber once a quarter. This will avoid the accumulation of coarse residues and fragments. Maintenance "Topas 8" recommends performing a complete flushing of the secondary chamber once every four months; it is most convenient to pump out dirty water using a drain pump and then a car wash high pressure“cut off” the remaining sediment and plaque on the walls.

It is also periodically necessary to open and clean the inspection well installed in the area between the house and the autonomous cleaning system. Often, the inspection well accumulates a large amount of garbage and waste products that cannot be processed by an autonomous sewer installation.
1.
2.
3.
4.
5.
Thanks to the advent of septic tanks such as Topas, there is no longer a need to construct them yourself. treatment plant on a suburban area. The process of processing sewage in them occurs using modern biological products. This stage of cleaning is carried out in such a way that the nature in the surrounding area does not suffer.
The Topas station is an environmentally friendly installation that complies with the current standards in the Russian Federation regarding the removal and processing of sewage. Its main advantage is the ability to install the equipment yourself.
Characteristics and advantages of installing Topas
Installing a Topas septic tank with your own hands in a country house is justified, since the station is characterized by:- high cleaning efficiency;
- economical power consumption;
- absence of noise during operation;
- compactness;
- tightness;
- no need for special care during operation.

- vegetables that have become unusable;
- sand and others Construction Materials;
- rubber, bags, cigarette filters and other products that are not biodegradable;
- water containing oxidizing agents;
- liquid with a high content of chlorine compounds;
- medicinal preparations;
- automotive consumables.
Inside, the Topas cleaning station is divided into 4 compartments. Each of them performs its own function. In a separate plastic bin there are two compressors that support the vital activity of bacteria - as a result of which the decomposition process occurs faster, because the liquid is saturated with oxygen.
Features of the operation of septic tank chambers
First compartment. All sewage flows into it through a pipeline. A float switch is located at a certain height. When the chamber fills, it transmits a signal to the first compressor. In automatic mode, the wastewater is redirected to the second compartment. In this case, all large fractions remain at the bottom of the first chamber. At the entrance to the second part of the septic tank, a coarse filter is installed that can even catch hair.
Third compartment. Liquid waste, agitated by the activity of bacteria, flows into the next chamber. It is assigned the function of a secondary settling tank. The third part of the treatment plant is equipped with a pyramid. In this compartment, the wastewater is separated into water and sediment. Old sludge, together with binding components, sinks to the bottom, and fresh and lighter sludge is sent to the first chamber for the purpose of additional purification.
Fourth compartment. This chamber is designed for water purification. The clarified liquid, passing through the top of the stilling pyramid located in the third compartment, enters the last, fourth part of the installation. There is a hole in it at a certain height, thanks to which the water completely leaves the septic tank.
Provided that the inflow into the first chamber is weak, deeper cleaning begins inside the installation. This is the second part of the cleaning process, during which wastewater begins to circulate from one compartment to another using an aeration tank, compressor and airlift.
The operation of the Topas septic tank does not provide for long interruptions due to the lack of drainage. The fact is that anaerobic bacteria die if they do not receive “food”. Based on this, we can conclude that it makes sense to use such a treatment plant in a suburban area, when residents live in the house permanently or at least several days a week.
Installation of a Topas septic tank
Do-it-yourself installation of a Topas septic tank is carried out in stages. Each of them is carried out in accordance with the instructions. Sometimes the installation method may change due to the design features of individual models.
Step one. First of all, you need to decide on the location where the Topas septic tank will be located. According to the instructions, it cannot be placed closer than 5 meters from a residential building.
Step two. When you build a Topas septic tank with your own hands, the size of the pit that will need to be dug depends on the station parameter. For example, the dimensions of Topas 5 are 1000x1200x1400 in millimeters. For such an installation, you should dig a pit measuring 1800×1800×2400 millimeters.
Step three. It is necessary to install formwork in the prepared pit, and after it create a 15-centimeter sand cushion. As a result, the septic tank will rise 15 centimeters above the soil surface, and thus the operation process will become more convenient. If this rule is neglected, when the snow melts in the spring, the station may be flooded. As a result of water ingress, compressors and other systems will stop functioning.
When choosing a Topas septic tank model, you need to take into account the depth of groundwater. If they are located close to the surface of the earth, you should give preference to a product marked “PR”. These installations provide for the forced removal of treated wastewater.
Step four. The installation diagram of the Topas septic tank is simple, and in addition, device models 5 and 8 can be installed without the use of special equipment. The station is lowered into the prepared pit using cables - they are threaded through special holes located on the stiffeners.
Step five. After completing the installation of the station, it is necessary to lay utility networks. Connecting a Topas septic tank begins with connecting the sewerage system, for which pipes with a diameter of 110 millimeters are used. They are mounted with a slope of 1-2 centimeters per meter. The insertion depth can be 70–80 centimeters, this depends on the distance of the cleaning station from the house.
When the distance from the building to the house is 10 meters, and the pipe insertion is made at a depth of 70 centimeters, then the exit in the building will be located at a depth of 50 centimeters from the surface of the earth.
Step six. At this stage, the station is sealed. For the sewer pipe, a hole with a diameter of 105–108 millimeters is made. Sealing should be done in accordance with the instructions. The pipe inserted into the finished hole is soldered using a polypropylene cord and using a hair dryer. When the connection has solidified, it is attached to the pipe sewage pipe. The housing must be leveled before sealing.
Step seven. Now you need to connect the electricity and normalize the pressure. The installation instructions always come with a connection diagram for the Topas septic tank, which you should refer to. To connect to the power supply, use a PVA cable with a cross section of 3×1.5. It is placed in a corrugated pipe intended for earthworks. Usually it is laid in the same trench with a sewer pipe. The cable is connected to the terminals through a specially prepared hole, and in the house - to a panel on a separate 6–16 A circuit breaker.
Step eight. Finally, you need to do an important job - normalize the pressure. This process is carried out simultaneously with sprinkling the station. The container is filled with water and covered with earth in equal proportions. These steps are repeated until the septic tank is completely immersed in the ground. Self-installation Topasa will allow the homeowner to save family money.
Septic tank maintenance
According to the manufacturer, the Topas biotreatment station is capable of operating for long term- about 50 years old. This can be achieved provided that the septic tank is properly maintained during operation (more details: ""). Earlier in the article, actions that should not be performed under any circumstances were already mentioned. The limitations are due to the fact that bacteria require certain conditions for their life.Failure to comply with these simple requirements will result in the system functioning malfunctioning and one day failing. When conducting Maintenance Once every four years it is necessary to clean the septic tank from sludge using a drainage pump. Sludge can be discharged directly to garden beds, since it is a high-quality fertilizer.
Once a month you need to clean the coarse filter. The membrane should be changed at least once every two years. After 10 years of operation, it is necessary to completely clean the chambers of the Topas septic tank and change the aerator.
Self-installation of Topas-type septic tanks should begin with the selection and preparation of a site. Firstly, you need to take into account the minimum distance between its body and the building, which is 5 m. Secondly, with the help of industry standards (SNiP) or design organizations, a criterion such as the depth of soil freezing in a given region is determined. It affects the choice of the main or extended (Long) version of the septic tank.
After determining the location, you can proceed to the next stage of preparation - forming a pit. Its dimensions depend on the dimensions of the septic tank and are determined according to the installation diagram that comes with the kit (example in the illustration below).
Wooden formwork is installed around the perimeter of the pit. This is a necessary precaution that should protect the walls from collapse. When groundwater lies too close to the surface (the so-called quicksand), without dense sheathing of the walls, it is not at all possible to form a foundation pit.
- With high shrinkage and mobility, sand provides a dynamic, shock-absorbing base. That is, any ground movements will be leveled, and the septic tank will maintain the correct spatial position and geometry;
- A layer of 15 cm will raise the top cover to a similar height above the ground. This solution will prevent flooding of the septic tank with melt water and, as a result, failure of electrified units.
After this, you can begin directly installing the septic tank in the pit. For ease of operation, there are technological holes in individual elements of the body (stiffening ribs, for example). You need to thread a safety rope through them and slowly lower the module to the bottom.
This can be done manually, involving assistants, or using auxiliary equipment.
As soon as the septic tank is installed in the pit, it is leveled and installation and connection begin utility networks. Typically, a specialized polyethylene sewer pipe with a diameter of 50 to 110 mm is used for these purposes. In a trench, it is also recommended to lay it on a sand cushion to avoid the influence of ground movement. It will be necessary to ensure a sufficient slope, which depends on the diameter of the line: for pipes Ø50 mm - at least 3 cm/m, and for pipes Ø110 mm - at least 1-2 cm/m.
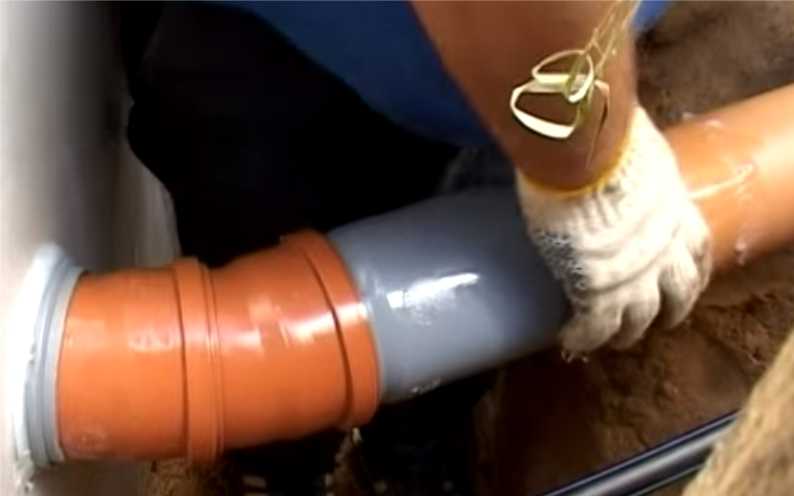
The place of insertion (input) into the septic tank body is determined based on the installation conditions and the requirements of the attached diagram. To form it, it is advisable to use a special core drill with an adjustable diameter. The connection pipe to the pipe is sealed using a special polypropylene soldering cord. It is laid around the perimeter of the hole and treated with a construction hairdryer (it melts and then cools and hardens).
Attention! Once again, I would like to emphasize the need to level the body of the septic tank before sealing the joint, since after this it will be almost impossible to do this.
After connecting to the sewer, you can begin electrical connections. For this, a PVA wire with a cross section of 3×1.5 mm is used, which is laid in a trench next to the pipe in a corrugated box. On the house panel, input is carried out through a separate circuit breaker(6-16A). Connections in the septic tank terminal box are made in accordance with the attached diagram.
At the final stage of installation, it is necessary to fill the space between the walls of the septic tank body and the formwork. This should be done carefully and slowly, adhering to the following recommendations:
- It is advisable to use sand for backfilling for the same reason as in the case of a cushion for a septic tank and. The soil is harder and more rigid, which in the future can lead to deformation of the walls of the housing and disruption of the normal operation of the installation;
- You need to fill the space gradually, in layers of 15-20 cm, while simultaneously filling the septic tank with water slightly above the sand level. In this way, it will be possible to equalize the pressure on the walls of the housing and avoid their deformation.
Conclusion

At this point, the installation of the Topas septic tank can be considered complete. All that remains is to improve the area and follow the manufacturer’s further recommendations regarding operation. There are not so many of them that it could complicate the life of the owner. Most of all you will have to tinker with the coarse filters (located between the receiving chamber and the air tank) - they need to be inspected once a month. Every 2-3 years of operation, the compressor membranes are inspected, cleaned and, if necessary, replaced. It is recommended to clean the waste sludge approximately every 3-4 years. By the way, it can be used as a fertilizer for the soil if you have a household plot. The aeration unit will have to be replaced no more than once every 12-15 years.
From the technical side, these are, in principle, all warnings, and as for the sewerage system, it is not recommended to discharge wastewater with a high content of aggressive substances into it. detergents, antibiotics and large fractions. Subject to these simple conditions a deep cleaning station of the “Topas” type can easily serve its allotted 50 years or more.
One of the ways to organize an individual sewer system for a private house, cottage or summer house is to install an autonomous treatment unit Wastewater. In short, such treatment plants are called AU, and in conversation the more familiar concept of “septic tank” is often used, although this is not entirely correct. Today we will talk about such an installation produced by the Topol Eco company. Their products are called Topas septic tank, they are widely used and have good reviews.
Modifications
The Topas septic tank looks like a plastic box with a lid. The body of the unit is made of polypropylene, so it does not corrode, rot, or react with the contents or the environment.
Exterior view of the Topas septic tank
These stations are produced with different capacities, designed for processing different quantities drains. From 4 to 20 people live in private houses and cottages at a time. For such cases, stations Topas 4, Topas 6, etc., up to Topas 20 are used. For servicing hotels and groups of houses, there are more productive ones designed for 30, 40, 50, 75, 100 and 150 people.
Models have been developed for different levels groundwater: for low and high. At high level groundwater, you should choose a Topas septic tank with a postscript - Pr. These models are equipped with an additional pump for pumping moisture into drainage system, storm sewer, a separate container with the possibility of its further use, etc.
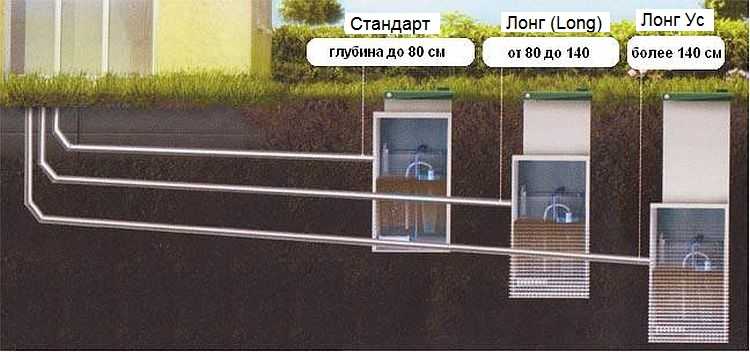
There are modifications for different depths laying sewer pipes:
- up to 80 cm, models marked “standard” are suitable;
- at a depth of 80 to 140 cm - Long, have an elongated neck;
- for those buried deeper than 140 cm -240 cm - Long Us.
There are no installations for even deeper burial. When choosing an installation, you first need to decide on the maximum number of people who can live in the house at the same time. In accordance with this, select the performance of the unit. Next, the groundwater level at the installation site of the Topas septic tank is taken into account, as well as the depth at which the supply communications should be located (depending on the depth of soil freezing in the region).
Design and principle of operation
This autonomous treatment station is internally divided into four compartments, each of which has its own cleaning stage. The wastewater sequentially goes through all four stages of purification; at the end, as the manufacturer says, the degree of purification is 98%. Waste recycling occurs with the help of aerobic bacteria that live in the presence of oxygen. To ensure their vital functions, each compartment has aerators that pump air.

The Topas septic tank works according to the following principle:
- The wastewater enters the receiving chamber, where it begins to be processed by bacteria. While filling is in progress, air is supplied to the chamber to activate bacterial activity. During the process, insoluble particles settle to the bottom, while fat-containing particles rise to the surface. In this compartment there is a filter for large fractions - this is a large diameter pipe in which holes are made. There is a pump installed inside this pipe that pumps the water that has passed through the filter. Thus, the drain enters the next compartment without major pollution- they remain in the receiver and bacteria continue to process them. At this stage, the wastewater is purified by approximately 45-50%.
- From the receiving chamber, partially purified water is pumped into the second compartment - the aeration tank. When filling, aeration switches here, which allows you to raise pollution particles above the surface of the water. Since the shape of the chamber is pyramidal, they settle quickly. About 20-30% of contaminants still remain in this compartment. With the help of pumps and special airlifts, semi-purified wastewater enters the third chamber, and excess sludge from the bottom is pumped into the stabilizer chamber.
- The third and fourth chambers are similar in structure to the second. Here, the final purification of wastewater occurs according to the same principle.
- Clarified water from the last compartment, by gravity or using pumps, is directed into the ground, into a container where water is stored for technical use, into a filtration column, etc.
As you understand, the entire operation of the Topas septic tank is based on the activity of bacteria. They demand certain conditions— presence of oxygen, positive temperature. Aerators supply bacteria with oxygen, so it is very important to provide the installation with continuous power supply. After turning off the power, bacteria can survive for 4-8 hours. If the air supply is not restored during this time, the installation will have to be populated with new ones.
Disadvantages and features of operation
Septic tank Topas at proper operation It cleans drains well, and with regular maintenance it does not smell. With the right volume, it ensures a comfortable city-level existence even in the country. All this is true, but there are also disadvantages:
- Dependence on the availability of electricity.
- The need for regular maintenance (2-4 times a year, list and description of work below).
- Restriction on salvo discharge. Each Topas septic tank model can accept a certain volume of waste at a time. You cannot drain more than this volume. This can become a problem if there are a large number of guests.
- Not everything can be drained into an autonomous sewer system. Large fragments that do not pass through the drain grate are not allowed; newspapers or any insoluble fragments are not allowed to get into the drains. Disinfectants that can get there in large quantities have a very bad effect on bacteria.
- You need to take care of where you will drain/dispose of the treated wastewater. They cannot be used for watering a vegetable garden or garden, only for technical needs - watering the lawn, flower bed, etc., washing the car. Another option is to install a post-treatment station and discharge it into a drainage ditch (if there is one nearby), remove the treated wastewater into a filter column or pit filled with crushed stone for further treatment and absorption into the ground.
- In seasonal homes (dachas), it is necessary to preserve the system for the winter, otherwise the bacteria will die.
So there are certain restrictions on use. However, these settings give better results than conventional ones.
Installation and commissioning
Installation of a Topas septic tank begins with marking the site - it is necessary to determine the optimal installation position. There should be no large trees or bushes nearby; it should be located so that sewer pipes from the house do not have to be pulled very far, but at the same time, it is convenient to send the purified water for further processing.
Installation
A pit is dug in the selected location. Its dimensions are 30-40 cm larger than the dimensions of the septic tank body. The depth should be such that only the manhole cover remains on the surface. It must be remembered that a 10 cm layer of sand is poured onto the bottom of the pit.

The pit is dug to the required depth, the bottom is leveled, then sand is poured 5 cm thick, each layer is spilled and leveled. The latter needs to be leveled “to the horizon” - using a rule or an even bar on which the level is set.
A trench is being dug towards the pit from the house. Its depth depends on the level of the home sewer outlet. The width of the trench is at least 25 cm, but it is very difficult to work in one, so it usually turns out wider. When digging a trench, remember that the pipe must go from the house towards the septic tank with a slope of 2 cm by 1 meter. Making the slope more or less is not recommended. With a larger slope, the water will drain away quickly, and solid particles will remain in the pipe; a smaller slope will not provide the required speed of movement of the wastewater.

The bottom of the dug trench is leveled, a 10 cm layer of sand is poured onto it, compacted and leveled, forming the desired slope. Sewerage pipes are laid on sand polypropylene pipe for outdoor use. Its diameter is 110 mm. When connecting segments, in addition to the O-rings, the joints are coated silicone sealant for outdoor work.
The pipeline is connected to the outlet of the drain and laid with a given slope in the trench. The slope is checked using a level. The pipe is filled with sand (not soil), which serves to compensate for soil pressure during frost heaving. They fill it up so that the top of the pipe is covered with sand.

In the same trench, along the sewer pipe, a power cable is laid that goes to the Topas septic tank. They usually use VVG cable 4*1.5 mm. It is placed in a HDPE (low pressure) pipe with a diameter of 20 mm. The cable, wrapped in a protective sheath, is laid in a trench and brought into the house, where the cable ends with a plug. The second end of the cable will need to be connected to the septic tank.

The next stage of installing an autonomous Topas sewer system is installing the device in a prepared pit. It must be lowered carefully, without hitting it. Polypropylene, although a durable material, is still plastic, so it can crack upon impact. You can lower the Topas septic tank manually or using a crane. To allow the ropes to be securely fixed, there are holes in the ribs running along the perimeter of the body. A rope is pulled through them. One at the bottom, the second in the middle of the height. The rope should span two opposite sides of the body.

Holding these ropes, the installation is carefully lowered into the pit. Then, placing a level on the lid, check how level the Topas septic tank is.
There remains a gap of 20-30 cm between the walls of the body and the pit. It must be filled with sand. Gradually, we fill the walls in a circle, while simultaneously filling the septic tank with water. At the same time, we make sure that the water level and the sand level are approximately equal. Having poured a layer of 40-50 cm, the sand is spilled with water. At the same time, it becomes denser and falls lower in level. So, gradually, the pit is filled to the top. After this, we can assume that the Topas septic tank is installed, and the installation and connection of its equipment begins.
Installation of equipment
First we connect the power cable. To do this, remove the protective cover on the input box and connect the conductors to the mounting plate in accordance with the diagram. The ends of the conductors are stripped of 0.8-1 mm of insulation, inserted into the appropriate sockets, and secured with clamping screws.

The next stage is connecting the sewer system from the house. It is brought to the septic tank itself. In the place where the pipe will enter the body, draw a circle around the pipe. Then a hole is cut out using a jigsaw.

The hole is coated with silicone sealant. A piece of pipe with a socket at the end is inserted into it so that it grows
The rub is on the outside, and it should fit snugly against the body (you can tap it with your fist to make it fit well). The resulting joint is sealed by fusing a 7 mm thick polypropylene tape.

The sewage system supplied from the house is connected to the installed section of pipe (do not forget to coat the joints with silicone).

We install the pumps according to this marking, connecting pipes to their inputs (visible in the photo above). We install flexible couplings on the nozzles, put the other end on the pump inlet, and plug the plug into the socket on the body with the same number.


Actually, at this point we can assume that the Topas septic tank has been installed. All that remains is to carry out a test run. To do this, connect the Topas autonomous sewer system to the network and begin pouring water into the receiving compartment (no drains yet). Until the compartment is full, the float sensor is at the bottom, air flows into the receiving chamber. When the water level reaches a certain point, the float will float up, and the air supply will switch to the air tank - the second pyramid compartment. Then all that remains is to start using the sewer, monitoring the cleaning results. Let us say right away that in the first month, with intensive use, the drainage may be cloudy. This is because there are still few bacteria and they do not fully cope with their task. After a month the situation should improve.
Service
Autonomous wastewater treatment plants, which include the Topas septic tank, are often called sewerage without pumping. This does not mean that the installation does not require maintenance at all. The point is that there is no need to call a sewer truck, but it is necessary to remove sludge periodically. How often? 1-4 times a year, depending on the intensity of use.

It is also periodically necessary to remove from the receiving compartment fragments that bacteria cannot process. This operation is carried out with a net by opening the lid. And one more procedure is cleaning the filter for large fractions and airlifts. The efficiency of the installation depends on their condition.
Cleaning filters
Another operation that must be carried out regularly is cleaning the filters on the pumps. To do this, you need to unscrew the large plastic nuts that are located on the top of the pumps. By removing the nuts, you can lift the covers under which the filters are located. If the filters are clean, you don’t need to do anything with them; if there is contamination, they are washed in cold running water, dry and install in place.

Removing excess sludge
Excess activated sludge, which is formed during operation, enters the stabilizer chamber, where it is mineralized. They must be removed from this compartment periodically. The recommended frequency of the procedure is once every three months, but many determine that the time has come by the appearance of a smell, which indicates that sludge has accumulated. Removal occurs using a pump (air lift) located in the stabilization chamber. This process is simple, all you need is:
- Turn off the power (toggle switch).
- Put on gloves and place a bucket.
- Open the plug.
- Lower the hose into the bucket and turn on the pump.
- After cleaning the chamber, fill the chamber with clean water and close the cap.
This operation can be carried out using a fecal pump. In this case, pumping can be done once a year.
Cleaning the filter and airlifts
During operation, the filter and airlifts become dirty, which affects the efficiency of wastewater treatment. To restore them they need to be cleaned. This is done using a powerful stream of water; the air cleaner nozzles are cleaned manually - using a needle. The procedure for cleaning a Topas septic tank is as follows:
- Turn off the power.
- Disconnect the air supply hoses and remove the pumps from the housing.
- Spray with a stream of water under pressure - outside and inside.
- When cleaning the air cleaner, clean the nozzles with a needle.
- Put everything in place, add water to the operating level, turn it on and check the operation.
This is all necessary work for maintenance of Topas septic tank.
Until recently, biological wastewater treatment was considered an unacceptable luxury for the average owner of a country farm. And only in recent decades the situation has changed dramatically, which is associated with the emergence of septic tanks, in particular, treatment systems called “Topas”.
Devices of this type provide high quality wastewater treatment due to their decomposition under the influence of microorganisms (bacteria), which is not accompanied by the formation of waste that pollutes the environment.
Installing a Topas septic tank with your own hands is quite simple from a technical point of view and can be done by any user who has had to handle such equipment at least once. However, before installing it, or better yet before purchasing, it is advisable to familiarize yourself with all the advantages of a septic tank and the principle of operation of the device.
Advantages of the device
The main advantages of the Topas septic tank include:
- high efficiency of cleaning procedures;
- low power consumption;
- excellent sealing performance and low noise level generated by the device during operation;
- compactness and ease of maintenance.
We also note that when purchasing cleaning equipment, you are given the opportunity to individually select a septic tank for the needs of your family (depending on its quantitative composition). Thus, the Topas-8 model, for example, is designed to serve a family of eight people, and Topas-5 is suitable for a family of five members.
Design and principle of operation

The main cleaning processes occurring in septic tanks are the result of the vital activity of special bacteria that feed on organic matter and decompose it into elements ready for disposal.
Note! The device does not require special cultivation of bacteria, since they reproduce independently, feeding on waste and oxygen.
A distinctive feature of the device we are considering is that its entire design is made in the form of a compact module, due to which the installation of the septic tank is noticeably simplified.
The device has four chambers and two built-in compressors that serve to support the work of bacteria, thereby accelerating the decomposition process.
The first chamber, equipped with a special float relay, serves to collect wastewater and settle it (with large particles of dirt falling to the bottom). When the chamber is filled to a certain level, the relay turns on the compressor, after which the waste is forced to move into the second chamber.

Having passed through a coarse filter installed at the inlet of the second compartment, liquid waste enters the zone of influence of microorganisms and is cleaned of organic components. To speed up the fermentation process, oxygen is pumped into the chamber using a compressor, which helps mix the wastewater with activated sludge, which acts as a kind of filter.
Sewage saturated with bacteria and oxygen then enters the third compartment, which is used as a secondary settling tank. In the fourth chamber, final purification of the water is carried out, which leaves the septic tank through a special channel.
Installation

When choosing a location for installing the device, you should adhere to the recommendations below:
- The septic tank must be located in a pit at least five meters away from residential buildings.
- The dimensions of the pit are selected depending on the model of the septic tank, and its walls are covered with formwork or laid out of brick.
- A sand cushion about 150 mm thick is prepared at the bottom of the pit.
The installation of the septic tank (its descent) is carried out using a system of cables threaded through special holes located on the stiffening ribs of the product.

After installing the septic tank in the pit, all necessary communications and, first of all, a sewer pipe are connected to it. The insertion depth of the inlet pipe is usually 70–80 cm below ground level and depends on the distance of the station from your home. At a distance of 10 m from the pit to the house, the pipe is inserted at a depth of about 70 cm (while in the house itself the sewer drain is made at a depth of 50 cm).
After installation, the device body is completely sealed and thermally insulated. These activities must be carried out in accordance with the instructions supplied with the product.
Note! Even before sealing, the septic tank placed in the pit must be installed strictly at level (after this it will be impossible to straighten its position).

To supply electricity, it will be possible to use a PVA cable with a cross-section of 3×1.5, laid in a corrugated pipe along the same trench as the sewer pipe.
And at the last, most important stage of arranging the device, it is backfilled with the previously selected soil, which is accompanied by equalization of the pressure on its walls. For this purpose, as soil is added, the chambers of the septic tank are gradually filled with water, compensating for the excess soil pressure on the walls of the device.
Video
This video shows the complete installation cycle of a Topas septic tank: