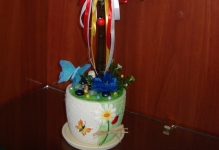
Topiary of flowers "Charm" is designed in purple-lilac tones, a massive crown is in harmony with a square white pot. Prefabricated flowers are made from cardboard egg trays, scraps of material used to form the ball. The trunk is reinforced with rubble and painted in 1 layer with white acrylic.
Used homemade ball from scraps of cardboard and old newspapers. A ready-made foam ball is also perfect. diameter 15 cm.
The total height of the topiary of flowers - 47 cm, crown diameter with decor - 23 cm. For the manufacture of a topiary of this size, it is necessary 5-7 hours: needed in advance, paint shells and marine life.
Materials for topiary from flowers "Charm"
- Cardboard egg trays (for creating flowers) - 6 pcs.
- Foamiran roses - 3 pcs.
- Glue half beads — 10 pcs.
- Organza - 2 sheets A4.
- A ball of scraps of cardboard trays or a foam blank.
- Wide tape.
- Gauze or fabric for covering the ball.
- Glue sticks for a thermal gun (we use a diameter of 11 mm, a length of 25 cm) - 3 pcs.
- Wooden stick for the trunk - 1 pc.
- Sisal or synthetic winterizer.
- Gouache white and purple (an alternative is acrylic or water-based paint).
- Crushed stone for pot.
- Shell - 1 pc.
- Plastic flower pot - 1 pc.

Decorative materials for the Charm flower topiary (marked with numbers in the photo):
- Purple felt sheet A4 - 3 pcs.
- Purple roses from foamiran - 3 pcs.
- White and purple beads - 20 pcs.
- Satin ribbons: 3 shades of lilac - 1 m each.
- Organza sheet A4 - 2 pcs.
- White lace - 50 cm.
Video master class - purple paper flower topiary
In order to convey each stage of the master class as much as possible, we have prepared for you a video in excellent 1080p quality - a step-by-step instruction on do-it-yourself Charm flower topiary. MK actually duplicates and in some places - complements the text version. Watch, get inspired, draw fresh ideas and share with friends on social networks!
How to make a do-it-yourself topiary from flowers - MK in 1 picture

Did you like the format of the master class in 1 picture? See everything from Alena Tikhonova!
Step-by-step master class with a photo - artificial flower topiary
Making flowers
Stage 1. Cutting flowers. We cut out strips from cardboard trays so that whole recesses for eggs remain - it is from them that flowers are formed. We cut the strip into separate cells, cut off everything superfluous from above (do not throw away the waste: we use them to make a ball for the purple topiary).


From cardboard blanks we cut out crosswise symmetrical rounded flowers into 4 petals (in the form of a camomile):


For each button you will need 5 flowers: calculate and prepare immediately the required amount, taking into account the crown diameter of the flower topiary.
Stage 2. Painting flowers. Having prepared the pre-painting area (taking into account the large number of blanks), we proceed to painting the inside of the buds white.
We mix white and purple paint to get 2-3 shades of lilac, paint the rest of the flowers for the topiary.


The bud is formed from 3 white and 2 lilac flowers. Calculate the required number of cardboard blanks of each color before painting.
Stage 3. Formation of finished buds. We glue 3 white flowers together, add 2 lilac flowers inside and a bead in the very heart of the bud.
We make leaves - we cut out the standard shape of a fish of different sizes from felt. For each bud you will need 3 leaves, which we decorate about half of the flowers.
The remaining buds are decorated with organza or tulle.
 Bud formation
  Felt leaves
  Organza edging
To make a topiary of flowers with a crown diameter of 12 cm, you will need 32 collected buds. The amount varies according to the size of the ball, we recommend doing it with a margin so as not to return to this step later.
An identical technique for making flowers was also used for. Except for the backing: artificial green leaves were used instead of felt, organza and tulle.


Making a ball and decorating a crown
Stage 4. Ball. Did you save the scraps from the egg trays? Excellent, it is from them that we will compress the ball for the flower topiary, and with tape we will give it the correct round shape and firmly fix it. The finishing winding of gauze or fabric will provide better adhesion of the surface of the ball with glue.


With scissors, we cut a deep hole in the ball, slightly smaller in diameter than the barrel.
Stage 5. Crown formation. We glue the surface of the ball tightly to each other with buds, we try not to leave gaps. Evenly, especially where there are visible gaps between the buds, we glue pre-prepared felt leaves and satin ribbons bent in half to the ball.


Preparing a pot for topiary
Stage 6. External design of the flowerpot. Approximately in the center of the cache-pot we glue lace and immediately on top - a lilac satin ribbon. In a chaotic manner, we distribute all the glue half-beads over the surface - 20 pcs. On one of the planes of the cache-pot we glue a bow from a satin ribbon and a foamiran rose.


That rare case when, when making a tree of happiness not recommended to use a hot glue gun: silicone dries very quickly and does not smudge. That's why use any polymer adhesive and a disposable cotton swab.
For the lilac topiary of flowers and sisal "Charm" it was not by chance that a white square pot was chosen: it blends perfectly with the crown - both in shape and in color.
When choosing a pot, consider the key rule: the total diameter of the crown should be at least 2 times larger than the diameter of the planter.
Stage 7. Mounting the barrel. We tightly lay crushed stone at the bottom of the flowerpot, coat the lower end of the trunk with glue and fasten it to the stone; continue filling the pots - up to about half. Each layer of crushed stone is abundantly glued so that the flower tree stands motionless.
Stage 8. Making the base of the tree of happiness. We cover the crushed stone or filling with white sisal so as to completely hide the filling. Instead of sisal, you can take a synthetic winterizer, tow or similar material.
 Sisal
Sisal  Sintepon
At the base of the tree of happiness, we create a composition of various decorative elements. On the proposed topiary of flowers and sisal, 2 foamiran roses, a shell, beads, and pebbles are glued. Use the materials that are available and compatible with each other.


Tree assembly
We generously coat the free end of the trunk with silicone from a thermal gun to the full depth, strengthen the crown, hold the ball in the correct position for 2-3 minutes for secure fixation.
The final touch in making a lilac flower topiary with your own hands: approximately in the middle of the trunk, glue 2 large and 2 small felt leaves, complement the composition with a white bead.


No wonder they say: "Every man should raise a son, build a house and plant a tree." But whether he can, one can only guess. But the fair sex can. She can even make a tree of happiness herself, with her own hands!
Topiary- direction of landscape design. The history of art has been known since ancient times. Today, the topiary is known as a clipped shrub, an elegantly decorated tree that will serve as a real decoration of the interior. Many are sure that the topiary attracts positive emotions and happiness, and if the tree is decorated with various banknotes or coins, then well-being in the house. This is where the name “tree of happiness” comes from.
As an element of decor, the topiary has gained worldwide popularity, and now every housewife dreams of seeing such a tree at home.
To create a topiary, you do not need to run around the shops in search of suitable materials, but use the materials at hand. Crowns can be decorated with paper flowers, ribbons or organza, multi-colored stones and pebbles, beads, sweets, etc., it all depends on your facts.
An interesting fact: Topiary, as an art, originated in antiquity. For the first time, bizarre and geometric shapes to trees began to be given in Daytime Egypt and Greece. A well-known example of that time that can still be observed is the Hanging Gardens of Babylon.
feng shui talisman
Topiary is a kind of talisman that can attract love and happiness, health and good luck. Topiaries sold in stores mainly look like flowering trees with stones. According to Feng Shui, talismans have Qi energy. In addition, the Chinese are convinced that a precious and semi-precious stone is endowed with a certain charge, so the tree of happiness can also improve health, bring good luck or make a wish come true. However, the influence of the topiary on a person will be felt only if the tree is located in the correct part of the room.

Many are sure that a talisman made with their own hands has a huge advantage. So the tree of happiness, made by hand, carries energy.
"Tree of happiness" do-it-yourself, manufacturing steps
Topiary (tree of happiness) is decorative. And it will depend only on your imagination how and from what materials you will form it.
Topiary includes three components:
- Crown
- Trunk
- Stand or Pot
Crown
A common form of the crown is a ball, however, fantasizing, you can choose any: in the form of geometric shapes, hearts, stars, etc. Popular base materials:
- Mounting foam. Such a crown can be of any shape and size. Foam is poured into an ordinary bag. After a little time, after complete drying, get rid of the polyethylene and give the crown the shape necessary for the composition. It is very convenient to work with such a crown.

Tip: Be sure to wear gloves when working with foam.
- Newspaper. It will take a lot of newspapers. From the material it is necessary to make a semblance of a ball of the required diameter and density. You can fix the base with a sock, stocking or other fabric. Additionally, cling film, threads and PVA glue will help form the base.
- Styrofoam. The desired shape of the foam can be given with a clerical knife. Styrofoam, as well as the base of polyurethane foam, is very easy to work with.
- Papier mache. Thanks to this technique, you can create the perfect shape for the crown in the form of a ball. An inflated balloon is glued layer by layer with pieces of paper. After complete drying, burst the ball with a needle and pull it out of the base. The form is ready.
- Any material. To work on the manufacture of a tree crown, you can use any material you like: a ball, a ball, spherical toys, etc.
Tree trunk
To create a tree trunk, you can take branches, a pencil, a stick, wire, or another similar element. The workpiece can be decoratively decorated with colored threads and paper, paints and ribbons, or any other material. To emphasize the structure of the tree, it is desirable that the trunk be longer. For a larger trunk, it is attached to the pot and to the crown. You can beat the composition by painting the trunk with different colors.
Tip: To make the tree of happiness look more sprawling, it is better to take a real shrub as the basis for the trunk.

pot base
The main element of the decor of the whole composition is a pot. It is he who is able to give the topiary a finished look. As a pot for a tree, not only a flower pot can act, but also a self-made pot, decorated with your own hands.
For example, if the talisman is made in the form of a bonsai, it is better to choose a rectangular pot, and if the topiary is a tall, rounded pot. For the stability of the crown and base, the bottom of the pot must be weighted. This can be done with a solution of cement or gypsum, gravel, polyurethane foam and other materials. To prevent cracks in the pot when pouring the solution, pieces of foam rubber, neatly laid on the bottom, will help. To decorate the base of the tree, various pebbles, sand, glass, beads, moss are suitable.
Tip: When choosing a pot for a tree, remember that it should be larger than the crown of the tree.
The crown looks more interesting and profitable from several materials that are designed in the same style. But remember that the combination of elements must be in harmony with each other, otherwise the topiary will look complicated and sloppy.

How to assemble and how to decorate?
When collecting topiary, the first step is to fill the pot halfway with filler. Next - insert a decorated trunk with a crown into the middle of the pot, firmly fixing it in the base of the pot with glue. After that, you can do the decor of the tree itself. To decorate the topiary, it is best to use a special glue gun or PVA glue. The final stage - the pot is completely covered with filler and decorated with various elements.
decor ideas
The most elegant and fragrant decor are coffee beans. An interesting option using pebbles, shells, stars and other symbols of the marine theme. The original idea of nut topiary: hazelnuts, walnuts, almonds and others. And the most popular decor today is coins and banknotes.
Tip: Dream up, turn on your imagination, and the topiary can become a real decoration for your home or an ideal souvenir!
Popular compositions
When starting to work on a topiary, consider your train of thought and the materials used. There are many ideas, as well as compositions. Here are some DIY ideas.

Corrugated Paper Tree of Happiness
The simplest decor. For registration you will need:
- Pot
- colored paper
- Spherical crown
- Barrel from any material
- colored beads
- Acrylic paint.
The pot is covered with paint, thick thread, better with twine, wrap the trunk around and fix it with glue in the center of the pot. And the last step is to attach the crown to the trunk.

Decor. For an oasis, plastic or cardboard is suitable. The size of the oasis depends on the diameter of the pot. To fix the stem in the pot, a small hole must be made in the oasis. To decorate the tree, corrugated flowers of various shapes and structures will appear. Each flower is glued to a spherical base with PVA glue or super glue. The top of the pot can be decorated with a border, and the oasis with beads.
Tip: Flowers can be glued with hot glue, or you can use skewers or wire.
Tree of happiness decorated with ribbons
An elegant version of the tree of happiness. For decor:
- Pencils
- Ribbons
- pot
- Invisibles
Rings are formed from the tape and glued to the base in turn, closing all the voids. After decorating, the crown is put on the trunk and attached to the bottom of the pot. The pot must first be weighted.

Tree of happiness from coffee beans
For decoration you will need:
- Coffee beans
- plastic glass
- tassel
- Ball
- 2 rubber bands
- Threads
- Rope
- Wand
The brush must be disassembled into individual hairs. Lubricate the stick for the barrel with glue and fasten the resulting hairs with rubber bands. We make a hole in the ball for the crown in order to put it on the trunk in the future. The base can be painted in coffee color, this will help hide minor defects in the composition. Using glue, glue the ball with coffee beans. It is better to alternate the grains with sinuous lines to give a more elegant look. Small flowers or cinnamon sticks look great with grains. The finished crown is covered with paint or varnish, but at the same time the grains lose their aroma.

For a pot, we use a glass, after weighing it with gravel, sand or other material. We glue the finished trunk with a crown to the bottom of the base of the glass. To decorate the cup, a prepared rope is suitable, which is tied around the entire diameter. You can complete the composition with a ladybug or a butterfly made of plastic, which can be fixed on the top of a tree.
An interesting fact: you can give the composition a spectacular look, nobility and relief due to the double coffee layer.
Tree of happiness from beads
Beaded topiary deserves special attention. Decorating such a tree can take a lot of time and effort, but it's worth it. Any product made of beads is painstaking work. To decorate a topiary, you can immediately buy a ready-made set of beads, and a jar of coffee or cream is also suitable for a pot.

Now each of you has an idea of what a topiary is and how to make it yourself. After all, it is much more pleasant to make a thing with your own hands, and if you try, you will definitely get a chic little thing for decor in the form of a fancy fantasy ball on a leg!
45 photos of happiness tree (topiary) ideas:


Topiary is especially popular today. The fashionable trend to decorate festive halls or home interiors is gaining more and more momentum. An actual element of inspiration for such modern art is floristry. Yes, yes, you heard right. Moreover, it is possible to create a unique composition with your own hands and according to your individual taste. Topiary means "tree of happiness". And the happiness made by one's own hands, doubly brings home comfort and pleases others.
The process includes:
- To begin with, you should cut the prepared flowers from the stem so that the tails are no more than one cm long.
- In the ball, make a shallow recess up to 2 cm.
- Start decorating the ball. With an awl, you should carefully pierce the holes and quickly coat the tails of the flowers with glue to insert them into the finished holes. In your head, you need to imagine the finished composition and, accordingly, distribute the flowers according to the color scheme. It is not necessary to have flowers very close to each other. It will be enough to completely cover the sphere without translucent base.
- The stem should be glued to the decorated ball and left to dry.
- Prepare gypsum, mix it with water to a dense density. Pour into a pot. Wait a bit and insert the barrel into the middle.
- Hold the tree until the plaster hardens well.
- You can hide unattractive gypsum with the remains of small twigs and leaves.
The simplest topiaries are made quickly, but financially more expensive.
You can make flowers and a ball yourself, in this case the tree of happiness will be much cheaper.
We make cheap and simple topiary ourselves
Simple topiaries are made quickly. For beginners, try your hand and learn the technique on simple topiaries. The most budgetary way to make a topiary is to make it from improvised materials that are stored at every home.

Some of the simplest ideas are described below.
Topiary from napkins
A fairly simple and cheap type of topiary. You can make flowers from napkins not only in white, but also in bright colors. This option is pretty cute.
Material on creating a topiary from artificial flowers will also be useful:

Tree of happiness from cotton pads
At first glance, such a decision may seem irrelevant, but in the end, this composition is not inferior to its other counterparts. Cotton pads are often decorated with purple or pale cream large beads and openwork ribbons. Topiary in this design looks very gentle and romantic.

Such products, in turn, test the performer for perseverance and painstaking work.
A simple idea for decorating a topiary can be ordinary colored paper flowers.
Interesting ideas for topiary: options for beginners
When making topiary, do not be afraid to experiment. It is possible to apply the most unusual, new and bold ideas. In this case, the tree will be purely individual, not having its own kind.

Interesting ideas for topiary:
- In cone topiary, it is interesting to use a real tree branch. You can decorate it with a small bird.
- Cones or coffee beans can be painted with acrylic paint or steel-colored spray paint will look spectacular. In this case, the tree of happiness will sparkle with completely new colors, both in the literal and figurative sense of the word.
- As a jet from the topiary "", you can use small flowers with beads or coffee beans.
- For the New Year holidays, the tree of happiness can be decorated with a small garland. This topiary can be used as a night light.
- For children's topiary, a transparent glass container will serve as an interesting stand. It is interesting to fill these forms with small round sweets or sweet peanuts. Such a tree will be doubly appetizing.
- In the role of a stand, there can be a glass or a voluminous transparent vase like an aquarium.
- Topiaries look spectacular in the form of various bizarre shapes, letters or numbers.
- For financial well-being, you can put a coin on the bottom of the stand or attach a banknote in a visible area.
- For grandiose holidays, you can make a large-sized topiary from fruits. The base will be a cone decorated with edible rings of exotic fruits.
- To make a composition luxurious means to decorate it with fresh flowers. Such a topiary will be appreciated even by the most unromantic person.
An important feature in the manufacture of topiary is the color scheme. Don't overdo it with bright colors. In this case, the tree of happiness will lose its charm and attractiveness.
The product should harmoniously combine decorative elements.
We create a masterpiece: beautiful do-it-yourself topiary

Examples of unusual topiary:
- Music paper flowers. Such flowers will look very original and unusual. The classic black and white coloring looks a little strict, but quite interesting.
- From grains. Moreover, it can be completely different grains, from corn to coffee beans. Of course, many will consider such a tree to be very simple, but the process of making such a topiary will take a lot of time and patience.
- From yarn. Wool threads look very unusual. Such a product brings coziness and comfort to any home.
- From pasta. Today, pasta manufacturers can pamper us with products of various shapes and colors. Flour products can be left in their original form, or they can be painted with multi-colored paints.
The base, the trunk, and the stand can be unusual in a topiary. It is important not to be afraid to experiment.
An unusual decor can be a thin copper wire in the form of a spiral.
Learning to make creative topiary at home
Creating creative topiary is characteristic of creative people, whose thinking and ideas are limitless.

Some examples of creative topiary:
- From Christmas balls. In this case, it is better to use small balls of plastic or plastic of the same color. The void in this case can be filled with tinsel.
- Topiary - floating cup. A jet of drink from an inverted cup is a frame.
- From burlap, beads and lace. Such topiaries are often used as interior decoration at banquets. The manufacture of this tree will take a sufficient amount of time and effort, but the showiness will justify all efforts. The tree of happiness in this performance is very impressive.
- From umbrellas. Cocktail umbrellas are a fun and easy option for a creative tree.
- From fresh berries. The base in this case is made in the form of a cone. Decor elements can be strawberries, cherries, sweet cherries. Such a delicious topiary will be relevant at any time of the year and a great gift for any occasion.
The trees of happiness in a monochromatic design will look very impressive. Moreover, the emphasis should be on saturated bright colors: purple, green, blue, red, turquoise, etc.
A topiary with a photo inside is considered quite creative. The base, in some way, serves as a frame for framing a photo, a person dear and valuable to your life.
We make expensive topiary with our own hands
Expensive topiary immediately implies the use of materials that are quite expensive financially. Such products require special care and caution, because the material is easy to spoil.

Expensive topiary products can be:
- or . In this case, the high cost of the product depends on individual well-being. Moreover, the color of banknotes can be completely different. Such a solution will not spoil the overall impression. In fact, such a composition is a real tree of happiness. Often, souvenir banknotes are used as banknotes, which can be purchased at any needlework store.
- From pearls. Such a topiary will be a rich and fashionable decoration for any home. A pearl tree can be presented as a gift for a wedding or other significant event.
The tree stand can be decorated with coins or stick pictures of feng shui signs.
You can make a product from expensive materials yourself, but for a start it is better to familiarize yourself with the process in order to avoid unforeseen additional costs.
Eco-style Topiary: master class (video)
If you are interested in the process of creating a topiary and have a great desire to try and not be afraid to bring your ideas to life, then do not rush to buy most of the elements for the creative process in the store. Absolutely all components can be made by hand. Moreover, such an occupation is no less interesting than decorating one crown. Indeed, during the process, interesting and original ideas appear.
DIY creative topiary (photo examples)


Ornamental trees are considered worthy decoration of the house. They are appropriate in any interior, you just need to think in advance about the color scheme that fits into the finished design project. Ornamental trees do not require special conditions of maintenance and care. They do not need to be watered as they are artificial plants. These decor items are freely sold in stores, but it is better to make a topiary with your own hands. It will take some time to make it, but in the end you will get a unique decorative tree that fits perfectly into the existing interior of the room. And it is better to build a topiary on your own, because according to the Chinese ancient teachings of Feng Shui, this tree brings joy to the house. Making an ornamental tree, a person charges it. According to legend, the topiary can bring happiness only to its creator.
Topiary: the history of appearance and meaning in a modern interior
The word topiary or topiary comes from the term "topia" - an ornamental garden plot. The concept came from Ancient Rome and meant various figures carved from the crowns of trees or bushes. The ancient Roman civilization disappeared, but the Catholic Church picked up the ideas of beautifully decorating gardens. Then the topiary entered the secular life. Their heyday came in the 17th century: it was then that decorative trees appeared in the residences of the rulers of states, incl. and in the Russian Empire. Then they were forgotten about, but in the 20th century, topiaries became popular again. Now they no longer decorated the gardens and walls of palaces, but were planted in pots. Today, topiary is no longer planted. They can be made from any material. Topiaries are made in the most bizarre shapes and colors, often quite controversially combining materials. In another way, they are called trees of happiness, believing that they bring joy to the house. They can be made from:
- coffee beans;
- walnuts;
- fir cones;
- straw;
- sweets;
- napkins;
- silk ribbons;
- plastic bags, etc.
Where to start assembling a tree
The assembly of the topiary must begin with planning the appearance of the future tree of happiness and finding the right details. The appearance of the topiary is determined by the style of the interior for which it is made. To begin with, there are materials necessary for constructing the base of the tree. In any case, you will need tapes, glue, colored paper, polystyrene foam, polyurethane foam, etc. The list of parts is limited only by the imagination of the creator. After collecting the necessary things, you can begin to create a topiary. First, the trunk is assembled, because. it is the basis of the topiary. Moreover, it must not only be strengthened, but also varnished or painted. Then one end of the trunk is attached to a pot, stone or shell, and a ball is hung on the other, which will later become the crown of a tree of happiness. To fasten all parts of the topiary, it is best to use glue.
The basis
To construct the basis of the tree of happiness, everything that is at hand at this moment will do. To make a base from newspapers, first you need to crumple them well, and only then form a sphere according to the given parameters. Newspapers are crumpled and tightly pressed, after which they are wrapped with tape. The base can also be made from newspaper clippings, but in this case they should be folded into a plastic bag. If you need to make a small base of synthetic winterizer, first you need to tamp it into a sock or stocking, then give it the necessary shape and wrap it tightly with sewing threads. It is even better to make this foam base using ordinary packaging from household appliances. But the foam crumbles, it is inconvenient to roll it into a ball, so this base is not very popular. In addition to the above, the following materials can become the basis of the topiary:
- mounting foam;
- Knitting thread;
- papier-mâché, etc.
Trunk
The trunk of the tree of happiness connects the base with the crown, so it must be strong and stable. In its role can be an ordinary wire, fixed with artistic tape, twine or plastic. For the realism of the product, this trunk can be made from a wooden branch or a piece of wood. But first, this branch must be cleaned of bark, varnished and stained. If a low topiary is made, then as a trunk, you can take a popsicle stick, sushi sticks or wooden skewers fastened together. The color and type of the trunk depends on the material of the base and crown. For topiary with coffee beans, white or brown is suitable. A curved trunk for a European tree can only be made of wire. You can also take any material that is approximately suitable for the topiary trunk, decorate it and fill it with plaster.
Crown
For the manufacture of a topiary crown, absolutely any materials that are currently at hand are suitable. To do this, you can take paper napkins, corrugated paper, folded origami, nylon ribbons, etc. Then the crown must be decorated. To do this, take spruce cones, real seashells, coffee beans, artificial flowers, etc. The crown is the main accent of the tree of happiness, so its design must be taken very seriously. The trunk and stand only emphasize the general theme of the topiary, so it is advisable to first decide on the material for the crown, and only then design the rest of the tree. But the topiary trunk may not withstand too large a crown, so it should not be overloaded. Some elements can only decorate the stand of the tree of happiness.
Stand
As a stand for a topiary, you can take an ordinary flower pot, a large flat stone or an iron bucket, decorate them beautifully and put them under the crown. The decor of the stand of the tree of happiness can be anything. It is decorated using the decoupage technique, decorated with lace or bright unusual shreds. You can stick stones, shells and artificial flowers on the stand. This element of the topiary is a semantic continuation of the crown, so its design must be based on the already existing elements of the decorative product. If the tree is decorated in a marine style, then shells and multi-colored pebbles will be appropriate, and for a romantic-style topiary, you will need lace and hearts made of colored paper. In size, the crown of the tree should be larger than its stand, so that the composition looks harmonious.
Wood making workshops
Making a topiary with your own hands is easy. To do this, you do not need to have an artistic taste or education as a designer. The ideal tree of happiness is decorated intuitively from the available materials. There are many tutorials on the Internet on this topic, some of them are presented below, but you should not follow these instructions step by step. According to feng shui, topiary quickly and effectively activates any sector of an apartment or house, instantly filling it with the necessary energy. But for proper operation, it must be decorated with the necessary elements. To normalize family relations, jasper or amazonite should be glued to the topiary stand. A tree with a tiger's eye, charoite or turquoise will help you climb the career ladder. And to improve the general financial situation, you need to decorate the topiary with a jet or a hawk's eye.
From coffee beans
For this topiary, you need to take high-quality large coffee beans and stick them on the base for the crown, laying them out with the central strip down. The ball is covered completely. For this, it is better to take a glue gun, although you can do without it, using ordinary glue from a tube. When the ball is completely sealed, a plastic tube is taken, which is sealed along the entire length with double-sided tape, departing from both edges 2-3 cm. A satin ribbon, fabric or corrugated paper of the desired color is glued onto the tape. Then you need to dilute the alabaster and pour the resulting mixture into a pot or an iron bucket. Then a barrel is inserted into this mixture and they wait for the alabaster to harden. After the mixture has hardened, its surface is spread with coffee beans in 2-3 layers. A finished crown is glued on top of the trunk itself.
The resulting topiary can be decorated with an elegant bow or jewelry.
From cones
Do-it-yourself topiary from cones is made according to a similar scheme. Small half-opened pine cones are glued to the foam ball with small gaps from each other. If the gaps are too large, they can be filled with acorns or chestnuts. For additional fixation of the elements, you can use golden or brown threads. To make the barrel, you need to put together several (up to 10) bamboo skewers, wrap them with a thick white or brown thread, leaving open areas along the edges of the sticks. Then you need to dilute the alabaster with water or take the finished cement mixture, pour it into a flower pot and insert the tree trunk into the base. When the mixture hardens, it is decorated with needles or sisal, a fully decorated crown of a tree of happiness is attached to the trunk, and the pot is decorated with a satin or lace ribbon.
From satin ribbons and other fabrics
As a basis for a satin ribbon topiary, you can take a foam sphere or a ball of crumpled newspapers, fixed with thick threads dipped in PVA glue. Then you need to take satin ribbons of any color, twist them into small rolls, after bending the ribbons at a right angle. You need to bend the satin ribbon several times until its length is over. As a result of these actions, you should get a rosebud. At the end of manufacturing, it is necessary to flash all the petals with a thin silk thread at the base. The number of such roses is determined by the size of the base. Usually 20-30 flowers are required. Then they decorate the crown of the topiary. As a trunk for such a tree, you can take an ordinary twig, and use a clay flower pot for a stand. The stand and tree trunk should be decorated with elegant green leaves made of satin ribbons or silk.
Corrugated paper
First you need to take a round foam ball. Then you need to make roses from corrugated paper. If they are very large, then there will be a lot of free space between the flowers, which will need to be closed with something, so it is better to make these roses medium. One small topiary will need 35-45 roses. To do this, it is better to take paper of different colors in order to alternate the shades of roses on the topiary in the future. The trunk for a tree of happiness can be made from traditional sushi sticks, and ordinary foam can be used as a primer. Alabaster is hard to make, but Styrofoam is easy to find. Only the barrel must be inserted into the foam base the first time. At the same time, it is necessary to decorate the crown by gluing roses in a chaotic manner. Then the crown is attached to the trunk and the topiary is considered ready. If desired, the soil in the pot is laid out with artificial grass, and the trunk of the tree is decorated with a bright bow.
A sea tree of happiness can be made from materials brought from the sea: pebbles, shells, dried crabs and pearls. They should paste over the base for the topiary crown. If there are few shells and pebbles, the space between them can be decorated with sisal, artificial starfish and marine-themed salt dough crafts. When making a topiary trunk, it is better to take sushi sticks decorated with white, blue or sand-colored satin ribbons. As a stand for a tree of happiness, you should take a white flower pot, which can be decorated with artificial pearls, lace and small figures from salt dough. Inside this pot, you need to fill it with alabaster and insert the trunk of the topiary into this alabaster mixture. Sisal fibers, sea pebbles and shells can be placed on top of the frozen fill.
Money topiary from coins and banknotes
This topiary is usually made from counterfeit banknotes, but for entourage, you can attach real coins to a tree crown or stand. Of course, it is better to use not ordinary, but rare, old or foreign coins. To begin with, each bill needs to be folded in half, slightly moving the edges, and then folded into an envelope from it, securing the uneven edges with double-sided tape. The number of banknotes depends on the size of the base ball, but usually about 20-25 banknotes are required. The trunk of a money tree can be made from twigs or sushi sticks, and a planter can be used as a stand. The cache-pot on the outside can be decorated with special self-adhesive paper with the image of money or lace. Alabaster is poured into the pot itself, a trunk is placed in it and they are waiting for it to dry. After that, the topiary soil is laid out with coins, sawdust or decorative stones.
From dried flowers and fresh flowers
A tree made from dried flowers is quite simple. You can decorate the base for the topiary crown with dried flowers and yellowed leaves, but the flowers and leaves taken for these purposes must be strong and dense, otherwise they will simply fall apart during work. Dried flowers are fixed directly on the foam ball. A curved branch from the street is taken as a trunk, and an ordinary clay pot turns into a stand. The pot is poured inside with alabaster, after fixing the trunk of the topiary. This trunk is inserted into the finished crown of the tree, and the dried alabaster is decorated with dry leaves and flowers. Fresh flower topiaries are usually created by professional florists, but you can try making your own at home. To do this, you need to take rosebuds, chamomile flowers, lilies or chrysanthemums, cut their stems correctly and carefully and attach them to the crown base. Otherwise, the technique for producing a tree of happiness and decorating a topiary pot is similar to its manufacture from dried flowers.
Topiary ("tree of happiness", "European tree") is a small decorative tree that decorates interiors and exteriors, and is also often used for. Topiaries are good because they look very beautiful, and you can make them with your own hands in just 1 evening from improvised materials.
- This means that you can make several decorations at once, for example, one pair for New Year's serving, another for Easter, and a couple more for the mantelpiece.
In this material you will find 1 basic instruction on how to make a DIY topiary for beginners, as well as 3 step-by-step master classes in addition to it and 45 photo ideas for inspiration.
Basic instruction for beginners
Topiaries of even the most complex design are made according to approximately the same principle. Having mastered the basic manufacturing technology, you can create a variety of topiary, changing only the materials for decoration.
So, to make a mini-tree with your own hands, you will need to create it:
- Crown;
- Trunk;
- The base of the tree.
Step 1. Design planning
Topiary can be different not only in design, but also in terms of service life. Before starting work, think about why you need a “tree of happiness” and where will it live? The purpose and future place of the topiary will determine its style, color scheme, and even the materials for its creation.
If you want to make topiary for, then materials that are not too durable can be used - paper, napkins, sweets, fresh flowers, fruits. If you want to make a topiary as a gift or for interior decoration, then it is better to use a more reliable decor - cones, artificial flowers, coffee beans, ribbons, organza, etc.
In the next selection of photos, you can get design ideas for themed and festive topiaries.

Sweet candy topiary for a children's party

Halloween decoration with potted candy

Halloween decorations from pumpkin seeds, ribbons and candy in tea cans

Easter trees made from eggs, artificial flowers, satin ribbons and moss

Christmas topiary made of artificial leaves and holly berries, cones and ribbons with a branch trunk

Candy tree for the holiday table

Topiary for festive table setting made of artificial flowers, natural branches, dry moss and satin ribbons


And here is a selection of photo examples of the design of exclusively interior topiary (scroll through!).


Step 2. Prepare materials
To make a topiary with your own hands, you will need:
- Styrofoam ball with a diameter of 8-12 cm(available at many stationery and art stores) or floral foam ball (available at gardening and flower shops).

If desired, the ball can be made independently from polystyrene foam, the same floral foam, polyurethane foam, papier-mâché, etc. However, the base of the crown can be not only in the shape of a ball, but also in the form of a heart, a star, a number, a letter, an animal figurine and etc.
- Crown decor - depending on your idea, use flowers, satin ribbons, organza, coffee beans, banknotes, etc.
- Trunk - it can be made from a dry and clean branch, a simple pencil or any other stick. In addition, a tall candlestick can replace the trunk and pot.
- Barrel decor- the trunk can be at least covered with a matte varnish or painted. And as a maximum - wrap one or two tapes.
- Planter - It is most convenient to pour the mixture into a clay pot, but any pretty cups, mugs, vintage buckets, etc. will also work.
- Fixing mixture- it is best to make a do-it-yourself topiary with a mixture of alabaster, as it quickly hardens, almost does not crack and is cheap. You can also use cement-sand mortar, gypsum or putty. However, not only binder mixtures can fix a tree in a pot, but also the same foam, floral foam or stones.
- Everything for mixing- container, water, stick, etc.
- Decor for masking the fixing mixture- to create an imitation of soil cover, it is best to use natural materials: dry moss, small pebbles, expanded clay, sisal fiber. Artificial moss and stones are also suitable. In the pots of "edible" topiary, you can put sweets and dragees.
- Glue gun and some glue sticks- if necessary, it can be replaced with glue like "Moment", but it's best not to do this, since the glue in the gun is more convenient, and most importantly, it allows you to remove random "cobwebs".
- Scissors or cutter.
- Tailor's studs with a very small head(optional, used in addition to or instead of glue, for example, for fastening beads).
- Side cutters or nippers for cutting the trunk or any decorative elements.
At the preparatory stage, divide the decorative details for the crown into groups - for example, large, medium and small. So it will be more convenient for you to alternate the decor and distribute it evenly over the ball.
Step 3Create the Crown
First, you need to mark the ball - mark the place for attaching the trunk and mark the border around it, beyond which you do not need to go for some time, sticking the decor. Thanks to this technique, in the future you can easily fix the barrel in the ball without ruining the decor.

As soon as the glue warms up, proceed to the design of the ball in the following order: “trying on” the part without glue - applying glue to the right place - fixing the part. Remember that you need to act quickly so that the glue does not have time to soak into the foam. That is why the decor is better to apply and try on first.

Here are a few more nuances:
- You need to stick the decor on the ball, starting with large elements and ending with small ones. For example, if you are making artificial flower topiary, first glue the largest buds on the ball, then the medium ones, and only then the small flowers and additional beads.
- Some decor can be attached to the ball with tailor's studs. But it is best to combine carnations with glue.
- If some details have wire bases (for example, the same artificial flowers), then about 2 cm should be left from their “tails”. Then you can not only glue the decor, but also stick it into the ball.
- To make the white base ball less noticeable in the gaps between the glued parts, it can be painted to match the decor.
Now we need to work with the trunk. As already mentioned, making it with your own hands is not at all difficult from a branch, pencil or any stick.
If you use a branch, then you can not paint it, but only cover it with a matte varnish so that the natural beauty of the tree is visible. If you use a wooden stick, then it can only be slightly tinted, artificially aged, etc. If you want to completely mask the surface of the trunk, then you can wrap satin ribbons, fabric, paper, rope around it, or completely paint it.
What length should it be? Since the barrel deepens both into the pot and into the ball, its length can be calculated using the following formula:
- Stem length = 1/3 ball diameter + pot height + desired stem length between crown and pot.
To fix the barrel, you need to make a hole in the ball with a depth of about 2-3 cm at the marking site with an awl and a knife (depending on its size). When the hole is ready, fill its bottom with hot glue and put the crown on the trunk until it stops. Then continue to hold the barrel and gradually fill the hole with glue around the barrel.

- Keep in mind that the hot glue will melt the styrofoam and deepen the hole even further. To prevent the trunk from going deeper into the crown by more than 1/3 of its diameter, small pieces of paper can be laid between the layers of glue.
As soon as the barrel is fixed in the ball, mask the attachment point with decor.
Step 5. Prepare the binder mixture and fix the tree in the pot
It's time to "plant" the resulting tree in a pot. For this you need:
- Stepping back from the edge of the pot about 2.5 cm, put a mark - the mixture will be poured to this level. If there is a hole in the bottom of the pot, you need to cover it with tape or hot glue.

- Dilute the mixture according to the manufacturer's instructions and fill the pot with it.
- Align and fix the topiary in the pot, holding its stem until the mixture hardens.
- Leave the mixture overnight or overnight until completely dry.

Hint: As already noted, it is best to use alabaster as a binder mixture. To fill 1 medium pot, it is necessary to dilute approximately 1 kg of alabaster with 600 ml of water. The mixture is kneaded for about 1-2 minutes until the consistency of thick sour cream, and then quickly poured into a pot and the topiary is fixed in it for 2-3 minutes.
Hooray! The topiary is almost ready, it remains only to create an imitation of soil in a pot and mask the fixing mixture. If you are using sisal fiber (see photo), shells, artificial grass or moss, then they need to be fixed with a small amount of glue.

Master class 1. Corrugated paper topiary
Topiary with paper flowers is especially suitable for decorating a festive table or festive interior decoration. So, for example, this rose topiary was made for Valentine's Day.

Materials:
- Base ball with a diameter of 12 cm;
- Corrugated (crepe paper) of medium density (corrugated paper in the form of a tape is used in the master class, but you can use regular rolls);
- Floral foam bars and/or any fixative mixture (see basic instructions);
- Planter or flowerpot for the base of the topiary;
- The trunk is about 30 cm long;
- Dry moss for pot decor;
- Ribbon for decorating the trunk;
- Glue gun.
Step 1. Cut the corrugated paper into strips 60 cm long and about 4.5-5 cm wide. If the paper is too thick and hard, knead the strips a little to make them more plastic.
Step 2. Now you need to roll the resulting ribbons into rosebuds. This is done very simply, just a couple of workouts and the principle becomes clear. Take one of the resulting paper ribbons and fold it 1/3 as shown in the photo below.

Then fold one end of the ribbon diagonally at a 45-degree angle and start rolling it into a roll. After three turns, you will get the core of the bud. Now wrap the free end to the outside, and continue to turn the core of the rose - voila, you have the first petal.


Step 4. Once the crown is completely covered with roses, attach the stem to it (see Basic Instructions). In this master class, the barrel was pre-painted with white spray paint.


Step 6 Lay dry moss on the "soil" and glue it in some places with hot glue. And finally, tie a bow on the trunk.

The following selection of photos presents other topiary design ideas that you can do with your own hands according to this master class, not only from corrugated paper, but also from satin ribbons, tissue paper, etc.


By the way, not only roses can be made from paper, but also lush peonies or hydrangeas. Methods for making such flowers are easy to find on the Internet.