The need to repair old ceilings can arise for several reasons. Leading positions are occupied emergencies when the ceiling was flooded with neighbors from above, banal wear and tear - cracking of the paint layer, separation of the old decorative coating from the base, the appearance yellow spots. Ceiling repairs in an old house are also done in the case when there is a widespread desire to simply update appearance and decorative coating. In this case, problems with the ceiling surface are often absent. Updating the ceiling will also be necessary when the internal repair of an apartment or a private house is carried out, which experts recommend starting from above, and then moving on to other types of work. This is because the ceiling is the most important detail interior, which is the first thing that catches your eye when entering the room. There are many options for repairing the ceiling, and the choice of the most preferred one should be carried out individually, taking into account the characteristics of the interior. Before proceeding with the repair of the ceiling, it is necessary to assess its initial condition, and only then draw conclusions about the need for cosmetic or major repairs.
Redecoration of the ceiling: basic principles
If you only want to update the look of the ceiling, chances are you don't have a major problem with its surface. In this case, your main task is to refresh the decorative coating. Despite the fact that, at first glance, this task seems quite simple, it is often complicated by many factors that accompany the repair.
First of all, the task is complicated by the inability to free the room from furniture and bulky things, especially if the repair is carried out in one-room apartment. In this regard, you constantly have to move furniture and cover it.

Today it is almost impossible to meet those who want to whitewash old ceiling- on the contrary, they try to get rid of whitewash. It is not surprising that one of the most "dirty" stages of ceiling repair is the removal of old whitewash or other ceiling covering from its surface. This operation is quite laborious, and the further quality of the ceiling coating depends on the thoroughness of its implementation. Removal of lime, water-based or chalk whitewash is carried out using a long-handled roller, which must be moistened with water and run along the ceiling, which is necessary to moisten the whitewash. After that, it is necessary to remove the old ceiling - for this, the moistened whitewash is cleaned with a spatula. All other types of paint are cleaned with a special cleaner.

The algorithm for further actions depends on the chosen method of finishing the ceiling. If you plan to paint the ceiling or paste it with wallpaper or ceiling tiles, you should know that all types of gluing and painting work should be carried out only after pre-priming the surface, which will increase the adhesion of the decorative layer and the main surface. In the case of installation of plasterboard or stretch ceilings, base preparation is not required.
Important! Replacing the old electrical wiring in the ceiling and installing outlets for recessed fixtures is also carried out at the preparatory stage.
At the next stage of the preparatory work, the surface is leveled and the base is primed. The grouting of the joints between the plates and the elimination of large irregularities is carried out using gypsum plaster, which is applied in several layers. Plastering the old ceiling will eliminate defects in the ceiling surface.
Inspect the finished surface for unevenness, gaps between the plates or small potholes. If any are found, cover them with cement or gypsum plaster, which is applied with a spatula used to clean whitewash. When eliminating gaps and irregularities in the ceiling surface, make sure that they do not protrude beyond the plane of the ceiling and, at the same time, do not sink too deep. To make sure the ceiling surface is perfectly level, use a laser level. According to the results of the measurements, the magnitude of the detected deviations should not exceed 5-7 mm.

The final stage of cosmetic repairs is the finishing of the ceiling, the complexity of which depends on the selected materials and the complexity of the installation. The current level of development of building technologies dictates its own rules, and today stretch ceilings are especially popular, the installation of which is recommended to be entrusted to specialists. However, it can be done independently. Despite this, for self-fulfillment, experts recommend choosing more simple options installation of the ceiling surface: painting, ceiling tiles or drywall.

Painting the ceiling: a step by step guide
If you have completed all of the above stages of preparatory work, you can proceed to the finishing of the ceiling and its subsequent decoration. Consider how to properly paint the old ceiling, while keeping within the shortest possible period of time.
Ceiling painting is a multi-stage process that includes many steps:
- First of all, remove the layer old paint from the ceiling. This must be done in order to increase the strength of the new coating, as well as to ensure its ease of application. Removing paint from the surface of the ceiling can be done in several ways:
- Mechanical method, which involves the use of a metal spatula, brush or angle grinder;

2. Thermal method, the principle of which is based on the use of a building hair dryer;
3. Chemical method, which involves the use of a special paint stripping solution, after which it will be easy to leave.

- The next stage is the leveling of the ceiling surface with putty, after which it must be primed for painting;
- The final stage is the application of paint with a roller. Experts do not recommend painting the ceiling with old paint, as this will negatively affect both the appearance and the quality of the ceiling coating. Depending on which room you are renovating, you can paint the old ceiling water-based paint, as well as choose acrylic or latex paint.

If you are puzzled by the question of the design of the painted ceiling, after reading the material of the article, you can take into account several options.
- One of them is a polyurethane rosette decorated with an original relief. It can be in harmony with the tone of the paint or contrast it. The ceiling will acquire a special chic if the volumetric relief on the stucco elements is covered with gilding, in harmony with the gilded elements of the chandelier;
- However, this is far from the only way to decorate the surface of a painted ceiling. Another option for decorating the ceiling involves the use of a stencil, which is fixed in the right place with masking tape. After that, a pattern is applied to the surface of the ceiling in a different color, which can be in harmony with the color of home textiles or wall coverings. To finish the ceiling in this way, experts suggest using fluorescent paint, which can be applied around the perimeter of the ceiling or along the outline of the pattern, so that it will stand out in the dark;

- Another option is to finish the ceiling with wallpaper for painting, the use of which will create a relief on the surface of the ceiling. This finishing method can be skillfully combined with other materials. The example below illustrates this situation. In the photo you can see how the ceiling wallpaper is pasted only in the central part of the ceiling in the form of a kind of "carpet". In the center it is framed by a frieze, the shade of which is in harmony with the decoration of the walls. Using this technique, you can visually adjust the configuration of the room. For example, by placing a contrasting carpet in the longitudinal or transverse direction, you can make the room more spacious or, conversely, compact.

How to repair a flat ceiling: finishing options
Consider the main options for repairing the old wooden ceiling, which is characterized by a fairly even base without obvious elevation changes.
Ceiling wallpaper pasting
One of the easiest repair options is wallpapering the ceiling. This method is most suitable for apartments than for private houses, since an apartment building is practically not subject to shrinkage, and therefore, we can safely say that the finish will not peel off from the ceiling surface. If your ceiling is not a perfect plane, give preference to wallpaper with a large embossed pattern, which will hide small irregularities and make the ceiling visually more even. These varieties include wallpaper with complex geometric patterns.

To facilitate the process of wallpapering, try not to do the work alone - invite a partner to support the second end of the wallpaper, moistened with glue. This will avoid tearing the fabric.
Technological nuances of wallpapering:
- Sticking wallpaper on the ceiling is recommended from the window to the opposite wall, which will make the seams less noticeable;
- Wallpaper must be cut into canvases, the length of which is equal to the length (width) of the room + 4 cm (2 cm per overlap). In the process of work, check whether it is possible to dock adjacent canvases, and number each cut with a pencil so as not to confuse the sequence of gluing the canvases;
- slicing required amount canvases, dilute the glue and grease the back of the canvases with it, paying particular attention to the edges. If the accompanying instructions require, fold the wallpaper with an accordion so that the glue is better saturated, and proceed with applying the glue to the next canvas;
- If the instruction says that gluing the wallpaper is carried out immediately after applying the glue, prepare a roller and dry rags, thanks to which you can remove excess glue and air bubbles, and proceed with the installation of ceiling wallpaper;

- When laying the wallpaper on the surface of the ceiling, let the edge on the wall, which is necessary in order to subsequently fix the edge of the wallpaper with the help of a ceiling plinth;
- Next, smooth the canvas with a roller and a dry cloth in the direction from the middle to the edges;
- If the walls in the room are uneven, before sticking the wallpaper, draw a line on the ceiling, focusing on which you will lay the edge wallpaper. If the width of the wallpaper is 50 cm, the line should be drawn at a distance of 50 cm from the window. If the wallpaper is wide - at a distance of 1 m from the window;
- After sticking the wallpaper until it is completely dry, refrain from opening the windows and airing the rooms, which will prevent uneven drying of the glue and rupture of the canvas at the seams.

Ceiling tiling
If the ceiling surface in the room being renovated is characterized by a height difference that is visible to the eye, and due to financial problems you cannot completely plaster the surface, give preference to polystyrene ceiling tiles, which still do not lose their popularity due to ease of installation and affordable cost.
The tiles are mounted on the ceiling using a heavy-duty adhesive that will firmly hold the coating on the ceiling surface even if there are bumps. To make the ceiling more original, experts recommend mounting the tiles diagonally.

Technological nuances of mounting ceiling tiles:
- Draw two perpendicular lines on the ceiling that connect the centers of opposite walls. To do this, divide each wall into two halves and draw lines from the points obtained to the opposite wall. As a result of such markings, a cross should be drawn on the ceiling, the middle of which is located exactly in the center of the ceiling;
- The first tile must be laid in the center so that its corners are projected exactly on the drawn lines. It is necessary to apply glue not on the entire back surface of the tile, but pointwise, only in the corners and in the middle;
- The second and subsequent tiles are laid exactly along the drawn axes, gradually moving from the center to the periphery. Two opposite corners of the tile should be strictly on the line;

- Having completely glued all the axes, proceed to fill in the spaces left empty;
- Approaching the decoration of the space near the walls, be prepared for the fact that it will have to be filled with pieces of tiles and prepare a clerical knife, which is great for cutting polystyrene;
- Having completely filled the ceiling space with tiles, install the skirting boards, then cover all the joints with putty.

Common problems leading to ceiling repairs
How not to remove the old layer of whitewash?
If the whitewash is strong enough, experts do not always recommend removing the lime layer. Diversity building materials available on the market allows it to be primed and painted. This can only be done with modern primers that can be applied directly to the lime layer. Usually produce writes about it on the packaging. One of these brands is the primer "Profix Antimel Strengthening".
Large irregularities are found on the ceiling surface. How to fix it?
- To eliminate noticeable height differences, experts recommend using the Knauf Rotband universal gypsum plaster, which is applied to the ceiling surface with a layer of no more than 5 cm. A primer layer of the specified thickness is applied several times;
- There is another option for leveling the ceiling, which involves the use of drywall. To do this, it is necessary to prepare a frame of metal profiles, which is fixed on the old ceiling and sheathed with a sheet of drywall. The resulting seams are sealed with putty, resulting in a perfectly flat surface;
- Minor height differences can be masked with a stretch ceiling, which is not only stylish and modern, but also a practical way to organize the ceiling space.

How to close the gaps between the plates?
- In order to carry out the sealing of joints on the ceiling or holes formed near the pipes, it is necessary to thoroughly clean them, and then coat the joints with a deep penetration primer;
- Fill in the gap mounting foam. If the seams are initially narrow, they must be expanded with a perforator;
- After 30 minutes, cut off the protruding pieces of foam with a knife;
- In conclusion, putty the surface with the Knauf Uniflott mortar, which is applied in 2 layers with an interval of 40 minutes.

What to do if the ceiling is flooded?
- It is possible to talk about the repair of a flooded ceiling only after its final drying. In most cases, this occurs no earlier than the third day from the date of leakage. After making sure that the ceiling is completely dry, you can begin to repair it.
- How to visually determine the location of a leak? That's not difficult. Usually a wet spot forms in this place. Brown color, which stands out strongly against the background of a white lime layer. If the stain is small, the ceiling surface does not need to be completely repaired, since the problem, in this case, can be dealt with locally. If more than a third of the ceiling surface is flooded, a complete finish is indispensable.
- The sequence of actions in case of repair after a leak is similar to any other repair, the algorithm of which was described above. It also involves the removal of the old finishing layer, leveling the surface, if necessary, with its subsequent priming. The primer in this case is recommended to be applied in two layers, while the second layer is applied after 30 minutes from the moment the first was applied;
- Then you need to putty the place of leakage. After the putty dries, make sure that there are no stains left. If they are found again, cover the problem area with matte paint. It is possible that the paint will have to be applied more than once, but remember that each subsequent layer is applied after the previous one has dried;
- After you have completed the stain, paint over the ceiling in the projection of the stain with a roller and only then apply the final coat of paint to the entire ceiling area.

Important! When painting the ceiling, keep the roller in one direction, as only in this case the painted surface will be perfectly smooth after the paint dries.
Shingles on the ceiling: what to prepare for?
Shingles represents wooden slats, nailed crosswise to the ceiling for plastering. One of the most common problems that can be encountered in old houses is that the plaster begins to fall off right on the head. How to deal with it?

There are several options:
Option number 1: Beat off the plaster with a pickaxe, and mount the frame from metal profiles, which is sheathed with drywall. The space formed between the base and the drywall sheet, if necessary, can be filled with insulation;
Option number 2: Remove the shingles and plaster the ceiling in the usual way;
Option number 3: If the collapses of the plaster are insignificant, try treating the shingles with glue (it can even be PVA) and repair the bumps with the Knauf Rotband mixture;
Option number 4: If the defects have also affected the shingles themselves, they must be eliminated by removing part of the plaster around it and patching them with a drywall patch, which is screwed with self-tapping screws flush with the ceiling. The joints are sealed with reinforcing tape and puttied.
Many apartment owners come to the decision to make repairs with their own hands. This, of course, requires a lot of effort, but the savings are more than noticeable. Most of the funds are spent on building materials and tools. If the work is done on your own, then no one needs to pay for it.
However, you should take into account the fact that not all of your dreams about a new apartment interior can be realized without using the services of professionals. Some materials sold in hardware stores require specific skills, work experience and a certain amount of skill. If you are not sure about own forces and you are doing repairs for the first time, it is better to use the “proven methods” that will be easy even for a beginner in such a difficult area as repair.
In this article, we will look at do-it-yourself ceiling finishes. Some are suitable for absolutely everyone, only people who already have experience in finishing work should pay attention to others.
Do-it-yourself ceiling made of plastic panels
The main advantage of this method is that you will not need to prepare the ceiling for decoration. It does not require long-term leveling, puttying, plastering and primer. You can even leave the wallpaper on the ceiling if it doesn't peel off.

In order to fix the plastic, you need to make a frame to which the panels will be attached. The cost of plastic is low, the speed of installing panels depends on your skills. The first 2-3 panels may take longer, but the next ones will be fastened very quickly. An excellent option in terms of the ratio of time spent and the price of materials.

Another plus plastic panels- moisture resistance. That is why the ceilings in the bathrooms, utility rooms and toilets are usually trimmed with plastic. A wide selection of colors and textures is also an advantage of this method.
The only (doubtful) disadvantage of this method is that plastic is not considered an environmentally friendly material. But different people have different opinions on this.
Bottom line: you can make a ceiling from plastic panels with your own hands not only quickly, but also inexpensively.
Do-it-yourself plastic ceiling - video
Do-it-yourself ceiling decoration with wallpaper

Wallpaper has long been used not only for wall decoration. Depending on which wallpaper you choose, repairs can turn out to be quite cheap or quite expensive.
A clear disadvantage of this method is the need for preparatory work. You will need to remove the previous ceiling covering (if any), then level the ceiling, putty it, prime it, and only then proceed with wallpapering.
When calculating funds, do not forget to include plaster, putty and primer in the estimate. Also, the preparatory stage will take time, because each layer must dry.

Perfectly flat ceilings are rare, and making them so without experience is not easy. If you paste even the most beautiful wallpaper on an uneven ceiling, then they will not look very good, since the joints, gaps and bends of the ceiling will become noticeable.
Among the advantages of this method are relatively quick and easy installation, a huge range and quick replacement if necessary (if the wallpaper fades, they can be changed to others without re-preparatory stage).

Bottom line: it is best to use wallpaper for finishing the ceiling with your own hands, if there are no defects on the surface. A fast way to fit any budget.
How to glue wallpaper on the ceiling - video
Do-it-yourself plasterboard ceiling

If the ceiling in your apartment is far from ideal, then plasterboard finishing is perfect solution. First you will need to mount the frame to which the drywall will be attached. This building material is one of the most popular on the market, since even beginners can easily work with it, and more experienced apartment owners can create real works of art from drywall. Tiered plasterboard ceilings will help visually highlight a certain area of the room or simply decorate your ceiling.

We do not recommend that you use multi-layer structures in small rooms and in rooms with low ceilings. To visually enlarge the room, use the "concave" ceilings. And ovals and radii will help to give a large room coziness.

Another plus of this material is that it can be used in damp rooms (exclusively moisture resistant drywall): bathrooms, toilets, pantries.
The only obvious drawback is the need for additional work after installation. You will need to carefully putty the entire surface to hide the joints.
Bottom line: an inexpensive, but time-consuming way to finish the ceiling with your own hands.
There is also such a finishing option as stretch ceilings. However, the process of installing a stretch ceiling is quite laborious and requires certain skills. Therefore, you are unlikely to be able to independently install a stretch ceiling with your own hands. It is better to contact a specialized company that carries out both tailoring and installation stretch ceilings. For residents of the south of Russia, we recommend buying stretch ceilings in Rostov from the RostovPotolok company, since it has established itself as a team of professionals in its field and has been on the market since 2006.
How to make a plasterboard ceiling - video
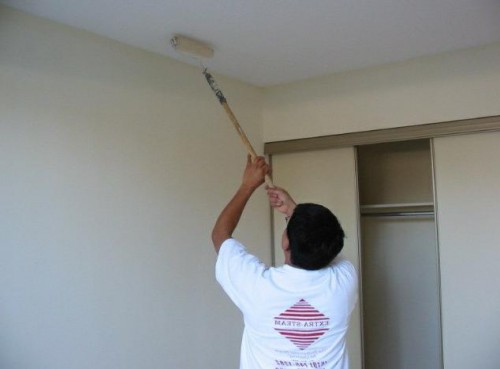
Do-it-yourself ceiling painting

This option has been used in the decoration of apartments for many years and does not lose its relevance. The main advantage of this method is its durability and reliability. You do not need to be afraid of the "flood" arranged by the neighbors from above, the ceiling, finished with paint, can easily cope with such a misfortune.
However, painting the ceiling requires the most serious preparatory stage. If you want your ceiling to look great, then it must be not only perfectly flat, but also perfectly smooth.
To do this, you will have to remove the existing coating, cover the ceiling with putty and carefully bring it to perfect smoothness with sandpaper (or a special mesh). This is a difficult job that requires not only time, but also accuracy. If you “remove the excess” in some place, then you will have to putty the ceiling again. Achieving the perfect ceiling for a non-professional will be very difficult.

The advantages of painting the ceiling with your own hands is that you are not limited in the choice of colors and textures. There are paints with different effects: matte, glossy, with mother-of-pearl, fluorescent (glow in the dark). You can even find paint that creates the effect of stretch ceilings.
Bottom line: a great way to finish the ceiling with your own hands, if you have a ready-made flat surface. Otherwise, the repair will require a lot of time, effort and money.
How to paint the ceiling with your own hands - video
The final stage of the renovation of the apartment - finishing work is carried out from top to bottom, unless it is a spot repair of the cladding. Repair of the ceiling in the apartment is carried out first, not because it is the most visible of the enclosing structures, but due to the inevitable contamination in the process of finishing all the bases below. However, the finishing of the ceiling base often becomes unusable before wall and floor cladding - the ceiling, although it is not subject to abrasive effects, as flooring, but on the other hand, it vividly shows on its surface the consequences of other negative factors - deformations and vibrations of the building, leaks from above, pollution. Therefore, the repair of ceilings in an apartment is sometimes carried out more often than the finishing of other building envelopes, that is, not as part of a large-scale renovation of the interior of the housing, but as an operation that is possible for independent execution - when protecting the wall and floor cladding from damage. Accordingly, the need to frequently perform this type of work makes it necessary to repair the ceiling with your own hands in order to save money.
Consider how to repair the ceiling in the most common situations and the most accessible ways.
Types of ceiling repair
There are many types of ceiling finishes, and do-it-yourself repairs in an apartment can involve both restoring the existing finishes and cladding using a different technology.
When planning to repair the ceiling with your own hands, you need to take into account several factors: the appropriateness of using the chosen repair technology in specific conditions, the budget for the operation, and the level of your practical skills matching the finishing method. If quality material is added to the optimal combination of these circumstances, then success is guaranteed.

We list the most common types of finishing:
- whitewashing or painting;
- finishing with polyurethane or expanded polystyrene tiles;
- pasting with wallpaper or self-adhesive films;
- siding lining;
- stretch ceiling;
- finishing ceramic tiles;
- dropped ceilings.

Most of the listed technologies, except for ceramic finishing, can be performed both directly on the enclosing structure, and on a shell mounted on a frame. That is, the repair of ceiling bases is carried out both without the use of a frame and in a frame way - the choice of technology depends on the operating conditions, the planned level of manufacturability of the finish, the professional skills of the performer and the budget.
Requirements for finishing ceiling bases
Depending on the operating conditions, the requirements for finishing ceilings of different functional rooms may vary, but there are a number of general properties that the lining of ceiling surfaces in an apartment or private house should have:
- security;
- environmental friendliness;
- sufficient durability.

Naturally, in addition to the listed characteristics, the ceiling coating must have heat, hydro, steam and sound insulation properties, resistance to ultraviolet radiation and bacteria, aesthetics and ease of daily maintenance, but the necessary degree of compliance with these requirements depends on the specific operating conditions.
Preparation of ceiling surfaces for various repair methods
Ceiling repair technologies require appropriate preparation of the base. Not only the aesthetics of the final result, but also the functionality of the finish depends on the quality of the preparatory work, so we will consider methods for preparing the surface with reference to a specific cladding method. Let's start with the work that needs to be done on the concrete ceiling base before any repairs.
Revision and cleaning of the ceiling
The ceiling plane is tapped with a hammer to identify areas with peeling plaster and putty.

Removing a layer of emulsion paint
If no defective plastered areas are found, and the planned finish is whitewashing or painting, then they begin to remove the old paint - as a rule, this is a water-based composition, since concrete in residential premises is not covered with oil or enamel.
The ceiling is moistened several times with water to soak the paint to a state where it can be easily removed in layers with a spatula. On the ceiling, wetting is easier to do with an airbrush; in the absence of this device, a paint roller is used, preferably a foam rubber one.

Removing worn plaster
When revealing plaster layers that have lost adhesion to the base, defective coatings are cut down with a hammer, chisel and spatula. If the plaster remaining on the concrete crumbles during scraping, it must also be removed, even if it is planned to install stretch ceilings - a fallen fragment of the old finish, if it does not damage the decorative shell, will be noticeable on it from the outside. Ideally, it is better to remove all old layers from the floor slabs so that the new leveling coating is uniform in all areas of application.

If there is bare reinforcement under the exfoliated solution, then it is cleaned of corrosion to bare metal and covered with two layers of a solution of iron or minium lead in drying oil.
Important! It is not allowed to cut bare reinforcement - it is in a prestressed state, and the removal of even one section will lead to a change in the stress balance in the slab.
Cleaning joints between slabs and cutting cracks
After dismantling the plaster, the quality of the sealing of the longitudinal joints of the slabs and the joints of the walls with the ceiling is examined. As a rule, old filling materials have to be removed to the entire available depth of the seam - this is conveniently done using a narrow and long chisel or perforator.
Cracks in the concrete of the slabs are examined for orientation and prospects for further opening. Longitudinal and diagonal cracks are not dangerous, it is better to show transverse cracks to the experts of the construction department of the local government. To study the dynamics of damage, control beacons made of paper or gypsum mixture are installed on them, indicating the date of installation.

Concrete base repair
After all worn coatings have been removed from the floor slabs, they begin to repair and seal the ceiling base.
Sealing joints between boards
If the depth of the cracks exceeds 3 cm, then it is better to seal them with mounting foam - an elastic and sealing compound that perfectly replaces cement mixtures in this situation.
To do this, the joints are blown with a jet of air or cleaned of dust with a vacuum cleaner, after which their inner surfaces are moistened with water - the adhesion of the mounting foam to wet surfaces is higher.
To seal the joints of the plates, it is desirable to use a proven type of foam, which after solidification forms a dense homogeneous fine-meshed mass. The guide nozzle of the foam can is inserted into the slot until it stops and by pressing the dispenser, the seam is filled to 2/3 of the depth.

Important! The cylinder must be upside down during operation, otherwise the gas will come out of it without foaming.
After a day, excess foam is removed with a clerical knife. If a frame is planned over the concrete base or a frameless installation of heat-sound insulation, then the foam is cut flush with the surface. If the surface is to be leveled with mixtures, then the excess is cut in such a way that 1.5-2.0 cm remains on top of the cut to the level of the slab - for applying the cement mixture.

If the width and depth of the gaps between the walls and the ceiling allow, they can also be sealed with mounting foam. If the cracks are narrow, they are filled with sealant using a mounting syringe or moisture resistant tile adhesive based on cement.
Filling holes in the ceiling
If, during the dismantling of the old plaster, areas were formed with spot peeling of the concrete of the floor slabs, then they are primed with a latex-based compound and, after drying, the following actions are performed:

Waterproofing concrete ceiling
Anyone who has ever repaired a ceiling after a leak, at the end of all the work described above, will definitely perform waterproofing of the ceiling base. This can be done most effectively with the help of deep penetration waterproofing compounds, for example, "Penetron", "VodoStop" or "Lakhta", which, when they enter defective concrete cavities, seal them and, upon contact with water, initiate crystal formation in their mass with the growth of crystals towards the inflow moisture.

After complete curing and drying of the repair cement compositions, the surface of the ceiling is abundantly moistened with water (until absorption stops) and, using a brush, roller or spatula, is covered with two layers of penetrating waterproofing, which is prepared by mixing the dry mixture with water according to the instructions for use or is sold ready for use. After the insulating coating has dried, the base is suitable for applying any other leveling or insulating compounds.

Effective waterproofing of the ceiling can be done in a more budgetary way - by applying a bitumen-based composition, but the bitumen in the composition of the coating imposes restrictions on the subsequent use of leveling mixtures - an additional base of drywall or expanded polystyrene will have to be mounted on top of such waterproofing.

In the production of waterproofing of the ceiling base, operations are completed that are mandatory before performing any finishing of the concrete ceiling surface. Subsequent types of work depend on the operating conditions of the premises and the choice of method decorative design ceiling.
Methods for basic leveling of concrete ceilings
The order in which the ceiling base alignment procedure is performed depends on a number of factors, including the planned functionality of the ceiling finish. For example, if you need to perform thermal insulation, then you should decide which insulation will be used. Installation on the ceiling of rigid types of foam plastic is possible in a frameless way, but the concrete base should not have height differences of more than 5 mm - the foam sheets will repeat the surface profile defects, and the finish will have to be done after unwanted additional alignment, which will significantly weight it.
If, however, a soft material (one of the types of wool) is chosen as a heater, then in most cases it will be necessary to mount a frame with an additional outer shell to lay it. But at the same time, the frame method of insulation eliminates the need to perform further - an additional base mounted on the frame in a horizontal plane will hide defects in the concrete surface.

Important! Stone (basalt) wool is produced in varying degrees of hardness, and its more rigid varieties still allow the installation of insulation in a frameless manner, followed by plastering over a reinforcing mesh.
If there is no need to insulate and soundproof the ceiling (if this is done effectively enough on the floors of the apartments), you can start leveling the ceiling base in one of the following ways.
Plastering a concrete ceiling
Plaster - time-tested and relatively budget way leveling concrete and brick bases for finishing. If the ceiling slabs in the room have significant differences in height (up to 5 cm), then one of the ways to bring them to a common horizontal level is plastering with a cement-sand mortar.

Without the skills to perform this type of work, especially the finishing of ceilings, you should not take on its independent implementation, especially on a large area. With your own hands, you can throw a cement-sand mortar and, after setting it, wipe small potholes in the plaster over the area. Plastering of the entire surface of the ceiling must be entrusted to professionals, having previously completed the waterproofing of the concrete base with a penetrating mixture. At the same time, it is useful to know the plastering technology in order to control the quality of this type of finish:

Important! The curing of the completed plaster coating should take place without drafts and additional heat sources (heaters); within 5 days, starting from the third, the plastered surface must be moistened.

Leveling the ceiling with leveling compounds
This method differs from plastering with material and execution technology - instead of a cement-sand mortar, cement-based dry leveling mixtures are used, which, after mixing with water, are applied to the concrete surface with a spatula.

The advantage of the method lies in the ease of preparation of the composition, which does not require compliance with the proportions of the components, sieving and has increased adhesion. Prepared according to the instructions on the package, the mixture is easily applied to the ceiling with a spatula and does not break down from the base as easily as it happens with a cement-sand mortar. Leveling cement mixtures are produced in many varieties that differ in characteristics or their numerical values - the degree of elasticity and tensile strength, waterproofing properties, the adhesive strength of the "live mortar" and its "survivability time". A wide range of these materials allows you to choose a composition that meets specific operating conditions, and save on the purchase of a universal mixture, the price of which is always higher precisely because of its versatility.

Cement-based mixtures level ceilings with plate differences up to 3 cm in height. If it is necessary to apply a layer with a thickness close to the maximum, layer-by-layer leveling is carried out, waiting for the previous layer to completely cure.
As for surface preparation, the concrete base for the finished mixture does not need a notch - only priming.
Plain plasterboard ceiling
If the ceilings in the apartment have significant differences, but at the same time are quite high (3 m or more), then it is possible to facilitate the process of their basic alignment by mounting an additional base of drywall sheets (gypsum plasterboard) on them. GKL is laid on a frame made of wooden bars or a special steel profile with mounting hardware, which is attached to the walls and concrete ceiling.
Frame installation
The manufacture of the frame begins with the marking on the ceiling of its structure and the calculation of the need for materials. There are several ways to arrange the frame, depending on the size and thickness. standard sheet GKL. Based on the most common drywall size of 120x250 cm, the frame structure is marked with a transverse step of 60 and a longitudinal step of 60 to 80 cm.

Then, along the perimeter of the walls under the ceiling, a starting line is applied - a mark along which the frame will be mounted. The distance from the ceiling to the starting line should take into account the functionality of the new ceiling covering - with the planned implementation of heat and noise insulation, and even with additional protection of the hygroscopic insulation from steam, this value should take into account the thickness of the insulating materials. If the purpose of the plasterboard ceiling being installed is only leveling, then this distance will correspond approximately to the cross section of the steel profile used.
On the walls along the starting line, ud-profiles are fastened with self-tapping screws, jumpers from the cd-profile are mounted perpendicularly to them, which are additionally fixed on the ceiling with hangers on their span.

If execution is planned, then the installation of the frame is carried out on a vibration suspension - special suspensions and gaskets that prevent the transmission of vibration of the structure to be mounted from the concrete base.
The heat, sound and vapor barrier materials planned for installation are placed between the frame and the ceiling in a certain sequence - the vapor barrier should be located on both sides of the insulation, and in the case of foil internal vapor barrier - foil towards the room.
Drywall installation
After calculating the consumption of GKL (room area plus 15%), the material is purchased, and they begin to lay it on the frame using metal screws (if the frame is made of steel profile). Sheets of drywall are cut with a clerical knife by making an incision on one of the sides and bending the plasterboard in the opposite direction, followed by cutting the opposite shell.

From the joining edges of the GKL, before installation, chamfer with a knife to ensure that the seam can be filled with a gypsum mixture to the full depth. The joints of the sheets are arranged so that they are located along the lintels of the frame, otherwise the constant appearance of cracks is inevitable on the finish along the seams.

In this case, the sheets are laid "in a row", or with an offset, so that the joint of the two sheets is not a continuation of the seam of two adjacent gypsum boards. Self-tapping screws along the seams are placed in a checkerboard pattern, maintaining a step within 12-17 cm and sinking their caps flush with the drywall surface.

After the installation of the GKL is completed, the self-tapping screws are puttyed and the joints of the sheets are filled with a special compound from Knauf, while the joints are glued with a reinforcing serpentine tape 5 cm wide.
Common finishing technologies
After completing the work on the basic alignment of the ceiling or the installation of the GKL, they proceed to the finishing, the options for which also exist. Let's start with the classic - whitewashing, but it makes no sense to consider self-preparation of a solution from lime and chalk - there is a wide range of water-based compositions for sale in a wide price range.
Whitewashing a concrete ceiling with water-based paint
If the base alignment concrete slabs made by the method of plastering with a cement-sand mortar or a ready-made cement-based mixture, then the final leveling of the surface with gypsum putty is performed - depending on the qualifications of the performer and the quality of the basic leveling, this will require the application of one to three layers. The surface is pre-primed in one layer with a latex-based composition, and each subsequent layer of putty is applied after the previous one has dried. Having achieved evenness of the base, it is polished with sandpaper, after which the ceiling is cleaned of dust with a vacuum cleaner and primed again.

Painting is done manually with a paint roller, then painting hard-to-reach areas with a brush. Usually, the instructions for use provide for diluting the paint with water in an amount of 10% to obtain the optimal consistency. Compositions for outdoor use are also suitable for painting ceilings, their grain size is slightly higher, but at the same time they better tolerate washing with water if necessary.
If desired, a color tint can be added to the white emulsion, but the amount of paint after that should be enough for two layers - it will not work to get the same tone of the composition a second time.

Painting is carried out in two layers (with a low quality of the emulsion - more), which are applied in perpendicular directions.
Important! Painting is carried out in the direction from the window towards the opposite wall, and the last coat should be applied along this direction.

After drying, which should take place without drafts, decorative polyurethane foam ceiling skirting boards are installed, the size and profile of which are selected in accordance with the dimensions and style of the room.
If you use skirting boards cast from gypsum, then their installation is carried out at the stage of final leveling of the ceiling by installing gypsum putty on the mortar, since higher requirements are imposed on the strength of the fastening of these elements.
Foam baseboards are attached to PVA paste glue or colorless silicone sealant, after which the joints are sealed with finishing putty. Installed skirting boards can be painted to match the ceiling or, conversely, made spectacularly contrasting. 
Whitewashing the ceiling with water-based paint from GKL
The technology for painting a drywall base is identical to finishing a leveled concrete ceiling. However, the hygroscopicity of gypsum should be taken into account even in the moisture-resistant version of the GKL, therefore it is better to prime the drywall with a latex composition in 2 layers - in the future this will allow you to safely clean the finish using water.
Wallpapering ceilings
This type of finishing is popular and can be performed both on a concrete base and on a ceiling lined with plasterboard.
The choice of wallpaper material should be made precisely from the segment of finishing products for ceilings, since the width of the ceiling wallpaper is greater than that of the wall wallpaper (to reduce the number of joints), and their thickness is less (in order to reduce weight). The most common non-woven wallpaper.
Important! If the final leveling with gypsum putty is defective, it is advisable to choose ceiling wallpapers with an embossed texture, which will hide minor surface imperfections.

Wallpapering on the ceiling is done by two people, cutting the material into strips of the required length and applying glue to one or both surfaces, depending on the wallpaper material and the type of glue.
Wallpaper strips are glued end-to-end and placed along the rays of light from the light source - the transverse layout will show the joints of the material.
Gluing is made on a special wallpaper glue, which does not leave stains from accidental contamination after drying.
Drying of pasted wallpaper should also take place without drafts and additional heating devices. If the wallpaper material is white, then it can be dyed, moreover, two or three times during operation, to improve the aesthetics of the finish.
After the finish has dried, the ceiling plinths made of polyurethane foam are mounted on silicone sealant.

Ceiling decoration with decorative polystyrene tiles
If the final alignment of the ceiling base is made with minor defects that the paint will not hide, and there is no time to correct these flaws, decorative polystyrene tiles will help to solve the problem, which will simultaneously act as a heat-insulating coating. It can be glued both on a concrete and on a GKL base.

There are a lot of varieties of this material on the market, they differ in density, surface texture, color and degree of decorativeness, on which the price of the material generally depends, as a rule, affordable to a wide range of consumers.

Other ways to finish ceilings
There are many other ways to repair the ceiling in an apartment on your own or with the involvement of professionals, and the list of them is constantly growing with the development of technology. These are stretch and suspended ceilings, siding and mosaic finishing, upholstery with finishing fabrics and decoration. plaster molding. The choice of method should be thoughtful and rational.

There is a nuance, which is also desirable to take into account - the more money invested in the decoration, the more difficult it is to part with it, and in a room any interior gets bored or worn out over time, not to mention the rapidly changing fashion.
Conclusion
When repairing a ceiling, one should not forget that this is primarily a supporting structure, the strength characteristics of which depend not only on the quality of the product, but also on ongoing care and maintenance. Therefore, redecorating the ceiling finish to mask the wear and tear of structures is not reasonable and dangerous, besides, on a restored concrete base, the finish is more durable.
The main gist of the article:
- Substrate preparation is an integral part of ceiling repair.
- Repair of a ceiling that has lost its aesthetics should be carried out after the restoration of concrete structures.
- Hiding serious defects in floor slabs under decorative trim is dangerous.
- High-quality basic repair of the base is the key to the durability of the finish.
- Choice of method decorative finishes ceiling of the many existing technologies must be thought out.
- The correct repair algorithm is a necessary condition for the quality of the finish.
Do-it-yourself ceiling repair is an important stage in the improvement of an apartment or a private house. The overall impression of the interior of the room as a whole depends on how the ceiling will look.
That is why its decoration is given the most attention.
Work can be done independently, but with maximum accuracy and knowledge of the matter. Modern materials and finishing methods can provide attractiveness and originality.
The final quality of the ceiling finish after repair depends on the thoroughness of the preparation of the base surface and the type of coating chosen. IN living quarters You can equip several types of ceilings:
- Cover and adhesive options. The first type includes painting and whitewashing, as well as decorative plaster and liquid wallpaper. The second option is implemented by pasting with wallpaper, plastic tiles and other facing materials. These ceilings require particularly careful surface preparation. The base must be perfectly even and smooth. Even minor defects are not allowed.
- Hemming and hanging structures. In these cases, another ceiling is formed under the ceiling base. It is attached to the frame (cladding) and can be made of sheet and tile materials, boards, panels, cassettes, slats, lining, etc. This type "eats" the height of the room, but does not require careful leveling of the surface. This is especially important in the presence of hard-to-level ceilings.
- Stretch design. The finishing ceiling is formed by stretching the canvas (textile or film), and the supporting frame is located on the walls. This design also does not require careful leveling of the surface.
In general, the preparatory stage of the ceiling repair includes the following activities: clearing the site for work; cleaning the ceiling from dirt and dust; removal of the old coating; elimination of defects and repair of cracks; surface leveling; primer.
Particular attention is paid to the removal of grease stains, mold and fungi. The affected areas of the overlap must be treated with an antiseptic. wooden elements floors are impregnated with anti-rotten compounds.

Removal of the old coating
- Whitewash. Chalk or lime coating is thoroughly washed off with water. To do this, using a paint roller with a foam coat or a spray gun, the surface is abundantly wetted, and then the whitewash is cleaned off with a sharp spatula. Wallpaper is removed in the same way.
- Painting. Depending on the adhesion strength of the old paint, different methods are used. The simplest is similar to the previous option - double, abundant moistening with an interval of 15-20 minutes and removing the swollen paint with a hard, sharp spatula. If the paint does not lend itself, then a chemical method is used. It is best to use special flushing compositions for water-based or alkyd paint. The dissolution of especially durable coatings is provided by such aggressive liquids: hydrochloric acid solution (2-3%); a mixture of lime with drying oil (20: 1), brought to the desired consistency with water; thick water-lime solution with denatured alcohol (40-50 ml / l).
- Tiled flooring. It is removed with a hard spatula. Residues of glue on the surface of the ceiling are removed mechanically using emery cloth or sanding mesh.
Suspended, hemmed and tension structures are removed by systematic dismantling of the coating and sheathing (framework). Care must be taken when removing the dowels so as not to increase the size of the damage.

How is the ceiling leveled?
If it is necessary to ensure a perfectly flat ceiling surface for finishing, leveling is carried out in several stages:
- Closing and elimination of defects. All convex irregularities (sagging) are removed with a spatula, chisel, chisel or emery cloth. Cracks are first slightly expanded with a spatula, and then filled with putty. Particular attention is paid to the junction of floor slabs. Here, if there is a noticeable gap, a mounting grid or sickle tape should be used.
- Primer. It provides initial leveling and improves the adhesion of coating materials to concrete. A ready-made deep penetration primer is usually used. The solution is applied in an even, thin layer to the entire surface of the ceiling using a paint roller, brush or wide spatula. One of the best materials the primer Betonokontakt is considered.
- Putty. If the ceiling has a slight degree of unevenness, and a layer 2-3 cm thick is sufficient to level the surface, then a putty mixture is usually used. It is recommended to use purchased formulations in the form of a ready-to-use putty or dry mix. Materials such as rough-type filler Isogypsum and fine mixture Satengypsum have proven themselves well. The solution is applied to the surface of the ceiling with a spatula 10-15 cm wide. Narrow spatulas (25 and 50 mm) are used in the corners and at the junction with the walls. With a layer thickness of up to 1 cm, one layer can be applied. A thicker putty is provided in 2 passes, with a coarse type composition being applied first, and then a fine putty.
- Plaster. It is most often carried out if it is necessary to apply a leveling layer 3-5 cm thick. It is recommended to use ready-made, dry mixes based on gypsum, for example, Rotband. Plastering is done with the installation of beacons that form a flat surface. They are aligned with the building level. The solution is applied to the ceiling between the beacons and leveled by the rule. After the work is completed, the beacons are removed, and the rustications are sealed with the same plaster mortar.
- Leveling and grinding the surface. After the plaster or putty has dried, the surface is processed with a sanding mesh or grinder. It is necessary to eliminate all smears and other irregularities. It is possible to provide alignment with a fine-grained sandpaper.
- Finish primer. It is not a mandatory element of the ceiling finish, but will significantly improve the adhesion of the paint to the ceiling. The primer is applied in a thin layer using a paint roller.
After carrying out all the above measures, it is necessary to allow time for the complete curing of the coating. After 2-3 days, you can start finishing the ceiling.
Tool for the job
To carry out preparatory work with your own hands, you should take care of such a tool in advance:
- perforator;
- electric drill;
- screwdriver;
- Bulgarian;
- grinder or mesh;
- spatulas 25, 50, 100 and 150 mm wide;
- Master OK;
- rule;
- paint roller;
- paint brush;
- screwdriver;
- chisel;
- chisel.
It is necessary to prepare containers for preparing (mixing) solutions and delivering them to the ceiling, convenient for work. Measurements and quality control are provided with a tape measure, a metal ruler, a building level. Best fit. Do not forget about protective measures - goggles, gloves, a respirator when grinding.
Finishing options
If the surface of the ceiling, after appropriate preparation, has become perfectly flat, then you can proceed to a fine finish to give an attractive appearance. Most often it is provided in the following ways:
- Painting. This is the most common method of refining the ceiling in all rooms, incl. with high humidity. The best option- water-based paint. It is applied to the ceiling with a paint roller in stripes with an overlap of 10-15 cm. It is recommended to paint in 2 layers. The first layer is applied in stripes parallel to the window, and the second layer is applied along the light flux. Painting begins from the corner farthest from the door. A brush is used at the junction of walls and ceiling and in the corners. Most often, the ceiling is painted in White color, but by adding the right pigment, you can provide any other shade.
- Whitewash. It can be produced with chalk or lime mortar with the addition of an adhesive composition. The highest quality whitewashing is provided by a spray gun. You can use a vacuum cleaner with a compression function and appropriate hose attachments.
- Pasting with wallpaper or fabric. The process of pasting the ceiling is similar to the decoration of the walls, only the complexity is increased due to the need to hold the wallpaper. Wallpaper glue is applied with a roller on the ceiling surface and wallpaper. Stripes should be applied towards the window so that the joints are less noticeable. With the help of a roller smoothing the wallpaper and removing air is ensured. It is important to accurately join the drawing, because. any discrepancy will be conspicuous.
- Application of ceiling tiles. When installing it, it is important to correctly markup. First, the center of the ceiling is marked, and lines for placing elements are drawn from it. Begin gluing tiles from the center of the ceiling. Glue is applied in the middle of the tile, in the corners and in dots along its edge. The seams between the elements are filled with mounting foam.
The considered adhesive and cover methods are the easiest to repair the ceiling with your own hands. They provide an attractive appearance and harmonize well with various design solutions.
What are suspended ceilings?
Shelving and suspended structures have a number of advantages: perfect alignment of any ceilings, unlimited design possibilities, the ability to provide additional heat and sound insulation. Their use is limited by the increased cost, lowering the height of the room, and increasing the complexity of installation.
The most popular options are:
- Wood trim. The most commonly used lining, which is fastened with self-tapping screws to a crate made of wooden beam. You can clad the ceiling with boards. All wooden parts must be impregnated with an anti-rot compound and flame retardants to increase fire safety. The finish is provided with a varnish that emphasizes the wood structure.
- Drywall. Drywall sheets are most often used to level ceilings with significant defects that are difficult to hide with plaster. They are mounted on the initial and guide metal profile, as well as suspensions mounted on the ceiling. The final finish is made by putty and primer.
- MDF and plastic panels. This coating has an important advantage - high water resistance, which allows it to be used in bathrooms, kitchens and bathrooms.
- Rack ceiling. For its manufacture, metal panels in the form of rails are used, which are fixed to the crate. Of particular interest are aluminum panels with a silver and gold tint, as well as chrome rails.
- Armstrong ceiling. This modern version false ceiling mounted from mineral tiles. They can be plain, colored or patterned.
These ceilings may have different designs, but they have a similar installation principle. A crate of metal (aluminum) profiles or wooden beams is mounted on the ceiling.
Its fastening is provided with dowels. To do this, first, using a perforator or an electric drill, holes are made into which they are driven plastic dowel. The elements of the crate are fixed with screws. Next, the frame is lined with the desired material.
Is it possible to make stretch ceilings yourself?
Stretch ceilings are the most difficult to install with your own hands. However, they have an attractive appearance and are able to perform all the functions of a false ceiling. At the same time, they eat up the height of the room less. They are based on fabric or PVC fabric.
To stretch it on the wall, stepping back 10-12 cm from the ceiling, a supporting frame made of a metal profile is fixed. The ends of the canvas are inserted into the corners of the frame and stretched. Then, its edges are pushed into the middle part of the frame and the final tension and alignment is performed.
Plastic (PVC) film is stretched with preheating. For this, they are used heat guns. When cooled, the material shrinks, which ensures its complete straightening.

Repair of the ceiling in a residential area can be done by hand. To do this, it is necessary to carefully carry out preliminary work on leveling the surface. External finishing to give the desired appearance can be done in different ways. Which finish option to choose depends on the quality of the ceiling base, the size of the ceiling and financial capabilities.
At the entrance to the room, the ceiling is one of the first to fall into the field of view of any person. It is from the ceiling, its type and condition that the impression of the interior as a whole will depend. Therefore, it is so important to maintain the ceiling in good condition, to monitor its cleanliness and integrity. Whether we like it or not, but in order for the interior to look great, sometimes it is necessary to carry out a complete or partial repair of the ceilings. To do this, you can hire craftsmen, or you can do everything yourself, especially since anyone who knows how to handle a tool can do a ceiling repair with their own hands.
I would like to immediately note that if you are not confident in your abilities, it is still better to turn to professionals. Ceiling repair prices depend primarily on the complexity of the work. So the cheapest are priming and insulation. For their implementation, they may request about 1 USD. for 1 m2. The most expensive are puttying, plastering and applying liquid wallpaper. The price for these types of work ranges from 7 to 10 USD. for 1 m2. All other ceiling repairs usually cost between $3 and $6. for 1 m2.
Types of ceilings

A variety of interior styles, building materials and creative design ideas reflected on the ceiling. Today in the premises you can see different kinds ceilings, from the simplest to complex multi-tiered with many lighting fixtures. Among the most common types of ceilings are the following:
- painted ceiling;
- whitewashed ceiling;
- glued ceiling;
- suspended ceiling;
- stretch ceiling.
Each of these types of ceilings has its own advantages and disadvantages, design features, which affect the cost of repairing the ceiling and labor costs. It should also be noted that it is possible to carry out a partial or complete repair of any type of ceiling. The amount of work to be done will depend on the type of repair that needs to be done.
As with any other construction work, ceiling repair begins with preparation. At this stage, it is necessary to clean the ceiling from the old coating, prime and level the surface, and also repair the joints and seams on the ceiling. The thoroughness of the preparation depends on what type of ceiling you plan to do. For example, the surface of the ceiling for whitewashing or wallpaper must be made as even as possible, while such a flat surface is not critical for suspended or stretch ceilings.
Ceiling cleaning

If the repair is carried out in a new room immediately after the builders, then you can skip such a stage of work as removing the old coating, and go straight to repairing the joints and priming. Otherwise, we start by cleaning the surface of the ceiling.
Most often ceilings whitened, plastered with lime mortar or simply wallpapered. Clear the ceiling of these finishing materials won't be too difficult. To do this, you need to take a regular paint roller and a bar under it. The roller must be moistened warm water and wring it out a little so that no water drips from it and it remains sufficiently wet. After that, we roll part of the ceiling, at first we press the roller not very hard, but with each new roll we increase the pressure. As soon as we notice that the roller is almost dry, we again dip it into the water and repeat the whole procedure on a new section of the ceiling. After wetting a part of the ceiling measuring a couple of square meters, we take a spatula and begin to clean off the whitewash, wallpaper or plaster to a concrete base or putty.
Important! Having found a layer of old putty under the finish, we check it for strength with a spatula. If it is firmly held on the surface of the ceiling, then leave it in place. If the putty begins to crumble and peel off, then remove it and then apply a new one.

Sometimes ceilings stained with oil or water-based paint. Removing paint is a very labor intensive process. This can be done in two ways: mechanical and chemical. The first option involves cleaning the paint with a spatula or sandpaper. It's quite long and dusty. The second removal option will require a special wash, which can be purchased at the store. After impregnation with a remover, the paint easily separates from the surface, the process of softening the paint can take up to 12 hours.
If any decorative elements or polystyrene tiles, they can be removed with a spatula with a hard metal blade. It may be that some glue remains on the ceiling. It will take some effort to remove it, but the result should be a clean surface.
Fulfilling overhaul ceiling with any suspended or tensile structure, you have to completely disassemble it and remove it to get to the ceiling. There are no special recommendations here, except to be extremely careful and make every effort not to damage the elements of a suspended or stretch ceiling.
Ceiling primer

After cleaning the ceiling from the finish coating and decorative elements proceed to priming the surface. It begins with checking the joints and seams on the ceiling. They must be filled with plaster or gypsum mortar, which is firmly and securely held there. If the mortar at the joints partially crumbles or falls off from a light blow on it, then we clean the joints and refill them with a mortar based on gypsum and cement or a mortar from special dry building mixtures with the addition of fiber. Having filled the seams, we compare the protruding solution with the plane of the ceiling and let it dry completely, only after that we proceed to priming the ceiling for further work. We apply a deep penetration primer to the surface to achieve better adhesion and strengthen the base. To apply the primer, you can use a roller or brush and take care to protect your hands and eyes from the primer. After the primer dries, we proceed to further work.
Puttying and plastering
The performance of these works is a strict necessity, since the surface of the concrete base is far from being perfectly flat. This is especially critical if ceilings are being repaired with wallpaper or it is planned to be painted or whitewashed. Which of these two surface leveling methods to choose depends on the personal preferences and skills of the master. But there are a number of features that can tip the scales in one direction or another. So plaster reduces the useful height of the room by 2 - 3 cm and has a rather large mass. And putty gives a fairly large shrinkage and requires the application of several layers, which affects the time and complexity of this type of work. The advantage of plastering the ceiling is the ease of work and the convenience of leveling the surface. At the same time, putty allows you to achieve a perfectly flat surface with a minimum layer thickness and low weight.
Plaster

If you decide to plaster the ceiling, then this will require: a primer "Betonokontakt", special dry building mixes, for example, "Rotband" and plaster beacons with fasteners. From the tool you will need: 1.5 m rule, drill or puncher and level. The work itself is carried out after cleaning the ceiling surface as follows:
- stepping back from the wall 15 - 20 cm, put a mark for the guide, put the second mark for the guide with the same indent at the other end of the room. With the help of a paint thread, we outline a line between these two marks;
- we retreat 1.25 m from the first line and repeat the marking algorithm for the guide;
- when the markup is applied, we drill holes for fasteners;
- we fix the guides to the ceiling with self-tapping screws. With the help of the level, we make sure that the guides are strictly along the horizon and in the same plane. If necessary, unscrew or fasten the screws, thereby adjusting the height;
- as soon as the guides are set, we fix them with a thick solution of the plaster mixture and let it dry completely;
- it remains to fill the gaps between the guides with a plaster mixture and level them along the guides using a metal rule.
The very process of plastering the ceiling is very similar to plastering the walls, the only difficulty is that the surface is non-vertical and is located above the head. After complete drying, a smooth surface is obtained, on which putty and top coat can be applied.
Ceiling Repair: Video - Ceiling Plastering Lesson
Putty

Puttying the ceiling also allows you to level its surface, but this may take a little longer than plaster. In addition, the work itself is quite difficult to perform if there is no skill in handling the tool. The following materials will be required for work: rough putty "Izogips" and fine "Satengips", primer "Betonokontakt", paint mesh. Of the tools you will need: wide and narrow spatulas, a container for kneading. Puttying the ceiling is as follows:
- if after cleaning and priming the surface there are large potholes or drops, then first of all we apply several layers of coarse putty. It has the least shrinkage, and its layer thickness can reach 5 cm. To level the plane of the ceiling and remove excess putty, we use a wide spatula or a rule;
- on top of the still raw coarse putty, we lay the paint grid. Such simple reinforcement will give strength to the ceiling. We draw a wide spatula along the grid with a little pressure so that it is pressed into the putty layer;
- if the surface of the ceiling is relatively flat, then you can immediately use the Satengips finishing putty. It is applied to the surface of the ceiling with a wide spatula, and the excess is removed with it. For reliability, it can be reinforced with a paint mesh;
- after the base layer of putty is completely dry, you can proceed to the finishing putty and bring it to the ideal.
To get a perfectly flat surface, we use special graters with sandpaper. Once you have achieved a flat surface, you can begin to apply the finishing coating of the ceiling.
Ceiling repair: video - ceiling putty lesson
Another option for creating a flat ceiling surface is to repair the ceiling with drywall panels. The entire surface can simply be sheathed with them, and then finally leveled with putty. Such careful leveling of the ceiling surface is required for its further painting, whitewashing or pasting with various materials.
This finishing option is perhaps the simplest due to the availability of materials and ease of use. In addition, the painted ceiling in the kitchen or bathroom is much more practical than all other ways to finish the ceiling in these rooms. As previously noted, an essential feature of painting the ceiling is high-quality surface preparation. It must be perfectly flat, otherwise the appearance of the ceiling will be spoiled.
Painting repair of ceilings: photo - example
For painting, oil paints or water-based paints are usually used. The preparation of the paint comes down to thorough mixing and bringing it to the optimum density. Then you can start painting. From the tool you will need a roller on a long rod and a brush. The painting process itself is quite simple. We start painting from the edges, which we paint with a brush. The rest of the area is painted with a roller.
Sometimes a cosmetic or partial repair of a painted ceiling is performed. First, the surface is inspected for loose or swollen paint, if there are any, they are cleaned with a spatula. Then they paint over again, but this option is only a half measure and will require a full repair in the future. If the paint holds firmly everywhere, then a new coat of paint is applied to the entire surface and left to dry.

Whitewashing the ceiling is considered one of the most common. A whitewashed ceiling suits almost any room interior, but compared to painting, whitewashing a ceiling is somewhat more difficult. The material for whitewashing is quicklime, which is diluted with water, filtered through a sieve and then applied to the ceiling. To do this, use a roller, brush, spray gun or vacuum cleaner. If you use a roller and brush, the application of lime will not be uniform enough, and with the help of technology you can achieve better results. Unfortunately, a whitewashed ceiling is not as durable as a painted one. It is required once a year to update the whitewash or completely clean and whiten again. As well as for painting, it is necessary to prepare the surface with special care. The indisputable advantage of whitewashing is its price and availability of the material.
Ceiling pasting
Not so long ago, a ceiling covered with wallpaper was at the top of popularity. Later, in addition to the wallpaper, a special ceiling tiles. And today, repairing the ceiling with polystyrene tiles is one of the most popular finishing options. As well as for painting and whitewashing, the base of the ceiling for wallpaper and slabs must be made perfectly even.
Wallpapering the ceiling

Wallpapering the ceiling a somewhat complicated process, since it will require the coordination of at least two people. Yes, and holding the wallpaper over your head is not an easy task. We need wallpaper glue and wallpaper for the entire ceiling area. From the tool: wallpaper knife, roller, containers for glue and rags. Wallpaper is glued as follows:
- having completed all the work on surface preparation, we prepare the glue according to the instructions;
- we cut off several canvases of the required length from a common roll, while making sure that the pattern on adjacent canvases matches;
- having laid out the canvases on the floor with a pattern down, we spread glue on them with a brush and let it soak a little;
- while the wallpaper absorbs the glue, we spread the glue on the ceiling along the entire length of the gluing of the canvas;
- now we fold the canvas into an accordion and, gradually unfolding, glue it to the ceiling;
- level the canvas with a roller, make sure that there are no air bubbles under the canvas. Remove excess glue with a slightly damp cloth.
We glue the remaining canvases according to the algorithm described above, while making sure that the pattern matches at the joints. Let dry indoors for a week.
Ceiling tiling
As opposed to wallpapering tile bonding process much easier and one person can handle it. For work you will need: tiles, special acrylic glue. From the tool you will need: mounting gun, spatula, trimming knife, paint thread. All work is carried out as follows:
- after preparing the surface, we find the center of the room. To do this, you can draw two diagonals from the corners, after which we draw two lines crossed at right angles from wall to wall through the center;
- We begin to glue the tiles from the center of the room. On the tile itself, dotted along the edges and a little in the center, apply glue and glue it to the ceiling. We place the tile with one corner strictly along the lines in the center;
- repeating the algorithm, glue the rest of the tile. If the tile does not fit entirely along the edges, we cut it with a knife;
- the final touch will be gluing skirting boards and borders in the corners of the room.
Pasting repair of ceilings: photo - example

In this article, we examined the simplest options for repairing ceilings. Repair of more complex structures of suspended and stretch ceilings is a rather extensive and complex topic that requires writing a separate article.