Profiled sheets (corrugated sheets) as roof coverings are mainly used in the construction of industrial, service or storage buildings. However, it is increasingly used in private residential construction, especially when using unusual architectural solutions. Having chosen this material for the roof, it is worth finding out its main characteristics and how to cover the roof with corrugated sheeting.
Profiled sheets are produced by cold rolling from high quality galvanized steel sheets. During the deformation process, the workpiece is given a trapezoidal profile. During production, it may be coated with multiple layers of protection to enhance durability. On initial stage the workpiece is treated with an anti-corrosion compound, then top part The sheet is coated with a mixture of polymers, and the lower part is coated with a special varnish.
Characteristics of corrugated sheets
The basis for the profiled sheet is a sheet with a thickness of 0.4 to 1.5 mm, treated with a special coating. The products are available in a very wide range when it comes to corrugation height and color scheme. According to its purpose, profiled sheets are divided into:
- wall (facade cladding, installation of fences);
- roofing (roof installation);
- structural/load-bearing (for flat roof, permanent formwork);
- special (perforated, transparent).
True, such a division is quite conditional - if necessary roofing sheet finishing facades and vice versa. It all depends on the architectural and structural features of the building.
Corrugated sheets are also divided by type of finish. This:
- Galvanized corrugated sheet - used on objects where aesthetics do not matter.
- Profiled sheets coated with aluzinc are resistant to atmospheric factors and temperature changes, recommended for roofing industrial and warehouse premises.
- Profiled sheet coated with polyester - used in residential construction, resistant to atmospheric influences, as well as corrosion. The metal base in this case is covered with a layer of zinc, a passivation layer, a primer layer and, finally, polymer coating thickness from 15 to 40 microns. The last layer usually consists of polyester, plastisol or purlar.
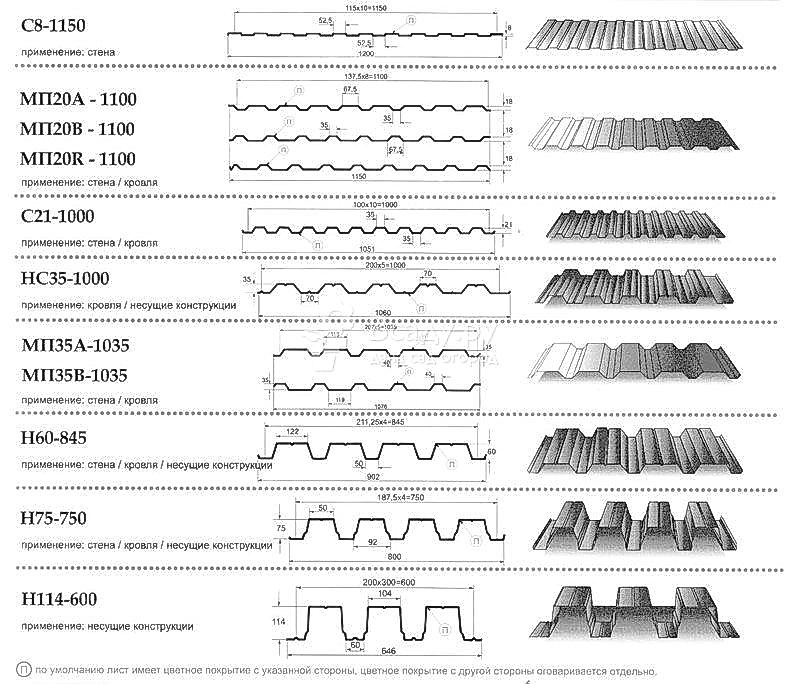
Profiled sheets are further divided in terms of profile height. IN roofing works The following profiled sheets are used: T8, T14, T18, T20, T35, T35, T50, T55. The number in this case indicates the profile height. Profiled sheet with a height of 35 mm is ideal for medium-sized residential buildings, therefore it is the most popular.
For buildings in which roofs with a large area are planned (for example, warehouses, production workshops, apartment buildings, markets, etc.), it is recommended to use sheets with a profile height from 80 to 200 mm.
We are talking about the use of so-called structural profiled sheets. The high height of their profile provides the roof with the necessary rigidity and timely drainage of rainwater and snow from the roof slope.
Corrugated sheet overlap and roof angle
Before covering the roof with corrugated sheeting, measure the slope of the roof. Since the sheets are mounted overlapping, this will help to calculate how far the sheet covers the adjacent one. Usually they focus on the following ratios:
- if the roof is inclined less than 15°, the overlap of the sheets should be at least 20 cm;
- if the angle of inclination is 15° -30° – from 15 to 20 cm;
- a roof slope above 30° allows you to reduce the overlap to 10-15 cm;
An angle of inclination that is less than 12° requires additional work to seal the joint, using silicone sealant, overlap from 20 cm.
Calculation of roofing material
When purchasing corrugated sheeting, you should distinguish between the concepts of full quadrature and effective. Complete shows the area of all ordered sheets that would be located next to each other. And the effective one represents the area of the material, as if already laid on the roof, taking into account the fact that the sheets are laid overlapping, and is less than the full one. These values are formed by multiplying the length of the sheet (can be up to 12 m) by the full or effective width, respectively.
Before ordering material, you need to calculate the required quantity roofing, lengths of skates, valleys and other things. And if it is quite simple to calculate the number of sheets of corrugated sheets for a single- or double-slope roof (from each sheet we subtract the size by which we cover the previous sheet, and divide the width of the roof by the resulting value), then a specialist should be involved in calculating the roofing material for complex roofs. The easiest option is to give the supplier the dimensions of the roof (preferably in the form of a sketch indicating the dimensions). Companies supplying corrugated sheets, as a rule, offer their clients necessary calculations using special programs, after which they provide a list of specific materials, fasteners and elements.
How to properly cover a roof with corrugated sheets with your own hands - where to start
Technically, making a roof from corrugated sheets is a simple and intuitive job, at least for people who have basic knowledge of construction as such. Therefore, covering the roof with corrugated sheets with your own hands is not a problem, but in order to do it correctly, you should learn the basic principles of performing the work and get an idea of the subject of the work.
Roofing installation from corrugated sheets

A corrugated roofing is a kind of pie consisting of various elements placed accordingly. The roof of a residential building is presented as an example. If we look at it in cross-section, the roof elements go in the following sequence (starting from the bottom):
- sheathing for insulation - nailed to the rafters from below, supports the insulation;
- vapor barrier – protects the insulation from condensation;
- insulation and rafters - sheets of heat-insulating material located between the rafters;
- hydrobarrier - protects the insulating layer from moisture (an air gap is required between it and the insulation);
- counter-lattice – provides ventilation of roofing materials;
- sheathing - the basis for the covering;
- profiled sheet.
The roof also includes various additional elements - ridge, valley, snow retainer, end strip And so on.
Tools and material for installing corrugated sheets
In order to properly cover the roof with corrugated sheets with your own hands, as for any other work, it is important to prepare working tools. You will need:
- measuring and control instruments - tape measure, square, level;
- power tools – drill, screwdriver, electric scissors;
- tools are common at any construction site - a hammer, a hacksaw for wood, scissors for metal.
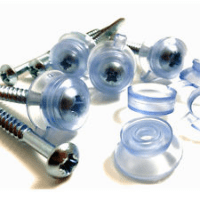
It is also necessary to prepare a sufficient number of special self-tapping screws with a sealing washer for attaching corrugated sheets, at least 8 pieces per square meter.
It should be remembered that you cannot use abrasive wheels to cut corrugated sheets.
Installation - how to cover a roof with corrugated sheets with your own hands
So, after everything is prepared, we begin to install the roof. On the warm side of the roof, a vapor barrier is secured with a stapler and a sheathing for insulation is installed. Then the insulation is laid (tightly, without tears). After the insulation has been laid, waterproofing is laid, secured with a stapler, but it should be remembered that its overlap at the ridge is unacceptable. Then comes the turn of the counter-lattice.
Installation of counter-lattice
The task of the counter-lattice, or false beam as it is also called, is to provide ventilation inside the roofing “pie”. For the counter-lattice, take a beam with a cross-section of 25 x 40 mm (40 x 40 mm) and attach it along the rafters in increments of 60 cm. Self-tapping screws are usually used as fasteners.
A sheathing is mounted on top of the counter-lattice; the pitch between its beams depends on the angle of inclination of the roof. The cross-section of the timber for the sheathing depends on the distance between the rafters; usually take 30 x 40 mm for a distance of up to 70 cm and 40 x 60 mm for a distance of up to 12 cm.
After this, along the lower edge of the roof, to the lower beam of the sheathing, a cornice strip is attached with self-tapping screws. Next, they begin laying the corrugated board. Installation of sheets can begin either on the right side of the roof or on the left. In order to avoid mistakes, you can attach the corrugated sheet as follows.

First, the first sheet is installed, aligned along the cornice strip (with an overlap of 50 mm on the cornice) and secured with one self-tapping screw at the ridge. Similarly, on one self-tapping screw, you need to overlap 4 more sheets, aligning them along the bottom edge. After the sheets are aligned, they are finally secured. Self-tapping screws are screwed into the bottom wave of the sheet, into every second wave, along the crest of the joint every 50 cm, and into each sheathing board at the end.
Installation of end strips
The end plate performs decorative function, and also protects the structure from the wind. It is fastened with an overlap (100 mm), starting from the overhang towards the ridge. Self-tapping screws are screwed into the ridge of the joint between the plank and the corrugated sheet and into the end board, after 350 mm, the excess is cut off.
Installation of the junction strip
The junction strips are mounted at the junction of the corrugated sheeting with the vertical elements on the roof (chimney wall, wall of the floor above, etc.). A sealant is glued between the plank and the corrugated sheet, then the planks are fastened with self-tapping screws, in increments of 200 - 300 mm; if the length of the junction is more than one plank, then they are laid with an overlap (100 mm).
That’s probably all about how to cover a roof with corrugated sheets with your own hands, and it turns out that it’s not at all difficult.
If your home requires a roof that has an attractive and sophisticated look at a relatively low cost, a corrugated roof — cold-rolled galvanized steel sheet coated with non-ferrous polymer materials- This is what you need.
Advantages of profiled steel sheet:
- excellent performance qualities: resistance to atmospheric factors, solar radiation, mechanical strength, corrosion resistance,
- short specific gravity(from 5.5 to 9.5 kg/m2), therefore low load on rafter systems and sheathing,
- roofing material can be selected according to texture and color to match the design of the building,
- relatively low price with high aesthetic qualities.
Which corrugated sheeting is suitable for the roof
Any brand of corrugated sheeting (universal, load-bearing or wall) is suitable for roofing, but laying thin wall material will require almost continuous sheathing. For ordinary lathing with a pitch of 65-100 cm, it is preferable to use a stronger and more rigid profiled sheet. The most commonly used material is with the following indicators:
- grade N or NS (load-bearing and universal),
- corrugated sheet thickness from 0.5 to 0.7 mm (strong and light at the same time),
- corrugation height 20-75 mm (provides the possibility of elastic deformation of the roof),
- the presence of a capillary drainage groove,
- coating color that matches the existing or planned exterior of the house.
The price of corrugated sheeting depends on several indicators of the material.
What you need to cover a roof with corrugated sheets yourself
A simple pitched or gable roof country house, summer kitchen Covering a garage or garage yourself will not be difficult with one or two helpers and some skills in working with a screwdriver and a jigsaw. A broken gable roof of a house with an attic will also be suitable for independent work. This video will help.
If the roof frame is of a more complex configuration, you should invite experienced specialists to cover the roof with corrugated sheeting. The price of the work will depend on the complexity of the roof and the area of the slopes.
How much material will be needed
Calculating the amount of material for a single-pitched or gable roof, knowing the size of the slopes, is not difficult. If the length of the slope is 12 m or less, you need to divide the width of the slope by the width of the material, and increase the resulting number of sheets by 15%.
For more complex roofs You can calculate corrugated roofing sheets online using special programs. The programs allow you not only to determine the amount of material as accurately as possible, but also calculate the slope of the roof, the dimensions of the overlap, and determine best option location and fastening of corrugated sheets.
Tools and fastening materials for work
To work you will need measuring and cutting tools, fastening materials:
Features of laying roofing from corrugated sheets
It’s best to do the work with four people, it will work out much faster. Two people can also handle it, but working alone with long sheets of corrugated sheets is very difficult.
- The minimum roof slope angle is 10 degrees. With a smaller slope angle, water can get under the material.
- The standard length of the profiled sheet is 12 m. If the length of the slope is shorter or longer, the sheets will have to be cut.
- To protect the corrugated sheet from corrosion, waterproofing and vapor barrier should be done along the sheathing.
Installation of sheathing under profiled sheets
An important step in installing a roof made of corrugated sheets is the organization of hydro- and vapor barriers to protect the metal from corrosion when water vapor enters.
They do this in two ways:
- laying a vapor barrier on the rafters under the sheathing and waterproofing (roofing felt) on top of the sheathing under the corrugated sheeting;
- organizing a ventilated roof, creating a ventilated space between the waterproofing layer and the roofing material. To do this, along the rafter legs, false rafters from bars are installed along the waterproofing, lathing is made on them, you get a layer cake: rafters, waterproofing, false rafters, sheathing, corrugated sheet.
Important! All elements of the sheathing must be impregnated on all sides with an antiseptic composition for wood. This will extend the life of the roof.
The sheathing boards are laid in increments of 0.5-1.0 m, attaching them to the rafters with nails or self-tapping screws. The thicker and more durable the corrugated sheeting is used, the greater the distance between the sheathing boards. So, for example, for profiled sheets of grade CH35, the lathing pitch is 0.5-0.6 m, for CH44 - 0.65-0.75 m. A distance of more than 1 m between the boards should not be made.
Having made the sheathing, you need to check the diagonals of the slope and align the slope along the verticals, horizontals, and diagonals. This will greatly facilitate the work of laying corrugated board on the sheathing.
The procedure for laying corrugated sheets with your own hands
- Corrugated sheets are laid from bottom to top, starting along the slope from the end of the building, from left to right or from right to left - it all depends on which side of the sheet the manufacturer made the capillary groove on. When laying the material, the groove should be closed by the wave of the next sheet.
- The size of the overlap of corrugated sheets horizontally and vertically depends on the angle of the roof slope. For small values of the angle of inclination of the slope, the sheets are laid with an overlap in two waves vertically, for high values - in one or half a wave.
- The horizontal overlap of the slope is at least 10 cm. The first row is laid with an overhang of 30-50 cm above the overhang (the distance depends on the design of the drainage system). The joints between the profiled sheets are sealed with a special tape. The sheet of the second row is laid with an offset along the end by half the width.
If 2 or more people are working, lifting the sheets is easy. They are laid on a frame of 5-6 bars in packs of 5-10 pieces and pulled up with a rope along inclined boards attached to the sheathing.
To prevent the sheets from rolling off, nail one or two bars from below onto the sheathing and place a pack of covering sheets. It’s much more convenient to work this way than to serve one at a time, although this method is also used.
How to attach corrugated sheets to the roof correctly
The sheets are secured to the sheathing with self-tapping screws, washers and sealing gaskets. Their number is no more than 6-10 pieces per 1 sq.m. flooring On the slope, screws are screwed into the lower ones, and on the ridge - into the upper waves of the sheet.
If the material is thin, the screws are simply screwed in with a screwdriver; they easily pass through without damaging the coating. On thick steel sheets in the places where they are attached to the sheathing, it is advisable to make preliminary markings and drill holes for self-tapping screws with a drill.
Important! It is necessary to accurately align and correctly install the very first sheet; the quality of the entire work will depend on it.
The first sheet is first secured in the middle with one screw and the overhang from the eaves and the vertical position of the sheathing are carefully aligned. After this, it is secured with a second screw.
The material is attached to the upper and lower boards of the sheathing by screwing screws into each deflection of the wave, into the central boards - through the deflection.
The second highest row is placed with the sheets shifted to the right or left by half the width. Cut the profiled sheet with an electric saw, a hacksaw or a jigsaw with a metal file. They do it on the ground.
Attention! You cannot cut profiled sheets with a grinder. This will destroy the polymer coating. For cutting, use metal scissors, and paint over the sections.
Horizontal joints are also sealed with tape. Overlapping screws are screwed into each recess of the wave. The rubber sealing washer should protrude 1-2 mm around the perimeter of the screw head, this indicates that it is not pinched or loose.
Installing a ridge on corrugated sheets
Ridge additional elements for corrugated roofing are produced
- simple in the form of a sheet bent at an angle with a shelf width of up to 30 cm,
- with a semicircular edge,
- with a U-shaped edge and shelves of the same dimensions.
To install a ridge on a corrugated roof, the last row of sheets should be aligned at the top along the end and laid in the same horizontal plane. The installation procedure is as follows:
- a tape or strip of ridge seal is placed on the edge of the last row of sheets,
- bars are fixed parallel to the ridge axis,
- The ridge elements are screwed to the bars with self-tapping screws into the upper corrugation after 20-30 cm, starting from the side where the wind most often blows,
Today, most craftsmen are in demand for roofs made of metal profiles, despite the fact that the market is full of a variety of roofing materials. This popularity of the coating is due to its technical characteristics and favorable price. However, not everyone knows how to cover a roof with corrugated sheeting without making major mistakes. Therefore, in the article below we will consider all the possible nuances of the work, how exactly to lay corrugated sheeting on the roof, in order to avoid further unpleasant incidents with the finished roof.
Important: those who want to lay a metal profile on the roof should know that one of the qualities of the material is a low level of noise absorption. Therefore, you will have to take care of high-quality roofing cake (hydro-, steam- and thermal insulation). Such a layer will significantly reduce the noise level of the “rain symphony” in thunderstorms.
Otherwise, the material, made of steel sheet with a thickness of 0.5 to 3.5 mm and coated with a galvanized and polymer protective layer, is, in principle, beneficial from all sides. In particular, covering the roof with corrugated sheeting gives the home owner the following advantages:
- High speed of work completion. This nuance is due to the light weight of the material and its dimensions. Often the length of one profile sheet is 12 m. And if the lengths of the slope and the roofing sheet coincide, then this makes it possible to avoid extra work when finishing the roof of a house (no cutting or adjusting the material). In addition, lifting the corrugated sheet to the top is not difficult.
- Low load on the rafter system. This means additional savings on the construction of its skeleton.
- Significant savings in the construction budget. This is ensured by the favorable cost of the material. The price for corrugated sheets is significantly lower than even for metal tiles.
- Attractive home design. A roof made of corrugated sheets looks quite decent and neat, while the corrugated sheet on the roof is in no way inferior to the popular metal tiles.
- High repairability of the coating and its resistance to water, cold, and sun. But only subject to the rules required for laying corrugated sheets on the roof.
Choosing roofing material

If you decide to attach corrugated sheeting as a roofing material, then you should know what it can be used on the roof. in principle, any of its types (load-bearing, wall or universal). But at the same time, you need to remember that a thin wall corrugated sheet requires the installation of a continuous sheathing under it. Otherwise, over time, due to snow and wind loads, the roof will sag in the gaps of the sheathing.
Important: most often, in order to cover a roof with a metal profile, a sheet of grades NS or N (universal/load-bearing) is chosen with a thickness of 0.5-0.7 mm. It is desirable that the height of the corrugation ridge varies within the range of 20-75 mm. This will serve as additional rigidity for the roof covering. In this case, the profile must have a drainage capillary groove.
We calculate the amount of material

If we decide that we will cover the roof with corrugated sheeting, then we need to purchase required amount material. This is important because a single volume of roofing is purchased from one batch. In the future, if one or two profile sheets are missing, it may be sold from another batch. And this threatens a discrepancy in color shade. And the work will be interrupted, which is not very good, especially if the uncovered house is hit by bad weather.
So, in order to correctly calculate the amount of coating and understand how to attach it, you need to calculate the parameters of the slopes. If it is single-pitch or gable roof, then there will be no problems at all. You need to determine the width of the slopes and divide it by the width of one sheet of covering. We multiply the resulting value by 15% (margin for overlaps). Such calculations are convenient for slopes whose length does not exceed 12 m. If the length (height) of the slope is greater, then the profiled sheet must be taken 40% more.
Rules for transportation, storage and use of coating

Those who do not yet know how to cover a roof with corrugated sheeting should understand that this roofing covering does not like strong mechanical influences and wind loads. They can lead to deformation of the material. This means that when working with it you should adhere to several important rules:
- When transporting a purchased profile, it must be transported exclusively in a horizontal position, stacked on a wooden pallet. In this case, it is better to secure the stack of coating with belts so that when the car moves, the sheets do not move or become deformed.
- When moving the profile or storing it, it is important to ensure that the sheets do not rub against each other or against other surfaces. Otherwise, the protective polymer coating may be damaged, which will subsequently lead to corrosion of the steel underneath.
- Lifting the metal profile to the roof must be carried out in batches, arranging a kind of lifting path of two beams arranged like rails from the roof to the ground. The profile pack is lifted on ropes and fixed on the roof, supporting it with a padded fixing bar from the eaves side. This will make it easier to lay corrugated sheeting on the roof.
- It is not recommended to work with the profile in windy weather. In this case, it will be difficult to attach the corrugated sheeting, since it has a large windage. Therefore, working in the wind both threatens the safety of the craftsman himself and can lead to deformation of the sheet.
- Roofing work must be performed in soft shoes. A hard sole may bend the coating.
- In addition, laying corrugated sheets should only be carried out using protective gloves. Because cut edges of the material can cause injury to the craftsman.
Important: when cutting profile sheets, it is not advisable to use a grinder. It greatly heats up the polymer coating when cutting, which leads to its deterioration and further corrosion of the coating sheet. The material must be cut with special scissors, and the cut edges must be painted with special paint.
Tools for getting the job done

If you don’t yet know how to lay corrugated sheeting or how to cover a roof with corrugated sheeting with your own hands, then we provide a list of the tools needed to complete the work. So, we will fasten the corrugated sheets using the following tools:
- Tape measure and construction pencil (marker);
- A jigsaw or special scissors for cutting profiles;
- Screwdriver;
- Sealing tape for sealing joints of the coating;
- Special self-tapping screws with sealing washers at the rate of 7-10 pcs/m2 of coating;
- Component elements (ridge, valleys, cornices, etc.). They are put in last.
Sheathing device

When trying to learn how to properly cover a roof with corrugated sheets with your own hands, you should understand that the device roofing pie is of no small importance when working with profiled sheets. Therefore, we will devote no less attention to the installation of the sheathing and fastening of the insulating layer:
- So, boards are placed on the rafter legs in increments of 50-70 cm.
- Now they are covered with vapor barrier material.
- Thermal insulation is laid on top.
- Everything is covered with waterproofing canvas and only after that they begin to install the sheathing for installation of the metal profile.
Important: the joints of all layers of membranes are taped with special tape.
- Now it is important to arrange the sheathing for laying the metal profile. Here, the technology of laying corrugated sheeting on the roof implies that the thinner the corrugated sheet, the smaller the pitch of the sheathing should be. A continuous sheathing is made under a very thin roofing material. As for the rest, for the CH35 profile, the lathing step is 50-60 cm. For the CH44 metal profile, this step can already be 65-75 cm.
Important: everything wooden elements roofs must be treated with fire retardants and antiseptics for greater resistance to possible moisture.
Metal profile overlap level

Continuing to master the material on the topic of how to cover a roof with corrugated sheets with your own hands and how to lay the covering correctly, we will learn what the overlap of sheets should be horizontally and vertically. In principle, if the height (length) of the slope allows, then the metal profile sheets are laid from left to right or vice versa, depending on the prevailing wind direction in the region. In this case, you need to cover the roof with corrugated sheeting with your own hands on the side of the roof opposite to the predominant wind direction. In this case, the vertical overlap may vary depending on the pitch of the roof. The larger the angle, the smaller the overlap can be. That is, with a large slope of the slope, it is allowed to overlap half the ridge, and with a slight slope of the roof, you need to lay the next sheet of covering on two ridges. This adherence to the principles will allow you to properly cover the roof.
As for the horizontal overlap, the fastening of the profiled sheet requires an overlap of 10 cm. In this case, the lower (first) row of material is laid with a protrusion above the cornice of 30-50 cm. That is, it covers the drain by a third of its width. Such overhangs allow high-quality drainage of water from the roof to drainage system. The sheets of the second row need to be installed with the seams offset relative to the first row. These installation instructions will allow you to make a high-quality metal profile roof. The roof is covered in this way correctly.
Important: all joints between metal profile roofing sheets are covered with a special sealing tape.
The principle of fastening a metal profile

Continuing the instructions on the topic “how to properly cover a roof with corrugated sheeting” and how to cover a roof quickly, we will introduce the reader to the principles of fastening roofing sheets.
So, thin sheets of metal profiles are placed on the roof of the house on specially prepared self-tapping screws with rubber seals. In this case, the fasteners must be carefully screwed in with a screwdriver. You should not clamp the screws on the laid layers of the coating too much, as this will create additional stress on the coating sheet. If you fasten the corrugated sheet tightly, this will lead to its deformation over time and water leakage under the washer.
Lay the first sheet of roofing and secure it at the top with one self-tapping screw. Now you should level the sheet using a level and additionally tighten it with the remaining fasteners. Then we cover the entire roof using this sheet. This information on how to cover a roof with metal sheets will help even a novice craftsman.
At the very top of the sheathing and at the bottom, the profile sheet is fixed with self-tapping screws into each ridge. You can screw corrugated sheeting into the middle boards of the sheathing using fasteners through the ridge.
Important: very thin material can be screw manually, without a screwdriver.
Installation of a roof ridge made of corrugated sheets

The installed roof must be completed by installing the ridge and side caps on it. How to secure this element is discussed below. It is worth knowing that profile skates are produced in three versions:
- Profile sheet bent at an angle;
- Semicircular ridge;
- U-shaped skate.
You can cover the roof with corrugated sheeting using any of them to your taste.
The principle of constructing a ridge (how to place it correctly) and fastening a roof made of corrugated sheets looks like this:
- In the upper, not yet installed ridge part of the roof, all laid profile sheets are mounted perfectly even along the edge. That is, they are leveled at the top.
- The gap between them is closed with a special sealing tape.
- Now you need to fix the wooden blocks parallel to the existing axis of the ridge.
- The ridge is screwed to them, overlapping the elements in such a way that the prevailing direction of the wind seems to smooth them. If the ridge parts are fastened this way, then the wind will not be able to damage the roof.
- The ends of the ridge are covered with plugs on both sides. Thus, you can completely cover the roof with a metal profile with your own hands.
Important: if you do not know how to properly install corrugated sheeting on a roof of complex configuration, then it is better to use the services of professionals. Although in this case all the work on installing the corrugated roof with your own hands performed according to the above principle. You just need to cut it carefullycovering roofing material necessary elements and place the valleys correctly. Remember, rightfixed material, lasts more than 30 years.
Recently, there has been a tendency to replace traditional roofing coverings, such as slate, with metal tiles. Re-roofing an old house is a costly undertaking in itself, and the desire of customers to somehow reduce the estimated cost is quite understandable. Often, hired teams of roofers insist on a complete replacement of the roof, including dismantling both sheathing and rafters. And this entails an increase in the estimated cost repair work. But there is experience in replacing the roof covering on a roof without replacing these elements. In fact, there is a combined way out of the situation. An example of how you can re-roof an old house with minimal losses is described in this short article.
Corrugated sheet over roofing felt - problems
Whether or not to remove roofing felt before is a question that everyone decides for themselves. But if you take into account the experience of using this technology, it is better to familiarize yourself in advance with what a home owner may encounter after renovation:
- Ruberoid is not capable of permeating moisture. Because of this, excess moisture will accumulate under the floor sheets over time, which can negatively affect the metal material;
- In summer, under the sun's rays, the metal heats up to high temperatures. From the heat, the bitumen impregnation begins to melt and release harmful substances. Not only are volatile compounds harmful to human health, but the very smell of molten bitumen creates a feeling of discomfort. In addition, molten bitumen is a source of increased fire hazard;
- Spots of bitumen that appear on the surface of the corrugated sheet make the entire roof untidy and ugly.
Video: Replacing the roof of a house without dismantling the old one
Advantages of corrugated sheets
The popularity of this material for covering the roof of an old house is understandable. It has a number of advantages, such as:
- Completely waterproof;
- Does not fade in the sun;
- Practical to use - easy to clean from dirt;
- Resistant to the mechanical effects of precipitation in the form of hail;
- It is light in weight;
- Relatively inexpensive;
- Easy to install;
- Not only used to cover the roof of an old house, but also for fencing land plot and wall cladding.
The professional sheet is divided into three categories:
- Carrier.
- Wall.
- Load-bearing - wall.
Each variety has its own characteristics (both in weight and rigidity) and its purpose - for walls or to cover the roof of an old house:
For small areas where it is necessary to cover the roof of an old house, corrugated wall sheeting is quite suitable. In the case of large areas or with sparse sheathing, only roofing is used - with a profile height of 20 mm (the same approach applies to peaked roofs on the roof, since they have to experience high wind loads).
Let's look at replacing the old covering of a house using the example of a material such as slate.
Preparatory activities
The first thing you need to do before re-roofing an old house is... find out the weather forecast for the coming days. It will be absolutely deplorable if the old covering is removed and long and lingering rains begin. Therefore, it is necessary to prevent rain from entering the living space through the roof.
Important! Even if the meteorological center promises dry weather, it would be a good idea to have a roll of plastic film in stock to cover the roof in case of rain.
The main material for dismantling a roof covered with corrugated slate:
- nail puller;
- a pair of wooden blocks;
- long ropes;
- a pair of hooks (they can be made from slate nails);
- To lower sheets from the roof, prepare two long guide beams (new material will also be lifted up along them).
Dismantling
Before covering the roof of an old house with corrugated sheets, the old slate roof covering is dismantled. The disassembly process begins from the ridge down. A nail puller is used to remove slate nails. Helps protect sheets from cracks during dismantling wooden block, placed under the nail puller.
Each sheet is lowered by means of a rope with iron hooks along wooden guide bars.
Important! Lowering sheets of slate simply with a rope is contrary to safety precautions.
If there are not enough manpower to reroof an old house, there is no point in trying to dismantle the roof in one day. Replacement of the coating can be carried out in a step-by-step manner. First one ramp - after that you can begin repairing the other ramp.

Since the roof of an old house is to be covered, the parallelism of the rafters with the sheathing is checked - if there is no plane required, it will have to be dismantled, leaving only the rafter system.
Video: Re-roof an old house without replacing the sheathing.
Rafter system repair
Of course, to speed up the process, you can leave the sheathing. But according to building codes, there are significant differences in the requirements for deviations from the plane of slate and corrugated board.
The first step is to check the condition of the rafters along the edges of the roof. After this we construct the plane as a whole.
This can be done using lacing, stretched from four points, using screws screwed into the rafters to the same depth. The cord is stretched diagonally, from corner to corner, and along the rafters.
If the floor plane of an old house is damaged, it needs to be restored. To do this, the rafters are leveled with an edged board, tightly bolted to the beam.
Video. Block slate roof old house with corrugated sheets.
Waterproofing
Waterproofing the roof of an old house made of corrugated board consists of laying a waterproofing film on top of the rafters. They begin to cover it with an overlap - from the lower tier gradually rising to the ridge. The film should lie freely without pre-tension. Fastening is easiest done with a construction stapler.

Simultaneously with laying the waterproofing layer, installation of the sheathing begins. This ensures access to roofing installation activities.
Lathing
A new sheathing to cover the roof of an old house with corrugated board begins with fastening a support beam (50x40mm) or a solid piece or cut 1 - 1.5 m long with fastening along the entire length of the rafters.
Transverse elements for the roof of an old house can be made from edged boards 25x150 mm. The direction of installation is from the eaves and ends at the ridge, observing the following condition - the first and last boards are attached to the very edge of the rafters. The remaining stripes go in increments of 450 mm.
Important! The fastening step is selected depending on the type of corrugated sheet used.
The work ends with the installation of a wind board.

Laying the corrugated sheet
The final stage is installation of corrugated sheeting. It is desirable that the sheets be equal in size to the length of the slope - the distance from the ridge to the edge of the rafters, with a margin of 5-8 cm.
During the production process, we do not forget about careful handling of sheets. Each sheet is carefully removed from the stack and conveyed along wooden guides to the roof of the old house.
Important! Careful handling of corrugated sheeting will help protect the surface from scratches and dents.
Correct installation of sheets depends on how carefully the preparatory measures are carried out. The crucial moment is the verification and installation of the first sheet of the roof of the old house. It is he who will set the direction for laying the remaining elements of the roof of the old house.
For this purpose, it is necessary to screw limiters onto the roof of the old house to the outer rafters - small slats 20 - 35 cm in length. They must be installed in the same plane with the entire rafter system. Self-tapping screws are screwed into these slats at a distance of 5 - 7 cm from the cornice so that the head protrudes above the wave of corrugated sheeting.
This is necessary so that a metal string is stretched between the screws. Installing the first row along such a guideline will greatly simplify the work and prevent the material from going to the side.
Each sheet of corrugated sheeting for covering an old house is fastened using special screws - self-tapping screws at the rate of 7 - 9 pcs./m².
Important! The tightening torque of the self-tapping screw must be pre-adjusted so that the press washer does not deform the iron of the roof of the old house.
It is better to install the wind corners and ridge immediately after installing the top row of sheets. So, there is less risk of scratching or making a dent on them. The ridge is secured with long screws - self-tapping screws with a press washer.

Video. Re-roof an old house.
The list of significant advantages of profiled roofing steel quite rightly includes ease of installation. One large metal sheet a significant area is immediately covered. The number of fastening operations and measures to align elements has been reduced.
True, the size of the covering cannot be unconditionally considered an advantage, for example, when arranging oblique ridges of roofs with four slopes. So that they do not cause difficulties, you should know how a hipped roof is constructed from corrugated sheets and how the correct installation is carried out on its plane.
Profiled roofing steel is produced in the form of corrugated or wavy sheets with or without a polymer protective and decorative shell.
It is made of cold-rolled metal, hot-dip galvanized, which provides the material with stable resistance to atmospheric attacks.
In the lines of corrugated sheets from different manufacturers, there is a conditional division into load-bearing, wall and roofing categories. However, in arranging roofs, any type that appeals to the home owner can be used, if he is not too concerned about the difference in the cost of load-bearing and roofing options. Note that the roofing material has smaller corrugations, is lighter in weight and has a more attractive price.
For arranging roofs with profiled sheets, all types are produced, which significantly facilitate roofing work. Within the range of products from one manufacturer, they are absolutely similar to those used in laying metal tiles. Because in fact, both roofing representatives are the same material, differing only in the presence or absence of a transverse profiled step.

By analogy with metal tiles, a drainage gutter is installed along the right or left edge of the corrugated panels. It is designed to remove moisture accumulated in the connecting seams of the coating. During the installation process, the outermost wave with a groove must be under the adjacent sheet of material, and its direct opposite must overlap the same groove of the adjacent element on the other side.
Installation of the covering is carried out by superimposing one or two corrugations of the laid panel on an element already located on the slope. The number of overlapped longitudinal recesses depends on the angle of inclination of the slope and the load-bearing capacity of the material. When calculating the material for arranging the roof, it is necessary to take into account how many corrugations are recommended to be overlapped.
The connection of individual panels into a common large-sized roofing sheet is made into a convex projection using short self-tapping screws that do not go deep into the sheathing. But the metal roof is fixed to it with a recess into the wooden parts through the concave part of the corrugation. The fastening elements are made in a tone that matches the color of the roofing, and are equipped with elastomer washers that ensure tightness at the connection point.

The profiled sheet is delivered to the site of the required length, specified by the customer when making the purchase. Angle cutting is not carried out by the supplier, but is done before installation at the construction site. In order not to overpay for excess, before purchasing material it is recommended to make a roof project or at least draw a sketch to scale.
Corrugated roof design
Installation of corrugated sheets on hip and hipped roofs is carried out with a significant difference from laying sheets on structures with two slopes. The fact is that large-sized coating elements require cutting and are installed in a special order:
- For tents. First, the central axis of the starting sheet and the ramp along the sheathing is marked. Then fitting is carried out with the axes aligned, during which cut lines are marked. All subsequent sheets are tried on and cut upon site.
- For hip. The first sheet is installed so that its edge coincides with the extreme edge of the right or left post of the ridge girder. The starter sheet has no bevel cuts and is installed to the full height of the roof. Only the panels adjacent to the oblique hip ribs are cut.
When arranging tent structures, the material for all four slopes is cut according to the same pattern. For hip roofs, the roof is cut into two end slopes and laid in the manner used in the construction hipped roofs, and two long ones with partial cutting.

When drawing up a project or sketch of a roof, for calculations before purchasing material and for developing your own plan for roofing work, you need to consider that:
- The number of sheets is calculated based on the width of the base of each slope.
- The height of the sheet is determined according to a pre-designed diagram. It should be positioned so that it completely covers the hip rib as much as possible.
- The calculations use not the total, but the useful width of the corrugated sheet when laid with an overlap in one corrugation. If two corrugations overlap, the calculated usable width will decrease by another wave.
- Sheets on triangular slopes are laid out from the center, on pentagonal slopes - from extreme point ridge run.
- The optimal arrangement of corrugated sheet panels minimizes the number of roofing parts whose width is less than half a sheet. These are too weakened areas of the roof due to the large number of attachment points per unit area and seams.
Without fail, the heights of the profiled panels must be increased by the width of the overhang above the eaves. This is the bottom edge of the sheet, 3.5 - 5.0 cm wide, extending beyond the frontal board.

During the design period, it is necessary to decide whether holders will be installed before or after laying the coating. In the first case, so-called long brackets are used, the installation of which must be carried out before installation work. In the second case, short hooks are used that are fixed on the front board; they can be attached at any time.
During independent design, you should decide whether the structure needs an insulation system. Thermal insulation device significantly affects the material consumption and design of the rafter system, because the roofing pie:
- A cold roof consists of only one layer. This is waterproofing made from a classic film or anti-condensation material with pile that absorbs excess moisture under the roof and dissolves it during the ventilation period.
- An insulated roof includes three layers: steam, heat and waterproofing. On the side of the operated premises there is vapor barrier film, protecting the insulation following it from household fumes. On the outside, the insulation is protected by a waterproofing carpet.
The roofing pie under the corrugated sheet is arranged with one or two functional ventilation circuits. Their number depends on the waterproofing material chosen for the arrangement. It is important to remember that options containing bitumen cannot be used as waterproofing under a metal roof with a polymer coating.

The first ventilation circuit is laid between the insulation and the waterproofing carpet, if classic polyethylene or fleecy anti-condensation material is used as it. If a diffusion membrane is used, in the formation ventilation duct there is no need to over it, because it spontaneously releases excess moisture to the outside when tension occurs.
A second ventilation circuit must be constructed between the waterproofing and the metal roof. Regardless of the material chosen for its construction, direct contact of the corrugated sheet with the water-repellent carpet must be excluded in order to avoid the appearance of first condensation and then rust that corrodes the metal.
The minimum size of the ventilation gap is proportional to the area of the slopes. For example, if the area being developed is 50 m², then the total area of the ventilation ducts for this slope should be 0.5 m². The last value should be divided by two in order to distribute the ventilation gap into inflow and outflow zones. U gable roofs these values are equal; for hipped structures, some difference is eliminated by installing an additional aerator.

Preparation of the rafter system
Note that profiled roofing steel is laid on both wooden and metal rafter structures. Device metal frame typical for non-residential objects, most often for household purposes. The frame can be welded or collapsible with bolted connections. The rafters are a channel or angle, the laths are a square pipe or a U-shaped profile.
Roof over residential buildings It is not customary to build on metal rafter systems. Wood is more suitable, and it is much easier for independent craftsmen to work with it. Therefore, we will disassemble the installation of corrugated sheets on a wooden base, as the most common option.

The rafter system and sheathing can be reasonably recognized as a reliable basis for the installation of profiled sheets if:
- The installation pitch of the rafters is no more than the limit of 1200 mm. The optimal interval is from 600 to 900 mm.
- The rafter legs are made of timber with a cross-section of 50×100 or 50×150 mm, depending on the wind and snow load characteristic of the region.
- The cross-section of the sheathing is selected depending on the distance between the rafters and the steepness of the roof.
The laths under the corrugated sheet are installed at equal intervals. Reduce the distance between them only in areas that require reinforcement: along the perimeter of eaves overhangs by a width of 50 - 60 cm for the subsequent installation of snow retainers, in valleys, along the ridge girder hip roof, around roof penetrations.
If rafter system does not have sufficient parameters to ensure the reliability of the base for laying corrugated sheets on hipped roof, it is strengthened by increasing the cross-section of the lathing or reducing the pitch between the laths.

Algorithm for constructing a roofing pie
The construction of the roofing pie is carried out in the traditional manner observed when installing any insulated roofs. It should be remembered that before installing a waterproofing carpet around the perimeter hipped design a dripper must be installed - a thin-sheet steel strip bent at an angle, designed to drain condensate.
Sequencing:
- Vapor barrier protection device. Roll material fastened with a stapler to the rafters, with tape between them. It is rolled out in horizontal stripes and laid with an overlap of 10 -15 cm. If it is planned to install OSB, plywood or gypsum fiber board sheathing, a sheathing is built on top of the vapor barrier along the rafters.
- Laying insulation. Thermal insulation made of basalt or glass wool is placed in the cells formed by the rafters. The material is cut so that the width of the heat-insulating element is approximately 1 cm wider than the distance between the rafters for laying it sideways.
- Installation of waterproofing carpet. Water-repellent material is laid on the outside of the rafters in horizontal strips, glued together with tape. Laying begins at the eaves and continues to the top or ridge purlin. It is temporarily attached to the rafters with a stapler, then fixed with laths.
The hip and insulating films are laid with an overlap of 15–20 cm over the oblique ridge. Along the ridge line of the hip roof, the insulating layers must have a gap. There is no gap along the oblique ribs.

If the thickness of the insulating layer is equal to the width of the rafter leg, it is recommended to use a superdiffusion polymer membrane as waterproofing. It does not require the formation of a ventilation gap between itself and the insulation, because can rid the material of condensation.
When using classic or anti-condensation fleecy waterproofing, there must be a gap between it and the thermal insulation. The width of the channel is 3 - 5 cm. It is formed by means of a sheathing made of a bar with an equal size on one or both sides, attached to the rafter legs from the outside. Then waterproofing is laid on top of it and the sheathing is re-installed to create a second-level gap - between the covering and the waterproofing carpet.
You can avoid wasting time and effort on installing a ventilation duct if the thickness of the thermal insulation is at least 3 cm less than the width of the rafter.
The construction of a roofing pie structure without insulation is much simpler and much faster. All actions consist of laying waterproofing on the rafters and installing a spacer sheathing bar on top of it. After that, all that remains is to install the eaves strips, then cover the planes of the hipped roof with corrugated sheets, secure them correctly, and fix the ridge elements.

Marking and cutting metal coating
To mark the cutting of panels at an angle, it is recommended to stock up on a simple homemade device, which was called “devil” by folk craftsmen. To produce it, you will need four pieces of 25×100 mm board or a suitable size bar. Two blanks will be approximately 1.1 - 1.2 m long. The second pair can be of the same length or slightly longer.
The process of manufacturing a basic marking device:
- On a work table or free flat area we lay out the prepared cuttings of the board in the shape of a rectangle or square. Naturally, they will be arranged in two parallel pairs.
- Between the left or right edges of the horizontal elements of the device being constructed, we form a distance equal to the working width of the roofing panel. Most often it is 1.1 m.
- We check the pairwise parallelism of the parts of the future device. After checking, we fasten them with hinge joints so that they can move relative to each other in parallel pairs.
To mark using a “dash”, apply the marked panel to the sheet installed and secured to the roof. Homemade instrument We place it on the oblique edge of the hip so that it marks the line of the upcoming cut. We mark the panel, move it to a place convenient for cutting and cut it.

The corrugated sheet can be cut with a sharp circular saw, the technical capabilities of which include the function of cutting thin sheet steel. For small amounts of work, a jigsaw or roofing shears are suitable for removing excess material. Use a grinder when cutting metal roofing unacceptable.
When cutting a coating with a polymer shell, it is necessary to ensure that it is not damaged by small chips. If scratches or cuts are found in the coating, they must be covered with repair paint.

Small sharp particles of the material being cut must be carefully removed from the panel with a soft brush before installation. Stubborn stains should be cleaned using soap solution. The cut edges of the sheets, at least from the side adjacent to the hip and ridge ribs, it is recommended to treat it with varnish or repair compound.
Laying corrugated sheets on a hip slope
Attaching the profiled sheet metal to a triangular plane is accompanied by fitting and cutting of each sheet. Before installing them, the roof perimeter is equipped with a cornice strip mounted to the sheathing.

Work on marking panels is carried out in a strictly defined sequence:
- On the first sheet we mark its central axis, on the mauerlat of the slope - its middle.
- We install the first sheet, aligning the marked centers of it and the Mauerlat, and check the horizontality of the lower edge of the panel.
- We secure the first sheet with one self-tapping screw at the top.
- We install adjacent panels, one of which is placed on the edge of the sheet with a capillary groove, the second is slipped under it from the opposite side.
- Align the block of three panels relative to the horizon and with each other.
- We temporarily fix each of the newly installed sheets with one self-tapping screw at the top, trying to position the fasteners outside the part required for installation.
- Mark the cutting lines.
Having completed the marking, remove the temporary fasteners and cut off excess material from the panels. Then we return them to their place, install them according to the scheme described above, fasten them again only at the top of the central sheet and align the block before final fixation.

First of all, the sheets are fastened into a single roofing sheet along the corrugation applied to the lower element with 4.8 × 19 mm self-tapping screws, screwed in every 50 cm. After joining, the block is again aligned with the horizon and the edge of the eaves and is attached to the laths. For this purpose, 4.8x38 mm self-tapping screws are used, which are installed in the recess of the profile in every second recess.
Fastening to the eaves grating is carried out in each profile recess; in the middle of the sheet, the fasteners are distributed evenly so that there are 5 fastening points per 1 m² of covering.

At the end of the work on laying the sheet covering, the ridge elements are installed with preliminary installation of the seal along the edges of the extensions. In the arrangement of trapezoidal slopes, the first to be installed are the planks on the hip ribs from bottom to top, then the plank with plugs is mounted on the ridge ridge.
Video about the principles of laying corrugated sheets
Sequence of work on laying corrugated sheeting on the roof:
Video about the first experience in self-installation corrugated sheets:
Folk tricks in installing corrugated sheet roofs:
To ensure that the result of difficult work does not disappoint and does not require significant investments in remodeling, you need to know how to properly cover an architecturally complex object - a hipped roof - with corrugated sheeting. The material we present will provide effective assistance to independent roofers. Compliance with the described rules guarantees success.