Installation of a drainage system is relevant even for small baths.
The reasons for this are very logical and simple:
- If there are no drainage gutters, then during rainfall moisture freely flows from the roof directly onto the walls of the bathhouse. Along with rainwater, accumulated dust, dirt, and small debris also flows away. As a result: dirty walls, windows and Entrance door. In such conditions it deteriorates quickly appearance and the service life of wood, plaster, brick and any other materials is reduced;

- Moisture flowing from the roof collects directly near the foundation or blind area, if there is one. And the more often it rains, the more the soil becomes saturated with water. As a result, subsidence of the blind area and even the foundation may occur. In addition, if the foundation is not well-waterproofed, moisture will seep into the subfloor, having a negative impact on the floors of the first floor and the indoor microclimate.

On a note! SNiP 31-06 of 2009 regulates the issues of drainage from the roof. Thus, according to regulations, in private construction it is permissible to have no drainage systems on the roofs of one- and two-story buildings, but provided that above entrance group and the balcony has canopies, and the eaves overhang is wider than sixty centimeters.
Any sauna with installed system drainage system looks more aesthetically pleasing and solid, the appearance is complete and solid. And the benefits of installing gutters are tangible.

It is advisable to install hooks and gutters at the stage of building the roof of the bathhouse, but even after completion of construction and exterior finishing It's not too late to start installing drainage systems.

And the first stage of the upcoming work is choosing a drain and calculating the number of elements.
On sale you can find a drainage system for every taste and budget. From the point of view of economy, plastic (polyvinyl chloride or vinyl) gutters come first, and elite copper and zinc-titanium products close the list. Steel and aluminum systems are classified as medium price category. But focusing only on the price tag is not always correct; you should pay attention to the service life of the products and ease of installation. But the noiselessness of drains can play a role only in one case - if there is Living spaces or the building is attached to the main house, but usually the noise of rain through gutters and pipes rarely disturbs those visiting the steam room.
Table 1. Types of external drainage systems by material of manufacture
| Material of manufacture | Peculiarities | For which roofs is it recommended? |
|---|---|---|
| Wall thickness up to 3.3 mm. Color palette plastic gutters rich, but after a few years of use the shade may lose saturation. It is very easy to install a plastic drain on a roof of absolutely any configuration thanks to a large selection of additional and fastening elements. The light weight of the products and the absence of the need to use special tools is an additional plus for those who want to do the installation themselves. It can last 30 years, but it is better to choose quality products. with a wall thickness of 3.3 mm. | They harmonize well with roofing made of ondulin, slate, and soft bitumen tiles. | |
| Classic gutters with a service life of 60 years or more. They are made from rolled steel up to 0.7 mm thick. They do not burst, do not break, and do not spoil the appearance of the bathhouse. Relevant for regions with predominantly sunny weather and scorching sun. Among the disadvantages: firstly, certain difficulties may arise during the installation process, and secondly, not all rafter systems are designed to support the weight of a metal drain. | Metal galvanized roofing coverings. | |
| Refers to metal gutters. A layer of primer and polymer is applied on top of the steel base. protective covering eg pural, polyester, modified polyester or plastisol. The service life is impressive, but can be shortened if the decorative coating is damaged (the corrosion process begins actively). All coatings are resistant to sunlight, except polyester, which quickly loses its color saturation. | Corrugated sheeting, metal tiles with polymer coatings. | |
| Wall thickness up to 0.8 mm. Lightweight, durable, reliable. Not subject to corrosion. Wide selection of shades. | Any metal roofs. | |
| Made from material 0.7-0.8 mm thick. Are not subject to corrosion, are not afraid of UV radiation and high temperatures. Scratches on the surface may heal on their own. The service life reaches one hundred years. Disadvantages: incompatibility with some metals and high price. | Suitable for luxury roofing materials such as seam copper, slate, natural ceramic or composite tiles, shingles, titanium-zinc. | |
| Copper gutters have a thickness of no more than 0.6 mm. Elite gutters are valued for their durability (up to 150 years, subject to proper installation). They do not require painting, frequent cleaning or maintenance. Copper gutters are resistant to heat and high humidity. They do not fade or rust. The average price of one three-meter copper gutter is 6 thousand rubles, one three-meter section of pipe costs about the same, and prices for receiving funnels reach 15 thousand rubles. Install an expensive drainage system for a bathhouse on summer cottage unreasonable, another thing is a prestigious bath complex several floors high. | Ceramic tiles, slate tiles, copper roofing sheets or copper shingles. |
Table 2. Dependence of pipe diameter on roof area
Table 3. Dependence of the width of the trays on the number of risers and roof area
| Roof area, sq.m | Number of risers | Gutter width, cm |
|---|---|---|
| Up to 70 | 9 | |
| From 70 to 140 | 13 | |
| Up to 110 | 9 | |
| 110 - 200 | 13 | |
| No more than 140 | 9 | |
| From 140 to 220 | 13 |
Calculation of the number of elements
To calculate the number of elements, you need to schematically draw a sketch of the bathhouse, take measurements of the building, and then put them in the drawing. This will simplify the calculation process as much as possible. Then you can draw a project on the same diagram drainage system indicating the elements.
Table 4. Elements of drains
| Name | Description |
|---|---|
| The total length of the gutters corresponds to the length of the cornice minus the length of the corner elements, if provided. The standard length of 1 gutter is usually 3 meters. | |
| They are calculated by the number of gutter joints. | |
| 2 plugs for each open line of gutters. If the drain is closed around the entire perimeter of the roof, plugs are not needed. | |
| Prevents large debris from accumulating in gutters. The length corresponds to the total length of the gutters. | |
| The quantity depends on the roof configuration and the length of the eaves (L). If L is 12 meters, then the funnel is installed closer to the center of the eaves or two funnels are placed at the corners of the roof. In accordance with SNiP II-26-76, the distance between funnels cannot be more than 26 meters. | |
| According to the number of internal corners of the bath. Typically the length of the corner is 40 cm. | |
| Accordingly, according to the number of external corners. Elements can be 90 and 135 degrees. | |
| The pitch between the brackets depends on the material from which the drain is made. For plastic systems pitch 55-60 cm, metal - 70 cm, copper - 30-60 cm. The smaller the pitch between the hooks, the greater the load the gutters can withstand. The number of hooks is equal to the total length of the cornice divided by the pitch between the hooks. The hooks are attached at a distance of 15 cm from the edge of the cornice. Additional hooks (2 pcs.) are installed on both sides of the gutter connectors. |
|
| The standard length of one pipe is 3 meters. The total length of the riser corresponds to the height of the bathhouse wall. | |
| If necessary, to connect pipes in a riser more than 4 meters high. | |
| If necessary, for each riser. The size of the knees depends on the size of the eaves overhang. | |
| If necessary, connect risers, combine pipes. | |
| By the number of risers, subject to the presence of storm sewerage. | |
| If there is a storm drain. | |
| It is installed 15 cm from the ground if there is a drainage collector (well) or 30 cm from the ground if there is no well. | |
| The step between the holders is no more than two meters. The length of the screw and dowel is selected depending on whether the facade is insulated or not. |

Prices for gutters
gutter
Example of drainage system calculation
Initial data: hipped roof. The length of the eaves on the long side of the bathhouse is 12 m, on the short side - 8 m. The eaves overhang is 0.9 m. The height from the eaves to the ground is 8 m. The roof area is 120 sq. m. m.
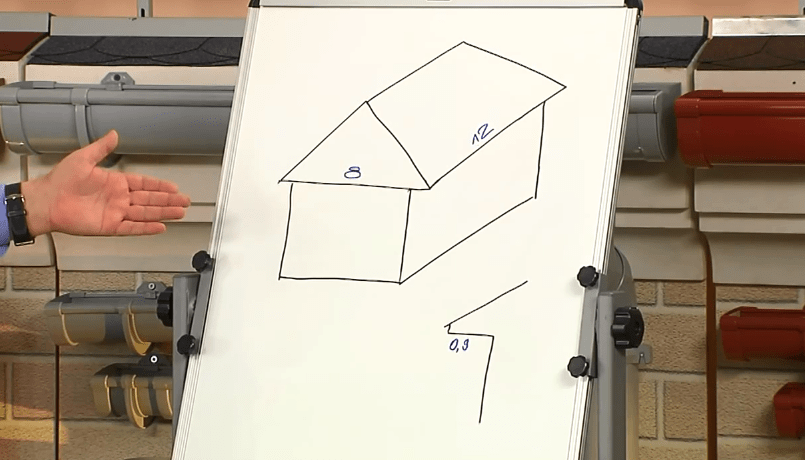
The roof area is more than 100 sq.m, so we choose gutters and pipes with a cross-section of 130 mm. The facade is insulated, the insulation thickness is 50 cm. We choose screws 160 mm long. Bend – 67 degree elbow.
Cornice length:
8 + 8 + 12 + 12 = 40 meters.
Number of gutters:
40 m: 3 m = 13.3 pcs.
Round 13.3 to the larger integer 14.

Quantity drainpipes:
8 m (length from eaves to ground) x 4 (number of risers) = 32 m.
32 m: 3 m (length of one pipe) = 10.66 (rounded to 11 pieces).

Two more pipes will be needed to bring the drain to the wall.

Total: 13 pipes.
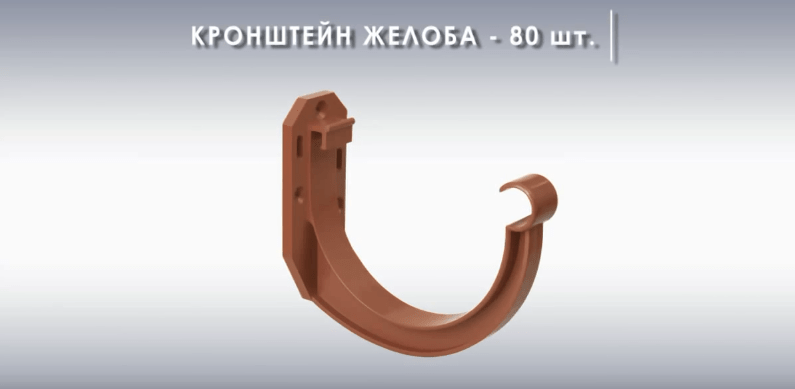
Number of brackets and extensions. The bracket is fastened from the edge of the funnel at a distance of 10 cm, the step between the hooks is taken to be 55 cm. In total, 80 brackets will be needed.
If the hooks are attached to the front board, you will need 80 x 3 = 240 self-tapping screws.
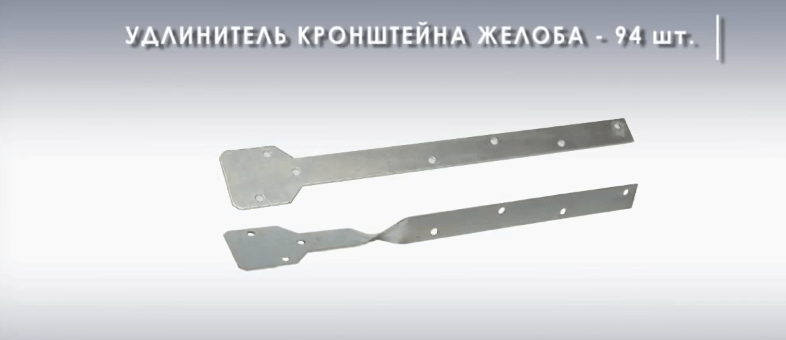
If there is no front board, you will need bracket extensions (straight or twisted).

Straight ones are attached to the flat part of the rafter system.

Twisted extensions are attached to the side of the rafters.

Using the same extensions, if there is no frontal plate, couplings and funnels are attached. In this case, the number of extensions is equal to the number of brackets + number of couplings + number of funnels. A total of 94 extension cords will be needed.

Prices for bracket extensions
bracket extension
Number of double-coupled bends: 8 pieces. There are 2 outlets for each funnel.
4 funnels x 2 outlets = 8 outlets.

Scheme of connecting a funnel to a drainpipe using two-coupling bends and a pipe section
Number of brackets: 28 pieces. They are installed under each connecting element. The step between the brackets is taken to be 1.5 m.
Result:
- required amount funnels - 4 pieces;

- the same number of outer corners of the gutter;

- number of gutters (L = 3 m) – 14 pieces;
- 10 coupling connectors;

- 80 hooks;
- number of three-meter drainpipes - 14 pieces;
- 8 connectors and 24 pipe brackets;


- screws 160 mm long will need 24 pieces;

- number of bends (67 degrees): double-coupled - 8 pieces, single-coupled - 4 pieces.


Single-socket outlet, fastening diagram

Single sleeve bend 67 degrees
Important! Do not transport three-meter drainage elements on the roof of a personal car, do not store plastic parts in the scorching sun, and do not place heavy objects on lying gutters and pipes.

Prices for different types of pipe bends
pipe bend
Video - How to choose hooks
Installation procedure for a plastic drainage system
Tools:
- metal hacksaw with fine teeth;
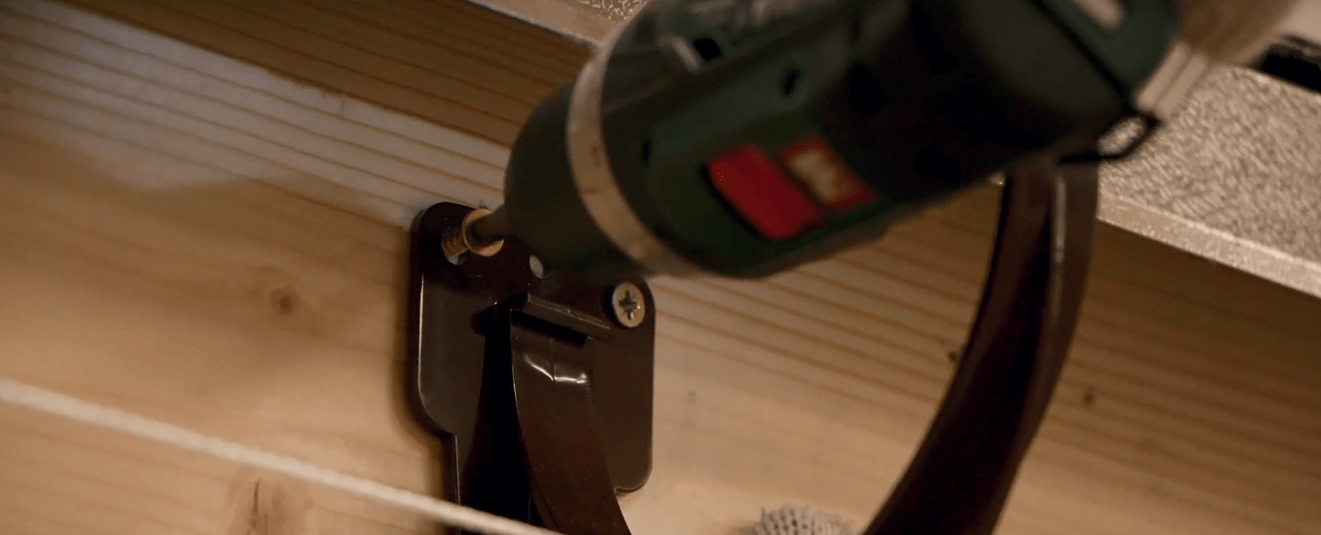
- device for bending metal hooks;
- construction level and tape measure;
- screwdriver, dowels and self-tapping screws for wood;
- file;
- construction cord (rope);
- adjustable pliers;
- marker or pencil.
Basic principles installation
- The inclination of the water intake trays is 3.5 mm for each linear meter length.
- The water flowing from the drip should fall into the central part of the trays.
- The edge of the bracket and gutter should not intersect the line of the roof slope.
- If we conditionally continue the roof slope in a straight line, then the bracket should be 1 cm below this line.
Provided that the indicated rules are followed, moisture flowing from the roof will not overflow the edges of the trays, and in the spring there will be no risk of deformation and breakage of the gutters during an avalanche of snow.
Installation procedure
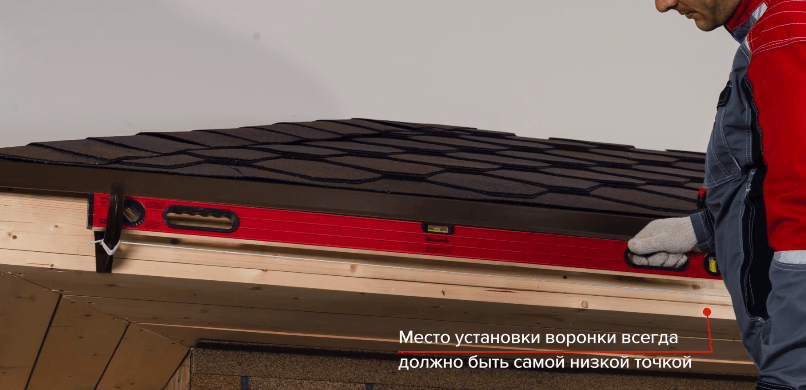
Stage 1. Determine the location of the water intake funnel. It can be located at the edge of the cornice or closer to its middle. But always, regardless of the installation location, the funnel is located at the lowest point of the gutters along the entire eaves, that is, the trays should always be tilted towards the storm drain.
Using a marker or pencil, mark the line where the funnel will be fixed.
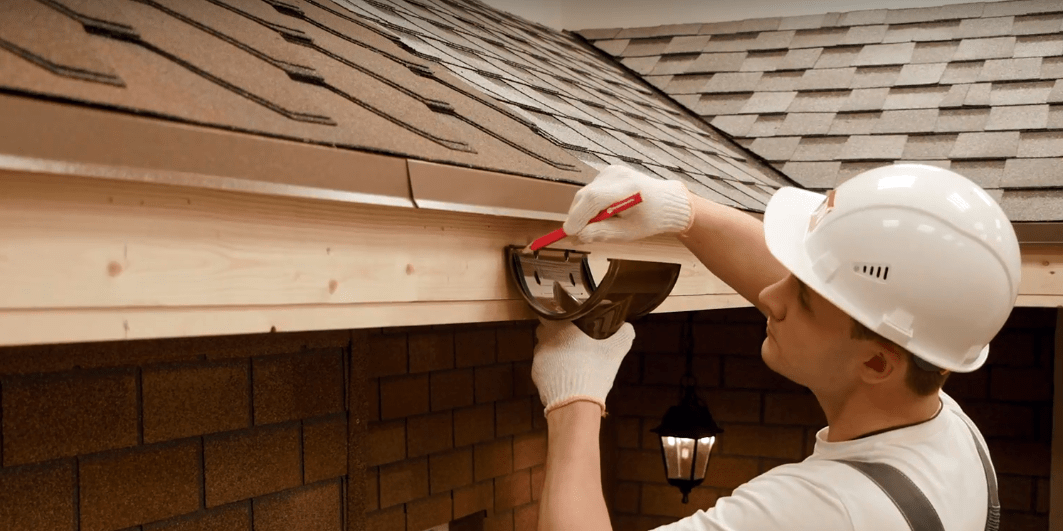
Stage 2. Plastic brackets are used to attach the gutters to the frontal board.
Mark the location where the bracket is attached. The extreme hook is always attached fifteen centimeters from the corner or edge of the roof.

We fix the first bracket, not forgetting the main principle of installation: the hook should be located 1 cm below the continuation of the roof slope.

Important start installation from the outer hooks in order to set the correct slope of the entire drain.

Stage 3. Using a tape measure, we measure the distance between the installed hook and the place where the storm drain will be installed.
Taking into account a slope of 3.5 mm per 1 linear meter, we calculate where the attachment point will be located. For example, if there are 2 meters from the hook to the funnel, then it will be 7 mm lower.

Stage 4. We fasten the storm drain with self-tapping screws to the front board. There are factory holes in the funnel for screwing in hardware.


Important! If there is no front plate, the funnel must be fixed using bracket extensions.
Stage 5. We pull a string between the storm drain and the outer bracket.
Along the line of the stretched cord, we install brackets on both sides of the storm drain. The recommended distance from the edge of the funnel to the bracket is 15 cm.

We attach intermediate hooks in increments of 50-60 cm. If the distance between the brackets is made greater, then the gutters are likely to become deformed.
How to attach brackets if there is no front plate?
Option 1. If the roof is not already covered and the structure does not include a fascia board, either metal hooks or straight bracket extensions that are mounted on top of the rafters are used to install the gutters.

on a note! Most often, the pitch of the rafters does not coincide with the pitch of the hooks. In this case, it is permissible to fix the brackets on top of OSB-3 boards, having previously cut out the recesses.
Option 2. If the roof is already covered, curved side extensions are used to secure the hooks.


The main advantage of extensions is the presence of holes and grooves, which make it easy to set the position of the brackets and adjust the angle of the gutters.

Stage 6. We begin installation of gutters.
The first step of the work is marking. We measure the required length of the gutter with a tape measure, put a mark, then saw off the excess with a hacksaw. We process the edge with a file to remove burrs.

We lay the gutters on top of the brackets.

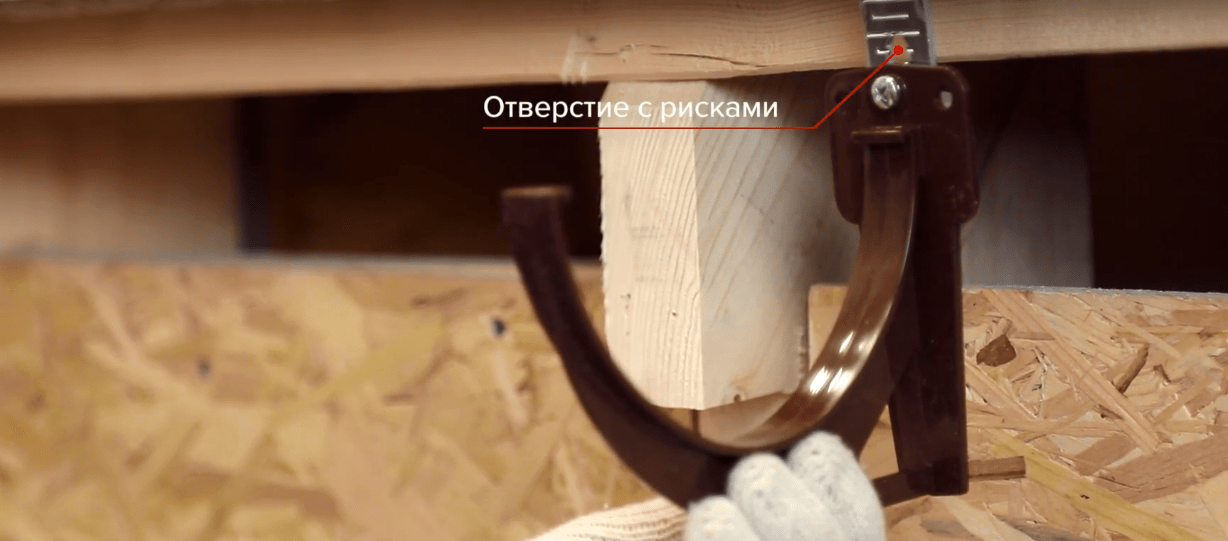
First, insert the edge of the bracket into the funnel. There are special notches inside the funnel; these are specially applied markings that take into account the linear expansion of the gutter material when heated.

We insert the gutter from the inside out so that it snaps into place inside the funnel. Apply a little pressure on the gutter during installation.
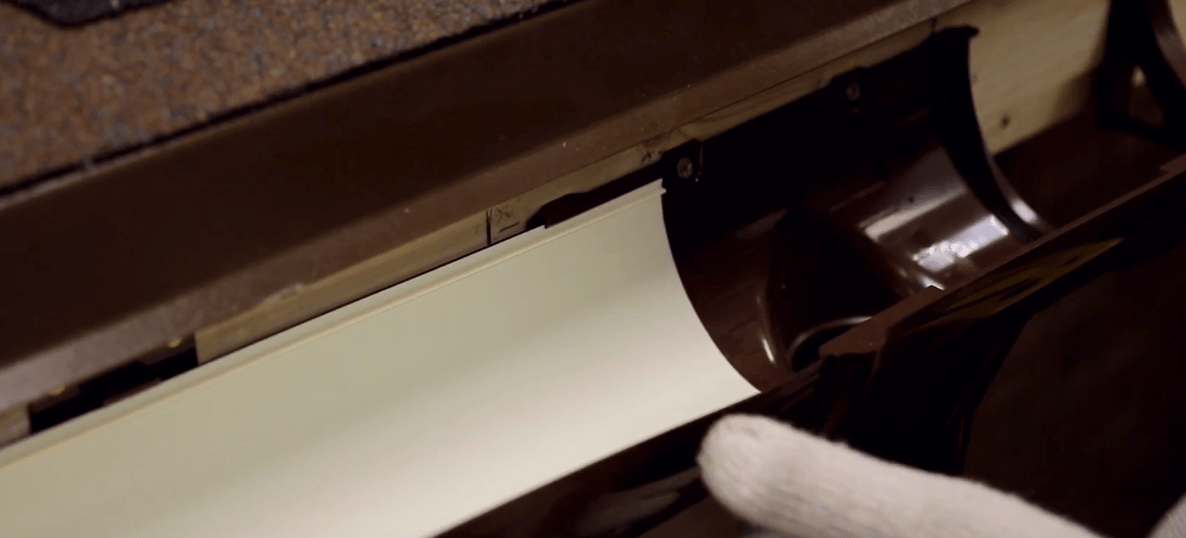
Similarly, we snap the gutter into the brackets.


Stage 7. We install gutter connectors.

The location of the elements is strictly between two brackets, which are mounted at a distance of 10-15 cm from the connectors.

Markings for fixing brackets
We fix the connector to the front board in the same way as funnels, using self-tapping screws through the factory holes.
We place the edges of the gutters inside the connector, focusing on the notches made inside.

On a note! The connectors are equipped with rubber seals for better sealing of the connection.
Stage 8. Installing corner elements. Both on the external and internal corners of the bathhouse, the elements are fixed equally simply. They don't even need to be screwed to the front board, you just need to snap the edges of the gutters into them.

Stage 9. We install plugs on the gutters.
Note! Depending on the gutter configuration, the plugs can be right-handed, left-handed or universal.
If necessary, we also install a plug on the funnel (in the case when it is located close to the corner of the roof), using a small piece of gutter to connect the elements.

Stage 10. At the final stage, we move on to the installation of drainpipes. We carry out installation from the funnel from top to bottom.
The order in which the elements are connected depends on the roof configuration and the size of the eaves overhang.

Stage 11. We fix the drainpipes with universal clamps.
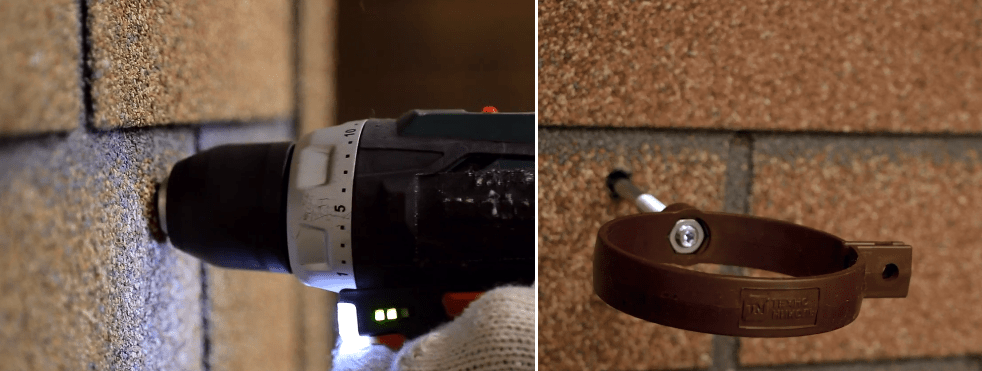
Important! There should be no more than one and a half meters between adjacent clamps.
Stage 12. We connect the pipes with couplings, and then secure the structure with a clamp. Each coupling has a special seat for the clamp.


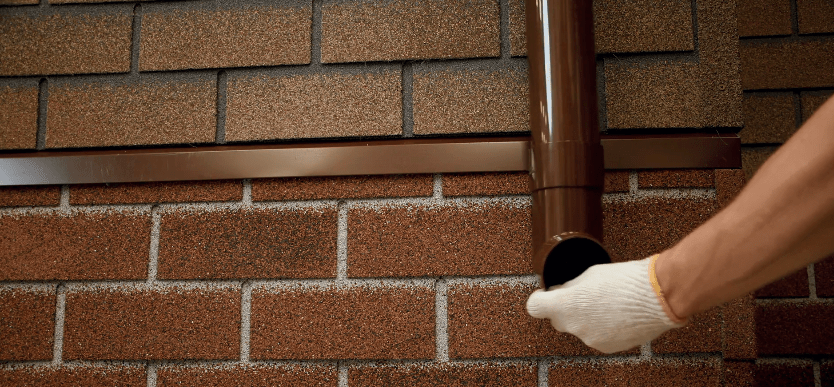
Stage 13. All that remains is to install an elbow to drain the water. This elbow, like other elements, must be secured with a separate clamp.
Test the operation of the entire gutter by pouring a bucket of water onto the roof (not directly into the gutter!). Make sure that the water flows from the roof into the central part of the gutters, enters the funnel and rushes through the pipes to the ground or into storm sewer.
This completes the installation. In order for the drainage system to last as long as possible, do not forget to take care of it: inspect the condition of the elements twice a year, clean the trays from large and small debris.

Video - How to install a PVC drain
Option with a frontal plate, mounted on a plastic bracket
The brackets are placed at the level of the cord stretched between the end bracket and the funnel. The height difference between the end points of the cord should provide a slope of up to 3 mm per linear meter.
Option without frontal plate, mounted on a metal bracket
This option is used for roofs with a small sheathing pitch. The height difference is ensured by bending the bracket at the calculated location. The distance from the end of the supporting part of the bracket to the bending point should decrease as the intermediate bracket moves away from the final one.
Option without frontal plate, fastening with an extension and a plastic bracket
This option is used for roofs with large sheathing pitches. The fold lines of all extensions are at the same distance. The slope is ensured by moving the plastic bracket along the extension. The bend point should be no closer than 10 mm from the mounting point of the bracket clamping plate or no closer than 10 mm from the end of the slot in the extension.
Ensuring the optimal position of the elements of the drainage system relative to the operating roof
 |
The roof overhang is located above the gutter at a distance of 1/3 to 1/2 of its diameter.
The required clearance between the roof continuation line and top part a bracket of 25 -30 mm is provided by bending the final metal bracket (extension) or moving the plastic bracket.
Ensuring stability against deformation under vertical load
The distance between the gutter brackets should not exceed 600 mm. The funnel must be secured at two points (or on two extensions). The gutter connector must be secured to one point (or one bracket). The end of the corner element should be located no more than 150 mm from the nearest bracket.
The distance from the plug to the nearest bracket should not exceed 250 mm.
Providing compensation for temperature linear expansions
The gutter must be installed into the mating elements up to the line marked “Insert so far.” For ease of installation, point microstops are formed along the edges of the line, before contacting which the gutter is inserted. The distance from the end surface of the plug to the structural elements of the house must be at least 30 mm.
Ensuring the sealing of the drainage system
Before installation, you should clean the mating surfaces from dirt, make sure that there are rubber sealing gaskets and that they are tightly installed in the sockets. The spacers should extend to the ends of the sockets. All plugs must be installed. The ends of the gutters should protrude beyond the side section of the roof by 50 - 100 mm.
Comparison of the characteristics of gutters under load
The plastic bracket, funnel and connector are attached with self-tapping screws directly to the front board. To secure the gutter in a plastic bracket, you must first insert the edge of the gutter closest to the front board into the bracket clamp. Then, lowering the gutter into the bracket receiver and pressing firmly on the opposite edge of the gutter together with the clamp, insert the edge into the clamp until it clicks. When attaching to a front board, it is necessary to strengthen the connection between the board and the roof to prevent it from being pulled out when loaded with snow.
Roof without front board. Mounting on metal brackets
Metal extensions are used for long pitch sheathing and are attached to roof structural members. On metal extensions, the gutter is fixed in plastic brackets. When using an extension, the plastic bracket is secured with a bolted connection, which allows you to move the bracket when adjusting the slope of the gutter. A bolt (with a semicircular head) M5x30 is inserted through a washer into the upper central hole of the bracket, passes through the slot in the bracket and is tightened with a nut after the plastic bracket is positioned in the required position. A washer and a spring washer must be installed under the nut. The outer diameter of flat washers must be at least 15 mm. The spring washer is installed between the washer and the nut. To avoid vertical movements, the bracket is additionally fixed to the extension through the lower hole either with a bolt (M5x30 + 2 washers) with a hex head, or with a short self-tapping screw. The funnel and gutter connector are attached with a bolted connection (M5x30 + 2 washers) directly to the extension. The funnel is fastened with two bolts, and the connector with one.
Fastening pipe and fittings
There are two possible fixation methods:
Pipe: fastening with slipping, on the side surface of the clamp there is the inscription “Pipe”.
Fitting: fastening with rigid fixation, on the side surface of the clamp there is the inscription “Fitting”.
The base of the clamp is screwed with a self-tapping screw (diameter MB, length from 50 mm) to the wall of the house. The clamp arms are inserted into the base until it stops. The clamp is tightened with a bolt with a semicircular head (M5, length 40 mm) and a nut.
Sequence of installation of the drainage system
Installation of a catch basin
- Install end bracket 5 taking into account clause 2 of the “General Provisions”.
- Install funnel brackets 11 . For the option with a frontal board, a funnel 11 attaches without brackets.
- Hang the slope of the gutter from the end bracket to the funnel bracket. For the option with a frontal plate - from the cavity of the end bracket 5 to the bottom edge of the funnel cut 11 .
- Install gutter connector brackets 7 . For the option with a frontal board, install the connector itself 7 .
- Connector 7 or its bracket is installed taking into account clauses 1 and 3 of the “General Provisions”.
- Distance between funnel centers 11 and connector 7 should not exceed 3,080 mm.
- Install intermediate brackets 9 taking into account clause 3 of the “General Provisions”.
- Secure the funnel 11 and gutter connector 7 on fastening elements (bracket, connector).
- For the option with a frontal board, a funnel 11 and connector 7 fastened without brackets.
- Cut the gutter to the required length 8 and connect it to the funnel 11 and connector 7 .
- Cut the gutter to the required length 6 and place it on the connector and end bracket.
- Repeat the operations for the adjacent side of the roof (bracket 2 , gutter 3 ).
- Install in gutters 3 And 6 gutter corner element 4 .
- Install the funnel cap 12 to the open end of the funnel 11 .
- Install the gutter cap 1 to the open end of the gutter.
- Insert funnel mesh 10 .
Installation of a spillway
- Push it onto the drain hole of the funnel until it stops. 11 coupling or elbow 13 , depending on the characteristics of the installation site. If necessary, secure the coupling or elbow 13 on the funnel 11 with a self-tapping screw.
- Assemble the required configuration of the figured part of the spillway (elbow 13 , pipe section 14 , knee 15 ). When assembling the figured part of the drain, you must adhere to the following requirements: Fittings 13 And 15 in the figured part of the spillway they are connected to each other only through an intermediate section of pipe 14 and, if necessary, secured to a section of pipe with self-tapping screws.
- Secure the bottom fitting 15 clamp 16 in the “Fitting” position.
- Put on the pipe 18 all the way to the lower fitting 15 of the figured part of the drain.
- Place the pipe vertically. Mark the installation location of the universal clamp in the middle of the pipe 17 .
- Put on the pipe 18 for fitting 15 . Let's fix it in the clamp 17 .
- The middle clamp is mounted in the “Pipe” position.
- Cut the final piece of pipe to the required length 21 . Put it on the coupling 19 and put the coupling with the pipe on the lower part of the fixed pipe 18 .
- Mark the installation location of clamp 20 on the wall of the house, flush with the place where the clamp is fixed to the coupling 19 . Retreat to 10 mm below.
- Place the coupling with the pipe ( 19 And 21 ) to the lower end of the fixed pipe 18 . Secure the assembly in the clamp 20 . The clamp is mounted in the “Fitting” position. If the length of the pipe section exceeds 1,500 mm, secure it in the middle with a universal clamp. The clamp is mounted in the “Pipe” position.
- Place the nozzle on the pipe 23 . Mark the installation location of the clamp 22 . Step back 10 mm lower.
- Put on the tip 23 on the pipe 21 , fix it in a universal clamp 22 .
- The clamp is mounted in the “Fitting” position.
- It is possible to attach the tip to the pipe with a self-tapping screw.
Installation of drainage pipes on siding
 |
- Screw stud M8 - 1 pc.; Nut M8 - 2 pcs.; Washers 015 - 2 pcs. Screw M5x40 - 1 pc., Nut M5 - 1 pc. (comes complete with a clamp).
- At a considerable distance to the wall of the house, instead of an M6 screw stud 1 It is recommended to use an M8 screw stud. In this case, it is necessary to cut the pin to the required length and drill a hole in the clamp support to the diameter of the pin.
- During installation, it is necessary to drill a hole with a diameter of 10 to 12 mm on a flat section of siding.
- Screw in the stud 1 through the center of the hole into the wall of the house (to a depth of at least 40 mm). If the wall is not wooden, you need to install a dowel. The screw part should protrude 20 mm above the siding.
- Screw the nut onto the screw part of the stud 2 flush with the siding surface. Place a washer with a diameter of 15 mm 3 .
- Place the clamp support 4 onto the pin. Screw the nut from inside the clamp support until it stops. 5 with washer diameter 15 mm 6 .
- Align the clamp support 4 to the desired position (“Pipe”\”Fitting”). Tighten the nut 2 under the clamp support until it stops with a wrench.
- Insert clamp 9 into the clamp support and secure it with an M5x40 screw 7 and M5 nuts 8 .
Tools for installing a drainage system
 |
- For marking: tape measure, pencil.
- To attach the brackets: screwdriver, drill, screwdriver.
- To install the brackets: cord, hose level, spirit level.
- To bend metal brackets: bending machine.
- For cuts: hacksaw, fine-tooth saw, miter box.
Purpose of elements
 |
Gutter Designed to collect and drain rainwater from the roof surface |
 |
Gutter plug Can be installed on both the right and left ends of gutters to ensure a watertight system |
 |
Universal clamp Designed for mounting the system on the facade of a building. Has two positions: 1. “pipe”, 2. “fitting” |
 |
Drain pipe Designed to drain water from the gutter funnel to the ground or drainage |
 |
Funnel plug Installed on one of the ends of the funnel to seal the system |
 |
Tip Designed to drain water from the drainage system to the ground |
 |
Gutter connector with rubber seal Designed for sequential connection of gutters into a single system |
 |
Elbow 72° These fittings are designed to provide a transition from the funnel to the pipe. They are also used to bypass architectural elements of the facade. The elbows are connected to each other by a piece of pipe |
 |
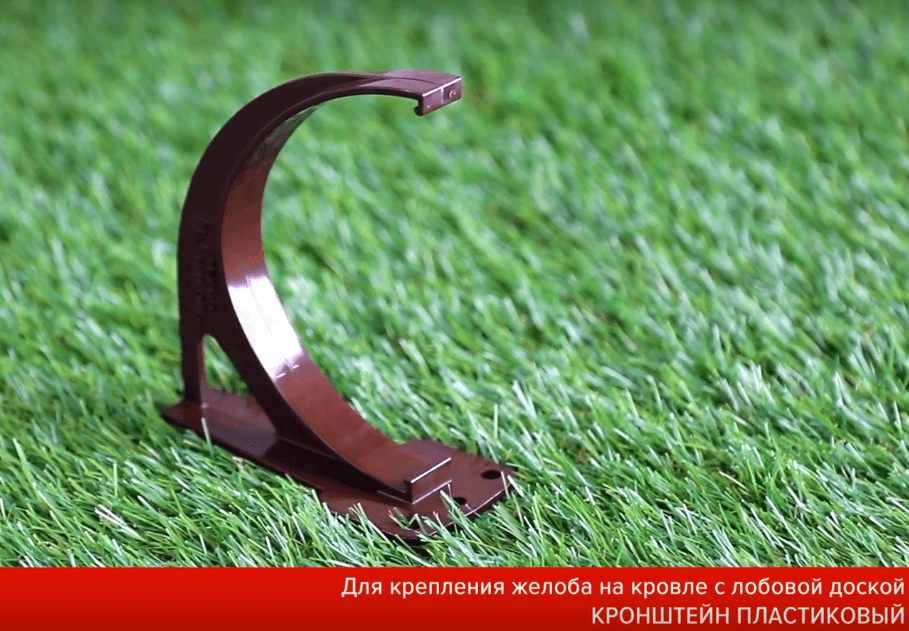
Plastic bracket Designed for fastening the gutter on roofs with a frontal board or in combination with an extension on roofs without a frontal board |
 |
Funnel Designed to connect gutters and pipes to drain water from the catchment to the drainage system |
 |
Elbow 45° | Metal bracket Designed for fastening gutter on roofs without a frontal board. The length of the supporting part of the bracket is 300 mm |
|
 |
Funnel mesh (Clear Tube) Prevents leaves, pine needles and debris from entering the drainage |
 |
Corner element 90° Corner elements are installed on both external and internal corners of the roof and are designed to connect gutters at an angle of 90° (135°) in order to change the direction of water movement |
 |
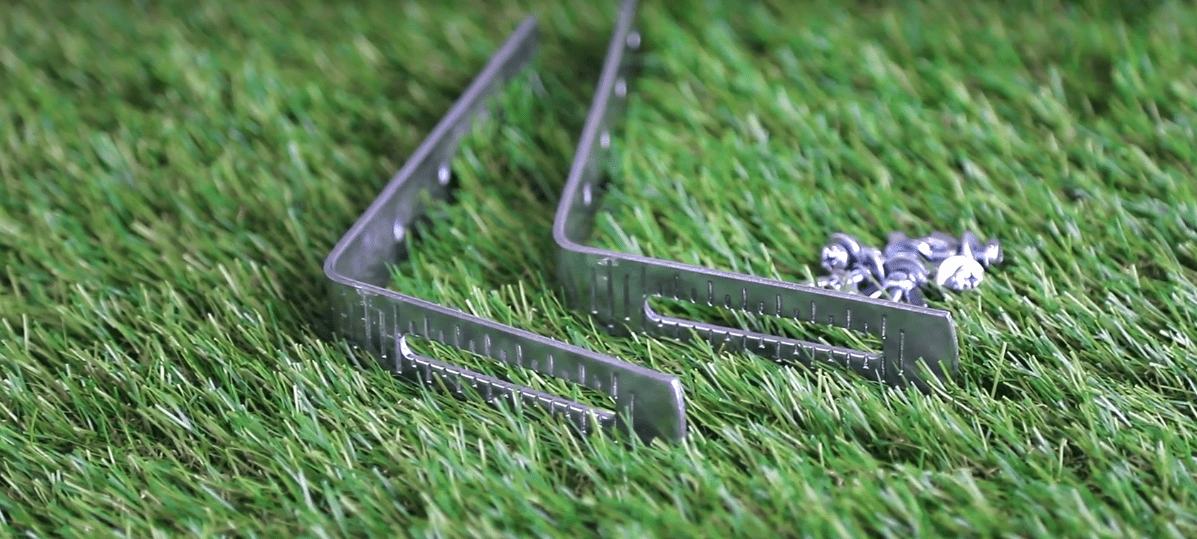
Metal extension cord Designed to provide fastening of a plastic bracket for roofs without a frontal board. The length of the extension support part is 240 mm |
 |
Connecting coupling Designed to connect a pipe with a funnel or two pipes |
 |
Corner element 135° |
Drainage of waste water from the roof is a must to ensure the longevity of the roof. To do this, install a drainage system on the roof. You can do the work yourself or hire specialists for this purpose.
Atmospheric precipitation accumulates on the surface of the roof, which causes its destruction over time. Buildings with a pitched or pitched roof are especially susceptible to this. flat roof. Of course, you can initially build rafter system at a certain angle, due to which wastewater will be naturally drained from the surface of the house. But then the foundation may be washed away due to the strong flow of water from the roof.
Photo - drain for home
Benefits of using a gutter:
- Increasing the efficiency of roof self-cleaning. At correct installation, regardless of the coating material, maximum liquid drainage is ensured;
- Protecting the building from erosion. You can direct the drain pipes to the drainage or to the garden at the dacha, which will help protect the foundation of the building;
- Extends the longevity of metal and asphalt roofing. Regardless of the coating material, it is destroyed by prolonged exposure to moisture.
The quality of the coating does not depend on the material used. The point is that in certain conditions you need to use a Modern metal profile (with a large number Wastewater), and in some - plastic (if you live in regions with sudden temperature changes). Sometimes sandwich panels are also used.

 Photo - water flow with pressure
 Construction and materials
Depending on the type of drainage chosen, the system may consist of various additional elements. Main details:
- Gutters;
- Funnels;
- Bends and plugs;
- Fastening elements;
- Couplings.

 Photo - design of the drainage system
 Each of these parts has its own purpose. Guide pipes are necessary to ensure water drainage to a certain place on the site and intake excess liquid from the roof. Galvanized metal and PVC are used for gutters. Funnels complement the main pipes; they are necessary to create a certain angle on the roof, with the help of which the maximum amount of liquid will fall into the gutter.
According to SNiP, for a complex roof it is necessary to use various bends and tees. They will help create the most effective technique water intake from the roof surface. The entire system is installed using brackets, screws and other fasteners.
Video: how to install gutters yourself
Gutter installation
Before starting work, you need to calculate how much water needs to be drained from the roof. Please note that this indicator does not affect the installation process itself, but is necessary when choosing a specific ready-made drainage system (Hunter, Galeco and others).
Step-by-step instruction How to install a storm drainage system with your own hands:
- The brackets are installed first. The fasteners are installed on the front board. To ensure that all hooks are located at the desired level, we recommend stretching the thread after installing the first one. According to SNiP rules, the minimum distance from the lowest rail should be no more than 25 mm;
- The technology for installing fasteners necessarily includes taking into account the slope of the entire system. For every 10 meters you need to tilt up to 5 cm. It turns out that after installing the bracket, you determine the installation location of the next part and mount it 5 cm lower than the previous one;
- Recommendations from experts on mounting brackets:
- It is imperative to maintain the average selected distance. During the rainy or thaw season, a large amount of water will pass through the drain, so it is important that it is secured as rigidly as possible;
- On average, the pitch of the hooks is no more than half a meter;
- The general slope should be done gradually, without sudden transitions.
- Next, in the places where the pipes are installed, you need to install water inlet funnels. They come in rectangular and round sections. Eat different ways their installation. For example, for plastic construction special glue is used, and for metal - clamps;

 Photo - water inlet funnel
 - It is imperative to install a grate in the receiving gutters, which will help protect the drains from dirt, fallen leaves and other debris;
- All that remains is to connect the gutters and brackets. The pipes are threaded into the fasteners using grooved holes. These are available in TechnoNIKOL systems. You need to clamp the pipe until it clicks;


- For galvanized steel and PVC siding (Plastmo, Murol), rubber plugs must be used. These details will help ensure the right job systems. They are put on the very end of the gutter;

 Photo - stubs
 - The manual for builders states that it is necessary to secure the gutters together after installation. To do this, you will need special couplings and seals that will increase the efficiency and rigidity of the system;

 Photo – clamps
 - Afterwards, drainage elbows are attached to the panels. These drainage parts will help ensure that water drains from the roof at a certain angle and connect the different parts of the system to each other. The rules for their installation state that the distance between the pipe and the wall should be no more than 35 mm;

 Photo – knee
 - Next, the circuit is assigned as a constructor. To the very bottom of the system, the knees are threaded into each other and strengthened with clamps. If you use a metal profile (Ruflex, Alta-Profile or Rainway), then you must additionally install brackets to increase the rigidity of the drain;
- It should be noted that the clamps for installing the drain on the wall of the house differ from the standard ones. They can be attached to bricks or foam blocks using dowels and screws;
- The last step for installing a gutter system for slate or tiled roof- These are low tide installations. It represents the knee turned in the other direction. To avoid having to dismantle it later, you need to calculate in advance the distance of the edge of the drain to the drain. 30–35 cm is considered optimal.
Tips from the professionals for gutter installation:
- Before starting work, you must prepare the surface. Treat the boards with antiseptics and varnishes to extend their durability;
- If the roof requires repairs, then it must be completed before installing the drainage system. Otherwise, a leaking roof will negatively affect the efficiency of the drain;
- If you cannot cope with the task yourself, then you can turn to specialists for help. Calling a brigade will cost about 10,000 rubles per object.
Price overview
Now there are a huge number of different gutters on the market. The Bryza, Braas, Docke, Icopal Wijo TBS systems (with additional insulation) and others are very popular. Their advantage is durability, and also the fact that they can be installed on bitumen shingles, slate, metal profiles and even provide drainage on the balcony.

 Photo – Ruukki 125 drain
 Let's look at the price for installing a drainage system in different cities (the price is for Ruukki 125 mm pipes):
Prices may vary depending on the required gutter diameter. The total cost can also be reduced by using non-professional brackets and couplings.
Gutter systems made of polyvinyl chloride are much lighter and more practical than outdated metal options. Plastic kits are much easier to work with. Despite the installation rules common to previous varieties, they do not require labor efforts commensurate in severity.
True, it is impossible to successfully install a roof drain with your own hands without taking into account the specific qualities of polymer products. Let's figure out what independent installers of PVC drainage systems should know and follow.
Gutters made of polyvinyl chloride elements are structurally not much different from metal predecessors and prototypes. The kits produced by industry include similar parts from which horizontal and vertical branches of systems are mounted. Assembly and installation are carried out in an equal number of steps and in a similar sequence.
However, in the manufacture and installation of drainage “constructors” from PVC, the specific properties of products with polymer base. This is a characteristic dimensional instability that manifests itself when the temperature background changes. Plastic parts are capable of increasing in a linear direction when heated and returning to their previous geometric boundaries when cooled.
A drain designed for outdoor use will naturally cool down. in winter and exposed to heat in hot summers. Following temperature fluctuations, it will lengthen and then shorten. It is difficult and unnecessary to interfere with the linear movements inherent in polymers. You just have to adapt to them. Those. take into account the specified qualities when designing and assembling the system.
For the construction of PVC drainage circuits, special compensating and connecting parts are produced. They allow the main elements of the system to lengthen and shorten without deformation or damage for the number of cycles promised by the manufacturer. Their design takes into account the possibility of some movement and subsequent return to the original place.

In addition to the described feature, polymer products have another important quality that must be taken into account when attaching a PVC drain to the roof. This is a tendency to deform and sag in long sections that do not have supports.
To ensure that fairly flexible plastic gutters do not sag, the installation step of the holders under them cannot exceed 60 cm. Otherwise, the horizontal sections between the brackets will begin to sag under the weight of precipitation and from their own weight. Dirt will accumulate in the deflections and water will begin to stagnate, which in case of frost can simply tear the polymer gutter.

Stages of assembly and installation of a drainage system
The construction of a drain from PVC elements is carried out in a clear sequence. IN general outline The algorithm for constructing a drainage circuit includes the following types of work:
- Design. Compilation the simplest scheme with the selection of the optimal size of the system and calculation of the number of main parts required for the device and fastening components.
- Assembly and installation of the water intake part. It includes gutters and funnels that receive precipitation, collect it from the roof and direct it into drainage risers.
- Assembly and installation of the plumbing part. Those. drainage risers that direct an organized flow to a specific section of the blind area or to a storm drain.
The drainage system is installed exclusively in a top-down manner. This means that first the installation of water intakes is carried out, then the installation and connection of drainage risers. Strict adherence to successive stages is dictated by the technological features of the system and technical characteristics the material used in its production.

Strict Design Rules
When developing a project for installing a drain, it is necessary to comply with technological requirements that ensure normal operation of the circuit and unimpeded drainage of atmospheric water. To do this, you should deal with the following questions in advance:
- Optimal drainage configuration. Gable roofs are traditionally equipped with two separate gutters and equipped with a continuous contour of gutters arranged around the perimeter. The construction of the latter will require corner connecting parts.
- Number of risers. Every 12 m of polymer gutter must be equipped with one riser. If the length of the gutter, usually based on the length of the cornice, is more than 12 m, you will need two risers with conventional water inlet funnels and a compensating funnel.
- Application of compensating funnels. They are used in several cases: a) when constructing gutters longer than 12 m, b) when there are technical obstacles to expansion, for example, closely spaced walls of neighboring buildings, c) when installing a closed drainage system around the perimeter of the roof.
- Selection of gutter holders. Long or short hook-shaped brackets are used for installation. The long ones are attached to the sheathing before laying the covering, the short ones are fixed on the front board at any time, including after the roofing is installed.
- Maintaining the slope of the gutters. Depending on the brand of the system, the slope recommended by the manufacturer is indicated from 2 to 5 mm, distributed per 1 linear m of the water intake gutter. The slope is formed towards the drainage funnel by installing brackets with a height offset.
It is extremely important to determine the location of the risers during the design process. They should not spoil the exterior composition. The best option their installation in the corners of the building. However, it is quite possible to place it in a niche created by a bay window or in the middle of the wall, if it is more convenient to make a receiving point for storm drainage there.

If you plan to discharge atmospheric water onto a blind area, then you just need to try to remove risers from nearby pedestrian paths, foundation ventilation vents, and entrances to basements.
For drainage system designers, solving the problem with the location of drainage risers will be somewhat more difficult. Their vertical drainage branches must be tied to the load-bearing post of the frame, but fastening to an ordinary one is also permissible. Craftsmen installing a system for a house with siding should do the same.

The required number of parts for the construction of a drainage system should be calculated individually. In private construction, they are now trying to move away from standard design, and at the same time from roofs that are similar in design. However, there is a calculation template that will give you an idea of how the calculations are performed.
Using an extremely simple scheme, the drainage for gable roof with slopes up to 12 m long. Let's assume that this is the case in our case, then we will need:
- Gutters. You need to buy them by the meter according to the lengths of the cornices. Nothing will interfere with the linear thermal expansion of the gutters, so the 2.5 mm allowed for expansion compensation at each edge can be ignored.
- Gutter connectors. If we take into account that their length is 3 m, then for each line of 12 m you will need 3 connecting elements.
- Two funnels. One for each gutter.
- Brackets. The number of hooks is calculated by simply dividing the length of the cornice into equal segments, each of which is up to 60 cm. Before dividing, 5 cm are retreated from both edges of the cornice.
- Additional brackets. For a funnel located near the corner of the house, you will need one additional holder, for a funnel in the center of the wall - two.
- Four gutter plugs. A pair for each branch.
- Two upper and lower bends each for constructing a riser drain.
- Two pieces of pipe to connect the elbows. They are used if the width of the eaves overhang exceeds 25 cm. The dimensions of the segments are determined in fact at the work site, and cutting is also done there. If the roof eaves are less than 25 cm, the knees are simply attached to each other.
- Pipes for riser. They are determined by the distance from the eaves to the ground minus the lengths of the drainage outlet, drain and another 20 - 40 cm - this is the distance from the earth's surface.
- Brackets for fastening risers. Two are required: one is installed near the lower elbow, the second near the drain from the drain riser. The rest are installed near each connection of drainpipes, but at least every 1.5 m.
Elements of a drainage system for a house with an attic are calculated using a similar method. The same applies if the drainage is arranged for multi-tiered buildings. pitched structures, but calculations are carried out for each slope separately.

But calculating the number of parts and fasteners for a half-hip will be significantly more difficult. Because to install them you will need at least four corner parts and two compensating connectors. The principle of using compensating funnels and connectors is the same as for linear individual sections. However, each closed circuit is equipped with parts to compensate for movements, regardless of the length of the largest cornice.
At the design and calculation stage, you need to decide on the diameter of the future system. Parts for collecting drains are available in several sizes to ensure the removal of atmospheric water in the required volume without overflowing. Precise selection size will at the same time exclude the purchase of an excessively large structure, which will look bulky and cost more than an option suitable in size.
According to technological recommendations, drains from 1 m² of roofing should take 1.5 cm² of the cross-section of the drainpipe. This is the average conditional coefficient for our middle zone. In the southern regions, the indicated figure is 1.5 times higher.

Competent selection of the standard size of a prefabricated drainage structure begins with determining the roof area treated by one funnel with a riser connected to it. For example, from calculating the area of the slope from our example.
The area of the slope will need to be divided by 1.5, which will ultimately allow us to obtain the calculated cross-sectional value of the drain pipe. According to this value, usually rounded slightly upward, it is necessary to select optimal size gutter
In practice, the area of the slope above a private house is rarely more than 80 m². Therefore, they do not bother too much with calculations, but take an average Ø of pipes for a riser of 100 mm with deviations in both directions for roofs of larger and smaller areas.
Construction of the water intake part
Let's look at the process of assembling and installing a PVC drainage system using a specific example. According to the example, the installation of the drain is carried out after laying the covering using long metal brackets for gutters. Because Cement tiles are laid on the roof, which means it is possible to simply remove the bottom row by slightly lifting the tiles laid on top.

Let's assume that we will equip two separate slopes of a gable structure. The length of the eaves slope is 12 m, the width of the gable overhangs is 50 cm. We will position the funnel so that the riser connected to it runs 10 cm from the corner of the building. To do this, subtract the width of the gable overhang from the edge of the cornice by 50 cm and these same 10 cm.
First of all, let's install the long brackets:
- Let's do a preliminary fitting. We will attach the outermost holder to the location of the upcoming installation. At the same time, we will install a rule or a regular rail directly on the slope. There should be 2 cm between the rule and the bent part of the hook.
- Mark the bend point. In addition to the above condition, there is one more thing: the edge of the roofing must overlap the gutter by at least a third. Once we have found a point that meets both conditions, we place a mark on the bracket leg.
- We find the slope to the drainage funnel. If, for example, a linear meter of cornice should be inclined by 3 mm, multiply them by 12 m, we get 36 mm. This is the difference in the bend height of the extreme hooks. If, due to the large width of the gable overhang, the funnel is removed from the edge by almost a meter, then 33 mm will be enough for the slope.
- Draw a fold line. To do this, we lay out the brackets in the quantity required for arranging one slope in a row and draw an inclined line on their legs. The point of the hook farthest from the funnel should be 3.6 cm higher than the point of the gutter holder next to the funnel.
- We number the hooks that have passed the marking.
- We bend the gutter holders. In this case, it is better to use a special bending device to optimize accuracy. Failing that, you can bend it using a vice, being careful not to damage the anti-corrosion shell.
- We attach the two outer brackets to the sheathing. The outer holders should be 15 cm away from the edge of the roof.
- We stretch one or two control lines between them. One must necessarily indicate the bottom, the second is used optionally to indicate the top point of the hooks, for example.
- We install ordinary hooks according to the distance between them and the lines marked by the fishing line.
The most important stage has been completed; now we need to prepare the gutters and funnel for installation. To do this, we try again, but this time on the part of the gutter to which the drain riser will be attached through a funnel. Place a plastic funnel on the gutter to find the exact location to drill a hole for it.

Draw the outline of the hole with a marker without removing the funnel. Then, according to the mark, we will drill a hole in the gutter using a suitable bit. You can form a hole for the funnel with a hacksaw by making two counter cuts. The edges of the cuts or drilled holes must be cleaned with sandpaper.
We install the funnel, as expected, on the gutter and fix it with the help of its snap-on sides. Before installation, apply a strip of about 5 mm of glue to the inside of the funnel around the pipe. Two similar strips are applied around the hole. If we use a compensating funnel, we install it according to the divisions marked inside, related to the atmospheric temperature on the day of installation.


We begin installing the gutter on the brackets with a section with a funnel. To join the gutter parts together, we use connectors, on the edges of which on the inside, as well as on the edges of the connected gutters on the outside, glue is also applied in 5 mm strips.
We install and connect all the gutter parts onto the brackets. Then we attach the plugs, which we have every right to install before assembling the gutters. An adhesive composition is also applied to the inner sides of the plugs before installation.

Installation of a drain riser
The construction of the vertical part of the system begins with the assembly of the transition from the horizontal part of the drain to the vertical riser. For roofs with narrow eaves up to 25 cm, it is assembled by connecting the upper and lower knees. Owners of structures with wide eaves will have to overcome a wider scope of work.

Let's join their ranks to study the next stage of drainage construction:
- We attach the upper elbow to the funnel pipe, first applying a strip of glue to it along the connection line at a distance of about 1 cm.
- We are doing another fitting. We attach the lower elbow to the installation location on the wall. Use a ruler to measure the distance between your knees. Mark the position of the lower knee.
- We determine the actual length of the connecting segment by adding to the distance between the knees the height of the pipe of the upper knee, onto which the segment will be put, and the height of the counter element of the lower knee.
- We cut out the connecting segment according to the obtained dimensions. We clean the cut.
- We assemble the transition and mark the point of the upper clamp for the drainpipe. It should be just below the lower knee. Mark the attachment point and again separate the lower elbow and connecting pipe from the upper elbow.
- We install the clamp, securing it as it should be technical rules fix on a wall made of a specific type of building material.
- We assemble the transition, now fixing its components with glue. Apply the adhesive composition in 5 mm strips at a distance of about 1 cm from the edges.
- We mark the installation points for the clamps for the drain riser, not forgetting that the lowest one should be located above the drain. The polymer drainage pipes are connected by couplings, under each of which a clamp must be installed.
- We attach the riser parts, moving from top to bottom. We connect with couplings, leaving 1 - 1.5 cm in the sockets for free linear expansion of the pipes.
- We do not tighten the riser clamps too tightly; the pipes should still be able to move slightly up/down.
- We attach the drain to the lower pipe using glue. If you wish, you can cut the plums from the top with a hacksaw.
If you plan to drain rainwater into a storm drain, it is not necessary to connect a drain to the riser. In such cases, the pipe may end directly above the drainage drain at a distance of 5–10 cm from its surface.


To prevent clogging of the system from above, it is recommended to completely cover the gutter with a grate or at least install protective nets in the form of a crab on the funnels.
Video about the rules for installing PVC gutters
A visual demonstration of the assembly and fastening of a plastic drain will help you quickly and correctly complete the installation:
By following the rules for assembling and installing a drainage system made of polymer parts, you can successfully install a roof great system removal of atmospheric water.
The ideal option is when the calculation of the drainage system is thought out at the stage of drawing up the overall project: this will make it possible to comply with technical requirements, according to which the installation of drains is carried out before installation roofing material. However, it often happens that this procedure is carried out already at finished roof, which is associated with a number of difficulties.
In what situations is the drain attached only to the front board?
Installation of drainage system hooks only on the front board is possible in cases where the ventilation of the under-roof space is carried out using special holes in the eaves lining - the so-called. "perforated soffits". This is the simplest and most inexpensive type of ventilation, but its effectiveness leaves much to be desired.
For a more complete air flow, use a gap under the sheathing. This implies a lower location of the frontal board and fixation of the brackets exclusively to the sheathing. The disadvantage of this method is the risk of the board collapsing under snow load. The decision on the advisability of one or another approach to the installation of gutters is made by the owner of the house.

Another reason for installing drainage hooks on the front board is to carry out the installation of drainage structures after the completion of the main construction work. A common situation is when an unfinished house with an expensive roofing covering: in order to avoid the labor-intensive procedure of dismantling it, it is easier to attach the gutters to the front board. The same algorithm of actions is selected when replacing the drainage system.
The third reason why brackets can only be installed on the surface of the frontal board is the use of anti-condensation waterproofing film. As the installation rules state, it must necessarily go to the overhang of the cornice, which implies the possibility of installing gutters exclusively on the frontal board.
Common methods of installing a drainage system
The installation instructions for the drainage system involve the use of special mounting hooks. According to building codes, they can be installed on a continuous sheathing (soft roof), on the surface of the rafters or on the outside of the wind board.

There are seven main ways to install a gutter:
- To the rafters. Some beginners expect to be able to lift a couple of sheets of roofing material to secure the hooks to the sheathing after completion. roofing works. However, as practice shows, this is not so easy to do, because you have to dismantle several rows roofing screws. As a result, unsightly holes remain in the places where they were installed, which will need to be covered with patches.
To get out of the situation, use lining of the boards on the roofing material, which avoids its deformation when removing and unscrewing the screws. Concerning slate roofs, then special wooden inserts are used directly into the waves of the material: they are turned in advance, exactly according to the profile. In this case, a through fastening of the drain through a sheet of slate and a wooden insert is used. - On the front board. The simplest method of installing mounting brackets on an already finished roof is to install them on the surface of the wind board. At the same time, the frontal board itself is often designed as a separate decorative element. Metal roofs are best equipped with short steel hooks mounted on metal strips. If we are talking about a lightweight plastic gutter, then the basis for fixing it can be an ordinary wooden wind board.
- With the help of crutches. There are situations when there is no frontal plate at all. A way out of this situation may be to install special crutches made of metal or wood into the wall. They will act as a mounting base for the gutters, which in this case are mounted on studs or beams.
- Support brackets. Small adjoining buildings are allowed to be equipped with brackets on supports or other devices.
- Invisible brackets. Mounting devices are offered for sale that are almost invisible after installation. It's all about the direction of fixation: in this case it is carried out from above. The installation step of such structures should not exceed 40-70 cm, in order to avoid deformation under the influence of snow and ice loads. If the brackets are intended to be attached to the sheathing or the top of the rafters, they are bent to the shape of the roof slope.
- Adjustable fasteners. This is an innovative development that allows, by tightening the screws, to adjust and adjust the brackets to a particular roof inclination angle. This will eliminate the need to check the bend radius of each individual fastener. This product consists of two main moving parts: they are positioned relative to each other, depending on the required fixation height.
- Installation directly on the surface of the roofing material. There are expensive fastening structures on sale that allow the installation of gutters in the most difficult situations when fragile or corrugated coating is used. It is important to understand that this installation approach can only be used in areas with low rainfall.

As a result, we can say that the degree of reliability of the fastening directly depends on the correct installation of the gutter. It should be understood that the drain is not designed to effectively resist snow load: This is the task of snow guards and special heating cables.
The technology for installing gutter hooks on a finished roof requires closer consideration.
Calculation of the required number of hooks, gutters, pipes
To calculate the required number of drainage elements, use the formula (B + H/2) x C
Explanation of symbols:
- B – horizontal distance between the overhang and the ridge.
- H – height.
- C – roof length.
All parameters are indicated in meters.

The procedure for installing drainage elements on the surface of the wind board:
- On the surface of the previously installed board, mark a horizontal line in the highest section of the gutter. For these purposes, it is convenient to use a laser level.
- The resulting marking is transferred along the entire length of the gutter. In this case, a slope of 3-5 mm per linear meter of drainage should be taken into account.
- Next, all fastening hooks are numbered. When applying markings, it is important not to forget the slope of the gutter. To change the radius of the hooks, use a special hook bender.
- The first step is to install the first and last hooks. Next, you should stretch the cord between them: it should be at the very bottom of the gutter. Using the resulting guide, it is quite simple to install the remaining fasteners.
- When determining the location of the funnels at the ends of the gutters, their size is taken into account: the funnel must be applied to the surface of the board, and its outline must be traced with a pencil. A 45 mm edge is left between the edge of the contour and its center. To cut out a hole, use a regular hacksaw or special metal scissors.
- The finished frames are bent outward, inserting the gutters into each other. It is necessary to ensure that the front parts of the gutter are put on correctly: in this case, the spout should be in the curl itself.
Correct positioning of gutters and funnels
The gutter is installed in the following sequence:
- First you need to install the funnel and the adjacent gutters.
- The edges of the gutters are fixed with self-tapping screws to the surface of the wind board.
- Fastening the funnel and gutter continues until their profiles completely match.
- You should carefully check the degree of slope and location of fasteners.
- Next, the gutter profile is installed on the brackets, followed by joining. To close the empty ends, the package includes special plugs.
- Funnels and pipes in the wall are connected by bends.
- After this, you need to install the bracket for the pipe.
- At the end, the direction of installation of the drain is marked to install the vertical parts of the structure.

Connection of modern metal gutters occurs using sealing clamps. To connect plastic gutters, latches on clamps, rubber seals and cold welding can be used. During these procedures, it is important not to forget about linear expansion compensation.
You can also use special grates for the drainage system to clean the flowing water from various debris that falls onto the roof surface from nearby trees (branches, leaves, pine needles). If blockages occur, the drainpipes begin to clog, which winter time is fraught with freezing of water inside the gutters, with the threat of their rupture.
How to install and secure drainpipes - instructions
The first step is to decide on which wall it is better to install them, and which mounting method will be optimal in this case:
- On the surface of three-layer walls, only the top facing layer can be used to attach brackets. With a thickness of 90 mm, the anchor is installed at a depth of 60 mm. A layer thickness of 120 mm will require a depth of 80-90 mm.
- It is recommended to drill double-layer walls upon completion of its finishing: the depth of the holes is 60-90 mm. When immersing the dowel, it must enter the second layer of insulation, after which it is allowed to tighten the fastener.
- On a single-layer wall, the bracket is fastened with screws or expansion dowels, with an immersion depth of more than 60 mm.
- In the case of wooden frame walls The holder should be secured using self-tapping screws. For fixation in this case, it is convenient to use a long, sharp rod.

It is best if the installation of vertical fastening elements of the drainage system is carried out during the construction of the walls.
Features of installing pipes to the wall
If installation is carried out on finished walls, the following rules should be observed:
- Installation of drainpipes is carried out only from below.
- The mounting holes should be small in diameter.
- The drain pipe and the wall surface must be separated by a certain distance.
- To protect the foundation from water flowing under it, a cut off drain elbow is installed below.

Brick walls are equipped plastic dowels, into which the screws attached to the clamp are screwed. It is more convenient to mount it on wooden walls using special rods or plates with self-tapping screws.
How to attach a vertical drainage system:
- Couplings are used to connect pipes.
- When inserting the down tube, a gap is left.
- The holder with trunk is installed under the coupling. Tees are mounted in the same way.
- At the end of the procedure, the lower outlet and pipe are secured.
It is advisable to place the corner pipe closest to the eaves at a distance of 150 mm from the corner of the building.