Geometric wood carving consists of different elements that have a geometric shape and is done with one cutter. maybe: lines, squares, triangular and tetrahedral recesses, etc. This technique will even allow you to make carved works of such shapes as leaves, flowers, berries, ears of corn. If you develop the skill, it will turn into the form of contour carving.
Original box made with geometric carvings
You can search the Internet or come up with it yourself. Geometric cutting is quite simple to perform; for this you will need: a cutter, a pair of semicircular chisels. Geometric carving lessons will show how you can play with chiaroscuro and unusual patterns. It is especially beautiful in different triangles, nail-shaped cutting and triangular-notched shape. This cutting allows for polishing and matte finishes.
For triangular notched carving, you only need a jamb knife, it has a beveled blade. In addition, the following tools are needed:
- flat chisel, 2 cm wide;
- semicircular chisel;
- hacksaw;
- files: round, square, semicircular;
- ruler;
- simple pencil;
- compass;
- eraser.
 Elements and patterns for making geometric wood carvings
 The cutting technology is simple, but each component plays its role in the work.
Wood
Wood comes in the following types: hard, very hard and soft. For beginners, it is better to use soft wood, it is easier to work with (linden, pine or aspen).
Linden is more difficult to obtain than other types, as it is often used by professionals. Pine has a disadvantage - it splits when cut.
Aspen a good option for work. There are many visual photos, what kind of wood it should be, and what the longitudinal fibers look like along which work needs to be done.
Preparing for work
For the first lesson, you need a board measuring 170 by 110 mm and 2 cm thick. Sketches for this work will be given below. The surface of the board must be sanded with sandpaper. Now, using a ruler and a simple pencil, draw out the entire surface of the tree in 5 cm cells.
 Wood carving patterns
 Then we draw all the figures, as shown in the figure below. There were 7 figures in total: pegs, diamonds, a twist, a pyramid, stars, squares and a rosette. From these figures you can then create new patterns. A photograph that shows what compositions can be made from just elements, and how the composition looks after processing and painting the wood.
Pegs - the first figure
In triangular-notched carving, the entire process consists of two operations - pricking and trimming. These are simple movements that are easy to do in practice. We take the knife in our hand, the thumb rests on the beveled part of the handle.
Press the cutter vertically to deepen it a few mm, then lower the blade at an angle to intersect the line of the side knife in accordance with the markings. In the same way, a prick is made on the left side of the triangle. 
For pruning you need:
- attach the cutting part of the knife to the left side of the triangle, so it connects to the top with its bevel;
- we move the handle of the knife back, maintaining a parallel between the right side of the pattern and the cutting blade (this movement is done with the hand, as if we were pulling a bow);
- press on the knife, returning to the first position of the hand; so the nose of the knife is on the top, and the cutting part is on the right side of the triangle.
Read also
Carved wooden cornices
The trimmed triangle will eventually break off, hence the name “peg”. This movement is called "shooting". When doing it, try to keep the angle at 45 degrees. The drawing comes out simple with this figure, but this is the basis of geometry.
Security measures
All movements should come from the hand, this simplifies the work and takes the load off the shoulder. 
The working hand (in which the cutter is located) is pressed tightly against the work table to free the movement of the hand. When holding the workpiece free hand, it is necessary to monitor the position of the fingers so that they are not on the working part when the cutting process is in progress.
Diamond - second figure
Ornaments for geometric carvings consist of simple details such as pegs and diamonds. A rhombus consists of two triangles connected by their bases.
The technology is the same, only you first need to cut out the top row, and then turn the board and make the bottom one.
Viteika – third figure
It consists of mastering basic carving techniques and basic shapes. Viteyka is the same type of chips. They are simply shifted to the side in relation to each other.
 Figures for geometric carving
 The result will be a winding path. To do this, you need to cut out and pin the lower triangles, and turn the board - the upper ones. So we will see that there remains a “snake” in the middle.
Pyramid – fourth figure
The first patterns were the simplest. And you can deal with them without difficulty. The following ones will be more difficult to complete, since they consist of several triangles and are located in a certain order in relation to each other.
So the pyramid consists of three triangles, it has in the center the point of contact of all the corners. Therefore, when cutting a given figure, each element, when pricked, comes into contact with the same point several times. The most important thing is that pruning is done in the direction of the wood layer. 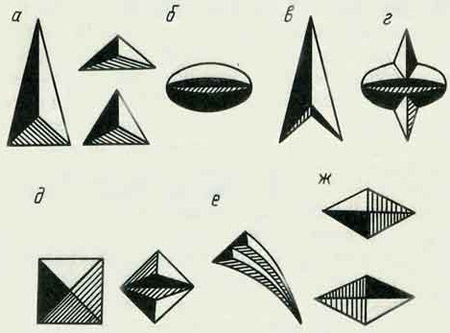
If you cut across, you will get unwanted chips that will ruin the patterns.
Asterisk – fifth figure
Geometric cutting patterns can be varied, but basically consist of the same elements that are arranged together. Same with the star shape. It consists of four pyramids, and this figure will not be difficult to make. You just need to sequentially cut out four pyramids one after another.
Of all types of carving, relief technique is one of the most expressive. Realistic wooden bas-reliefs, with neat detailing, effective play of shadows and properly constructed composition, can truly bewitch. The relief technique can be considered as a transitional step to sculptural carving, which is rightfully considered the crown of carved art.
In this material we will talk about the basic principles of relief wood carving. Our tips will be useful not only for beginning carvers, but also for craftsmen who have already tried their hand at this technique. Using the example of the proposed project, you will become familiar with the basic principles of clean and accurate cutting, learn how to correctly model volume, and master professional secrets that will help emphasize the three-dimensional qualities of a carved composition.
What is the difference between relief carving and other techniques?
The relief technique is distinguished from flat-relief, contour, geometric and other types of non-volumetric carving, first of all, by its emphasized three-dimensional nature. The main composition here comes to the fore due to the cropped background, making the image more expressive, with a characteristic abundance of light and shade.
If the main design of the composition rises only slightly, no more than half the thickness of the entire product, then such carving is called bas-relief (and the product itself is bas-relief). With a higher and more protruding relief, the carving is called high relief.
Newbie Tool Set
To learn wood carving, it is not at all necessary to acquire an arsenal of chisels, knives and other cutters, as many people tend to think. To master the basic skills of relief technique, a few corner chisels (games) will be enough, for example, 10 mm And 6 mm, straight chisel 12 mm, radius (semicircular) 10 mm, scoring knife and small gravel. It is appropriate to purchase other types of chisels for wood carving as your carving skill grows.

Always keep the tool sharp. If the chisel leaves a rough mark and chips the wood in small splinters instead of easily removing neat layers, this is a sure sign that the chisel needs sharpening. A dull tool spoils the quality of work, requires a lot of effort when carving and does not allow a novice carver to “feel” the chisel correctly.
Which wood to choose for relief carving?
The right choice of wood is the key to success for a master mastering the intricacies of this technique. Almost all soft hardwoods are optimally suited for the needs of carvers: aspen, alder, birch, walnut, etc. But the main wood for most craftsmen who do not only volumetric, but also flat, flat-notched, geometric and other types of wood carving is linden.

Linden is a soft and light wood with a uniform density, which makes it particularly easy to process: it is easy to cut, sharpen and plan in all directions. Linden almost does not warp or dry out, does not emit tannins, therefore it is considered an ideal raw material, including for the manufacture of tableware. The disadvantage of linden is its poor colorability in other colors.
Practicing relief carving skills using the example of the “Fox” project
We will tell you step by step how to make bas-relief carvings on wood using the simple “Fox” project as an example. As a blank, we recommend using a cut of linden or a regular board made of any other soft hardwood.

To transfer a drawing to wooden base They use carbon paper as the simplest and most effective solution. If necessary, the carbon paper lines can be easily erased by making the necessary changes as you go. To prevent the design from shifting during the transfer process, secure the piece of wood or place a rubber backing underneath it. Think about where best to place the image to make the composition look more lively and interesting. In our case, we will move it from the center to the bottom (photo 1).

Use an angle chisel to cut out the outer contour #12 (blade width 10 mm/corner 60°). It will not only allow you to make a neat outline of the main figure, but will also immediately remove a significant part of the background (photo 2).

Technique for cutting with an angle chisel:
- Fix the instrument tightly with your left hand, and push it forward with your right; The correct grip of the chisel will allow you to accurately guide the cutter, maintain a neat cutting line and prevent the blade from slipping off the contour.
- Mark the main contour of the lines with a cutter, then cut them to the desired depth (in our case 4-5 mm). By cutting the wood a little at a time, you will have more control over the carving process and reduce the risk of chipping.
- Overcoming the resistance of the wood, evenly distribute the pressure on the chisel, achieving a smooth and uniform surface.
- When working with a chisel, take into account the direction of the wood grain, because the cutter always tends to move along the solid annual rings.
- Under no circumstances should you point the chisel towards yourself: cut away from you or hold the tool parallel to your chest.
- Work the cutter directly behind the pencil lines, leaving them visible.
The correct and accurate removal of the background is largely the essence of relief wood carving. Mastering this skill is a responsible task for a beginning carver. Radius chisels (semicircular or sloping) help to remove a lot of background with minimal effort. In our case, we will leave the background of the composition in the form of wide decorative grooves (photo 3). If necessary, it can be made even using a flat chisel.

Having formed the background, we will return to the corner chisel and once again “finish” we will walk along the contour of the main composition (photo 4). Then we’ll straighten the background (photo 5).

Angled chisels are optimal as a tool for fine contour work. #15 (blade width 6 mm/corner 45°) or #16 (blade width 6 mm/corner 35°).
Outline the fox's eye, keeping the pencil outline (photo 6). Go down and start working on the mouth: carefully select the background around the teeth and inside the mouth (photo 7). Focus on volume and the laws of perspective in the composition: since the front teeth are in the foreground, they should be slightly exaggerated. Work on the nose area.

To work out the shape of the head, use a radius (sloping) chisel with a width 10 mm. Start with the ears: make the left ear in the foreground taller (photo 8).

Round the shape of the head (photo 9), making a smooth transition to the muzzle, which should remain flatter and without pronounced volume (photo 10).

When working on specific areas, do not forget to periodically evaluate the overall composition: how correctly the volume flows, how the perspective is worked out, etc. Here, every detail is interconnected with each other. Relief carving should be perceived as a complete composition, and not a collage of a set of carved elements.
To work on this element, use a cerasic - a deep semicircular chisel with a width 5 mm(photo 11). This narrow tool is well suited for working out small elements and creating leaf relief.

Make a neat trim along the entire perimeter of the sheet so that it stands out well from the overall composition and seems to be torn off from the background (photo 12). Having outlined the main outline and selected the background around the leaf, proceed to cutting out the veins (photo 13). Having finished forming the relief, cut off all the remaining flat places with a stencil (photo 14).
Using a scoring knife, create a deep shadow above the eye, line the lower eyelid with the cutter and give the eye a roundness (photo 15).

Finish working out the small elements of the mouth with a chisel (photo 16).

Imitating the texture of wool is an important skill that every carver needs to practice, because in the future you will repeatedly encounter carvings of various animals. In the presented project, fox fur is created using the simplest scheme: cerasic 5 mm short and shallow strokes are made (arrows indicate the direction of natural growth of the animal’s fur) (photo 17).

For greater naturalism, you can work out the texture of the wool with a thin steel cutter - a serger. Work on the texture until there are no flat spots left.
How to clean wood carvings?
When working carefully, the sharpest cutters almost always leave rough spots and minor defects that require elimination. Use a fine burr to clean out recessed areas and trim small chips. Volumetric surfaces are cleaned sandpaper P150. To finally make sure there are no undetected minor defects, wipe the painting with a rag soaked in white spirit and carefully examine it again from different angles. When all the imperfections have been cleaned out, you can begin finishing.
How to coat wood carvings?
For single-color finishing, the following compositions are used:
stain . In flat-relief carving they are used not only to give wood a more noble appearance. With the help of stain, they enhance the contrast of certain areas; they, in turn, emphasize the relief and volume of the composition. To achieve this effect, it is enough to apply stain to deep areas of the carving that should appear shaded.
If you decide to completely tint your work, you need to use stain carefully, taking into account the type of wood and the characteristics of the workpiece on which the composition is carved. Under the influence of moisture, small-relief carvings can swell, warp, raised pile and other defects can form on it, which will irreparably spoil the appearance of the work. A common flaw when staining carvings is unevenness of tone, especially often manifested in places where the bars are glued.
Wood carving is an amazingly beautiful and very popular type of hand-made wood processing these days. The carved interior details captivate with their magnificent appearance and reflect rich national traditions.

Creative people who are simply itching to do something very interesting and useful should pay attention to wood carving. Girls and women may think that this is only a man's activity. And they will be wrong, because there are no fewer women woodcarvers than men.

About wood carving for beginners
Can be used to decorate indoor and outdoor spaces different kinds carvings and techniques for implementing the plan. If you are interested in this type of needlework, then you must understand that you need to master the methods and techniques of wood processing, acquire necessary tools and improve your carving skills.
IN modern world smartphones and tablets, a wooden stand decorated with wood carvings looks very original.


Skillfully executed carvings in the form of simple and ornate patterns and ornaments seem to enliven the world and endow it with sophistication, charm, emphasizing the taste of the owner of luxury items and the talent of the craftsman.


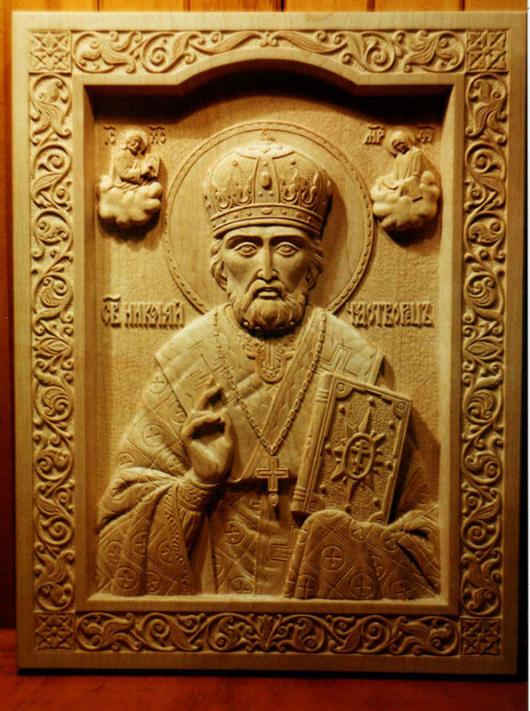

The works of the best carvers decorate the temples. Pay attention to the photo of the iconostasis of the upper Church of the Savior of the Image Not Made by Hands, which is located in Moscow, in the Church of the Intercession Holy Mother of God in Fili.

Modern masters with delicate taste create real masterpieces.

And thanks to finishing and protection technologies finished product from the destructive effects of mold and insects, these wood carvings have served people for hundreds of years.
Pay attention to the magnificent carved pieces of furniture:


Stylish doors:

Delightful handmade figurines:
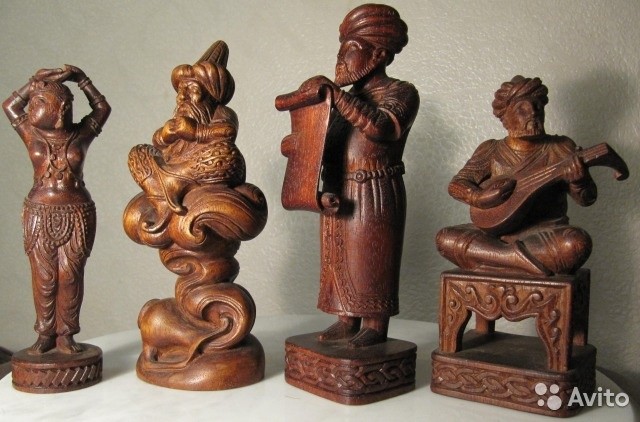

Very often, connoisseurs collect handmade carved items. Wonderful chess that is worthy of any collection.

Perhaps, over time, your wood carving masterpieces will be carefully preserved by collectors or decorate temples.
Types of wood carving
Of all types of wood carving, it is very interesting openwork or through thread on wood, which is characterized by some transparency, in which only the image remains, without a background. An example is an applied carving - this is an ornament that is attached to a finished background after production by a craftsman.

Geometric carving woodworking – This is a type of carving in which the pattern is formed using many simple geometric shapes(a diamond is often used).

Oriental carving on wood it is distinguished by its whimsical shapes. Egypt is the cradle of the oriental type of wood carving.


Relief carving on wood. In this technique, the image is located above the background or at the same level with it. This carved panels various shapes with three-dimensional images.

- This is a flat-relief carving, but distinguished by an abundance of carved and stucco decorations, various colors, curls, leaves, figures of people in unnatural poses, fabulous fantastic animals.

Originated in the village of Kudrino. Well-known products in this type of carving are boxes, vases, dishes, ladles, and home decor items. The main element is a floral ornament: rosettes, curls and twigs.

Volumetric (sculptural) carving Great for making sculptures, animal and human figures, toys.

- a subtype of volumetric thread. This is the main industry of the village of Bogorodskoye in the Moscow region. The famous Bogorodsk toys are figurines of animals and people made of linden and alder.

- the simplest and most unique type of carving. On a flat background, the master cuts out grooves - grooves, forming a pattern. Carved landscapes - images of landscapes on wood.


All these types of carvings are quite conventional. Each master chooses the most suitable one, taking into account work experience, quality of wood and creative inspiration.
What can be decorated with carvings?
The simplest staircase is transformed, decorated with carved balusters. Balusters- these are figured columns in the form of columns, a stylish and noble decoration of the staircase. Wooden balusters look organically with a spiral wooden staircase.

Bas-relief. Another name is "low relief". This is a sculptural image on a plane. Most often these are figures of people and animals .

Choosing tools for wood carving
As in every business, wood carving has its own secrets and nuances, which allow one to reveal the beauty of wood in a wonderful ornament. It is necessary to select special tools for wood carving and stock up on the necessary blanks and sketches for wood carving, which will be embodied in the form of drawings, borders, lace or genre scenes.
Basic tools
Very high demands are placed on the quality of carving tools. Of course, skill plays an important role, but well-selected and sharpened tools will help bring your idea to life. Experienced carvers will tell about its quality at first glance at a tool, but beginners are lost in the store because of the huge selection.
The basic set for wood carving includes:
- several knives and chisels;
- needle files;
- hacksaws for metal;
- vice;
- sandpaper;
- drill with several types of drills;
- bars.

Knives should be made only from high quality steel. It is better to purchase them in specialized stores for creativity. Although on initial stage Just sharply sharpened knives will do. Great start Knives from Tatyanka, Narex, Kogatana and others will serve.
It is not necessary to choose an expensive foreign-made instrument, because domestic instruments can be the same good quality but much cheaper
As your skill grows, you may need a set of tools, a milling machine, a drill, etc.

Chisels for carving
Sometimes, instead of a chisel, a sharpened screwdriver or file is used for wood carving.

Flat chisel- This is a long rod, at the end of which there is a flat cutting edge. Very often it is used for primary wood processing.
Semicircular chisel- This is one of the most important tools for work. They differ somewhat in the degree of roundness, that is, they are medium, round and sloping.
It still happens V-shaped version of chisels. It can be useful for geometric wood carving, which we will introduce you to below.
Beginners need only a small wood carving set of good quality to immediately get used to the correct movements and pressure.
In this video there is a wonderful master A. Yuryev shared with us which tools to choose for carving.
How to protect yourself from injury when carving wood
Any tool of a master carver can be compared to a straight razor, therefore, when working with it, you must strictly follow safety precautions. The material must be positioned so that you can work freely with a knife or chisel, eliminating the possibility of the sharp edge hitting your hands.
The work place should be comfortable and clean. All unnecessary tools at the moment should be carefully folded, because they are very sharp and can cause injury.

Materials for work
Each type of wood for carving has its pros and cons. Soft wood is easy to work with, but there can also be a lot of defects. These are aspen, linden, birch. For beginners this wood fits better Total.

Oak, boxwood, mahogany are more expensive and complex wood. It is hard and durable, so it is difficult to carve from such wood. Very often there are troubles when working with such types of wood. Either the instrument or the craftsman may be harmed.
An experienced carver can easily work with a variety of woods, including juniper. Well, for beginners it is better to use inexpensive materials - spruce, pine, pear or birch.
Whatever tools are chosen for wood carving, safety precautions must be strictly observed!
Geometric carving technology
Geometric wood carving is considered the simplest and is perfect for beginners. To create the intended design, you need to have a small set of wood carving tools and clearly follow the design. In geometric wood carving, symmetry and repetition are of utmost importance. This achieves a wonderful play of light and shadow.


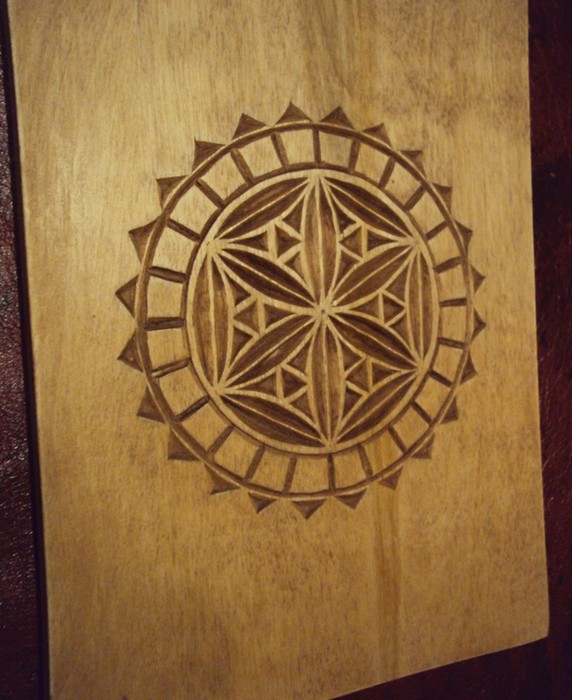
Cutting boards using this technique and wooden panels look wonderful in the kitchen.

Geometric carving consists of sequential cutting out of simple geometric shapes: rectangles, triangles, squares, rhombuses. But the result is a wonderful ornament that looks different in different lighting.
Execution Sequence any wood carving is like this:
- First, a wooden blank is made (board, deck, blank).
- Next is rough leveling of the surface of the workpiece, during which all defects and roughness are removed.
- Then a decorative relief is formed using special cutters.
- After the main carving is completed, the finishing process is grinding, impregnation, painting, varnishing.
You cannot work with a workpiece on your knees! The master must have a table to work on.
Master class “Geometric wood carving on a cutting board”
Tools. You will need 2 knives for wood carving: a triangular jamb knife and a feather knife, a ruler, a compass, a pencil.

A triangle jamb knife is necessary for cutting triangular shapes of various configurations, as well as for cutting long straight lines. A pen knife is used to cut long lines such as a petal or groove. Carving knives should be sharp and comfortable.
First stage. We make a sketch of the pattern on the board. It can be applied using a compass and ruler. Or you can print out carving patterns taken from the Internet and use carbon paper to transfer them to a prepared cutting board.

Second phase. Cut out the petals. We use a pen knife.

While working, the thumb is pressed firmly against the board, and the index finger lightly touches the wood. This will help regulate the depth of the knife into the surface and the angle of inclination. And your thumb will help you move the blade smoothly. First we cut in one direction at an angle, then turn the board over and cut on the other side.

If the shavings curl like a rope, the knife is good and sharp. It must be periodically sharpened with a piece of leather with GOI paste.

Third stage. We cut out the triangles with a blunt knife. Using the heel, we cut the knife into the wood at an angle of 45 degrees, not reaching the edges of the pattern on three sides. The slots should meet on all sides in the shape of a pyramid. The sliver falls out and forms a beautiful triangle.


Fourth stage. What we couldn’t cut, carefully clean it so that the edges are frequent and even. Using the same principle, we cut out grooves and triangles around the perimeter of the board.
Fifth stage. We sand everything with sandpaper and treat it with natural impregnation. All! The work is done. We decorate the kitchen useful and beautiful cutting board with wood carvings.
Wood carving designs
To perform wood carving, photographs, drawings and sketches are simply necessary. Large drawing for wood carving, used for dimensional products: for house facades, interior decoration carvings of churches, windows.
For interior items and furniture, carvers use small patterns that are carefully worked out by the craftsman.
YOU WILL NEED IT
We offer you an archive from . Choose, print, create.
Video master classes on wood carving for beginners
Of course, the wood carving looks especially impressive in the video. Channel "HAND WOOD CARVING" shows the features of geometric carving for beginners.
A woman's view of wood carving. Channel tatianacarving shows us how to make flower petals and leaves.
Konstantin Belyaev on his channel he talks in detail about wood carving cutters.
And in this video Ivan the Builder shows how to make relief-planar carving:
We will be very glad if this article inspired you to take up wood carving!
All photos from the article
The simplest type of wood carving is geometric, which is where learning this craft technique begins. The ornament is formed from various figures - squares, rectangles, polygons, ovals, stripes, circles, segments - parts of a circle, triangles. Today our task is to ensure that you learn as much as possible about what geometric wood carving is, where it is used, how to select and prepare material for it, about tools and techniques.

Features and scope of application
The original and unusual ornamental pattern of a geometric notch is obtained by creating dihedral, trihedral and tetrahedral notches in wood, which are folded into geometric elements.
Despite the fact that this type of carving is considered the simplest, for many years the price of products decorated with its help has been quite high, and it has received a special place among other types of crafts.
Tip: when making furniture, make carved parts from the same type of wood as the main item.
The only limitation in the areas of application of geometric carving can be the author’s imagination, his sense of proportion and taste.
Today there is a large number of furniture decorated in this way, here are just a few:
- buffets;
- cabinets;
- cradle;
- shelves;
- coffee tables;
- the Bureau;
- chests of drawers
Geometric wood carving patterns created by professionals can be found not only in the private homes of collectors and craft connoisseurs, but also in various museums - for example, in the Catherine Palace in Pushkin or the Hermitage in St. Petersburg.

How to choose wood
To train your skill and learn to work with wood, you should start with small parts and elements, this will give you the opportunity to get the basis of the craft. To get a better feel for the wood, it is better to perform the very first drawing on soft wood:

After gaining experience, you can start making patterns on more expensive materials without fear of ruining them. Hardwoods are considered the most valuable. For example, to produce expensive and unique furniture, tree species native to Russia such as beech, oak and pear are often used.
The first has a fairly soft structure, but the wood has attractive aesthetic characteristics; the last two representatives are more hard. By the way, from many points of view, the characteristics of hazel are the most sought after, so in furniture stores that sell antiques you can find products made from it.

How the material is procured
To perform the work correctly, the material must first be prepared. The selected boards are interspersed and stacked over the next 2-3 years.
Tip: the drying of the material must be constantly monitored.
Main condition - right choice places for drying, for example, the attic is considered optimal. Please note that sudden changes in temperature, cold and humidity can greatly affect the subsequent quality of the material, so it should be protected from their influence. Periodically rearrange the boards on different sides; in addition, you need to shift the blanks from wall to wall.