A do-it-yourself carpentry workshop in the country is a great way for any man to realize his potential.
The dacha is perfect for creating a workshop, because there is a lot of free space. There is no need to spend extra money and hire workers to create a workshop; this task can be completely accomplished by you on your own.
To properly use the available space, follow our simple recommendations.
The first thing you need to remember is that not just any space will suit you.
A do-it-yourself carpentry workshop at the dacha is only possible in a room that has an area of 5 square meters. meters. You must organize the space of your future workshop correctly. 
A separate place should be allocated for massive tools such as machines and workbenches. Pay special attention to storing the tools you plan to use in your woodworking shop.
Don't forget that there should be room in your workshop for a heater, which will be an indispensable attribute in the winter season. You should also consider the issue of lighting in the workshop. This is a very important aspect, because you really need good lighting, which is why we recommend creating a workshop in a room equipped with a window. 
You should also take into account that the workshop must have a very good soundproofing, which will protect your loved ones and all kinds of sounds that may be heard while working in the workshop.
We recommend that you think through all the nuances in advance. To avoid unwanted dust in the space, we advise you to place a vacuum cleaner in the workshop. There must be a metal bucket in the workshop; it will be needed to collect nails and other used parts.
Do-it-yourself carpentry workshop at the dacha
This is a great opportunity to combine business with pleasure. In order for your workshop to be useful to you, pay careful attention to its arrangement. You must take into account that the floor in the workshop must always be hard and dry. This Golden Rule which must be followed. 
When calculating the workshop area, keep in mind that the entire area of the room should be 2 times the area of the space occupied by the tools. Creating a workshop is not an easy process and should be approached thoroughly. The carpentry workshop must have adequate ventilation. The most important thing you must consider is that there should be no sources of fire in the room. This will guarantee safety.
Carpentry workshop at the dacha
Country house- This is a great way to store things. A carpentry workshop in the country is a great idea that will help brighten up your leisure time.
It is very important that you do not forget about safety precautions when creating a carpentry workshop in your country house. The simplest thing you can do to protect yourself is to place a fire extinguisher in your workshop. This is the most affordable fire remedy.
Never forget to dispose of waste. Do not store flammable paints and varnishes for too long. These substances may cause a fire. When you start working with substances that are chemical in nature, do not forget to wear a protective mask. It is very important.
A carpentry workshop at the dacha is a responsible step. 
The most significant tool in your workshop will likely be your workbench. You can place either plumbing or carpentry material in the carpentry room.
If you plan to work primarily with metal, then we recommend purchasing the first option, and if the main material is wood, then the second. A carpentry workshop in the country will be an excellent place to store tools. This is a great opportunity to do something useful and create or repair the necessary things or devices.
How to equip a carpentry workshop at home
If you are a hardworking person, then you will probably want to create nothing more than a carpentry workshop at home. This is a great idea, follow our simple recommendations to bring it to life. The first question you must answer correctly is how to equip a carpentry workshop at home.
You should start by organizing your workspace. This is the most important area of the room. Most likely this will be exactly Workbench, which should also be purchased. When choosing this tool, pay special attention to the details. Start with appearance. This tool must be massive. It is very important. It is desirable that it has fixation. The height must be appropriate and safe.
You may want to immediately purchase other tools that may be useful in the workshop. This could be a machine and other electrical tools. 
We recommend that you do not place items in this space that you will not use during work. Let your workshop be filled with only important and necessary tools, because there is not too much space in the room anyway.
You should buy these simple tools like a hammer and screwdrivers. Pliers and other tools will be indispensable in the work. Let there be a caliper in the workshop. Don't forget about primitive stationery.
How to open a carpentry workshop
Opening a carpentry workshop is an event for which you should be well prepared. Today we will tell you how to open a carpentry workshop correctly.
Start small. write a good business plan. This First stage, which is very important. Consider your financial capabilities and compare them with the real cost of everything you need. This will be the first step. Find out what equipment you have and what you will have to purchase.
The main step towards opening a personal workshop will be the selection of premises. Pay special attention to this moment. We recommend that you purchase premises on the outskirts of the city. This option will allow you to quickly grow your clientele. You should not save on equipment, because the level of goods that you plan to produce will depend on its quality. 
In order not to spend extra money, find direct suppliers of raw materials. This will help you save money. Opening a carpentry workshop will help you not only make a profit, but also discover your talent for craftsmanship.
In fact, this business is a great opportunity to make money. Few people want to engage in this way of making money, so there is practically no competition. You can start producing exclusive goods from wood.
Such work always costs a lot. If you are determined to pursue this method of earning money, do not be lazy to read additional literature. If you want to open it only for yourself or friends, then it will be enough to place it in the garage or basement of the house.
Use your imagination and you will be able to create a real masterpiece from wood or metal. All you have to do is calculate everything. This is a real business with a lot of risks. Think about your product range in advance. It may not be very large at first, but over time you will be able to expand your business.
Today you learned how to open a carpentry workshop without any problems. Just take into account all the recommendations and you can realize your dream without any problems.
And also you can watch the video carpentry workshop
- How to choose the right place
- Necessary equipment
- Arrangement rules
Carpentry workshop for household work should be located as far as possible from residential premises. If you don't have a garage, summer cottage, a private house, you can equip one of the rooms of a city apartment, a loggia, a storage room. A workbench for home carpentry can fit into a built-in closet installed in the hallway. The article offers several ideas for arranging carpentry.
How to choose the right place
It is necessary to evaluate the capabilities of the available space. The smaller the dimensions of the room, the greater the limitation in the range of equipment. A room of 4 m2 can only accommodate a workbench and a small grinding machine. This should leave room for movement.
Garages and sheds with an area of at least 6–8 m2 are most suitable. They can accommodate several lathes, drills and other types of machines. To comply with the rules fire safety You need to install a box of sand next to the foreman’s workplace.
Workspace organization
It is important to ensure good sound insulation. Especially when the premises are located in the yard.
The walls and the inside of the door must be covered with sound-absorbing material. If a window is provided, it is better to place it on the side opposite to the residential building. It is imperative that if the woodwork is not resistant to fire, it is necessary to treat the internal lining with fire retardants.

The workshop will require a multi-core power cable (VVGng 3x6) that can withstand heavy loads. In a wooden shed for carpentry, the wiring is laid in boxes or corrugated pipes. Sockets and equipment are grounded. The work area should be well lit; it is better to use fluorescent or LED lamps.
It is also necessary to take care of ventilation. During woodworking, a lot of dust is generated; an exhaust hood can improve the situation. It is important to remember that you need to ensure not only the exit of dust from the room, but also the influx clean air inside.
When equipping the workshop technically, the priority of equipment placement is observed. Drilling and lathe machines are installed next to the workbench, grinding units are placed slightly away from the main workplace. For convenience, all tools are stored in cabinets and wall cabinets.

Compact home workshop
To prevent carpentry from disturbing other people, you can locate the workshop on the balcony. Glazing and supplying the room with a heat source will allow carpentry to be carried out throughout the year.
Care must be taken to install sockets for electrical equipment. The home electrical network is not designed for the operation of powerful units, so difficulties may arise.
Carpentry work using powerful machines is accompanied by noise. Conflicts with neighbors are possible. To avoid this, you will have to limit yourself to hand tools.
Ventilation on the balcony is carried out by opening the window. It is difficult to ensure air flow in the utility room. These rooms in city apartments are small; they are rarely equipped with workbenches and other larger devices. If you do not plan to regularly perform a large amount of work, you can build a cabinet with a folding table top. The simple design will allow you to neatly store tools and provide a working surface in the carpentry.
Necessary equipment
Tools, devices:
- The workbench is factory-made or assembled yourself.
- Woodworking Machine.
- Clamping device: vice, clamps - for reliable fixation of the workpiece in a stationary position.
Hand tools:
- plane, chisel;
- drill with a set of drills and attachments of various diameters;
- roulette;
- hammer;
- hacksaw;
- pliers;
- sandpaper and some other tools.

The photo shows how to equip a rack, saving space by installing additional cabinets and cabinets designed for storing working tools.
Arrangement rules
The main recommendation is to ensure unobstructed access to the working plane from several sides. The free space must be twice as large as the space occupied by the machines, otherwise movement will be difficult and the technical process may be disrupted.
The floors in the room must be smooth and hard.
Electrical equipment needs to be grounded. It is advisable to install a powder fire extinguisher near the workplace and place a bucket of sand in case electrical appliances catch fire.
The room allocated for home carpentry, must be equipped with a hood. It is important to ensure that humidity levels do not exceed the permissible norm.
It is important to clean daily. Use a rag to remove oily dirt. Dust and small debris are removed with a construction vacuum cleaner after completion of work.
The home workshop is equipped with a first aid kit stocked with first aid supplies: dressings, hydrogen peroxide, brilliant green, medical plaster, painkillers.
The main secret is to buy only what you really need and don’t waste money on expensive trinkets. Take a closer look at professional workshops where each tool justifies its price. Think about how you can achieve the same results and how you can get the most out of every penny you invest without sacrificing quality.
START WITH THE MAIN THINGS
There are different opinions about which machines and tools for the workshop should be purchased first. Here's how we set those priorities. The list includes machines, power tools and other equipment. (This assumes you already have the basics, such as a screwdriver, jigsaw, and vacuum cleaner.)
First thing - sawing machine
This versatile machine is the heart of most carpentry shops. With its help you can saw lengthwise and crosswise, cut out grooves, tongues and tenons, and do much more. Since this will be your main machine, you don't want to be too stingy. Avoid buying low-end desktop models, which often lack precision and power.
pay attention to simple machines with an open stand or tabletop ones costing $300-500. They have plenty of power, are more accurate, and will allow you to use a variety of attachments.
By raising the bar higher, you can own an even more powerful and accurate entry-level closed stand saw, or (for the same money) a great open stand saw with a powerful electric motor and a 50-inch rip fence. Any of these machines can remain the only one for life. A good longitudinal stop always justifies its price, so you should choose it carefully and not skimp too much. When determining the expenses for the purchase of a sawing machine in your budget, do not forget to add funds for the purchase of a high-quality combined saw blade with 40-60 carbide teeth to avoid numerous chips and burns on the wood.
Having purchased a saw machine, use one of its side wings as milling table by installing the mounting plate. This way you can avoid the unnecessary costs of a separate base and save valuable space on the workshop floor. You can also use the same rip fence alternately when working with the saw blade and cutters.
A router with replaceable soles plays any role
The router is undoubtedly one of the most versatile power tools in the carpentry shop. And today, for the same money, you can have many more routers than before.
By her own milling machine is useless, however, you can buy cutters in large sets, which will significantly save money. When several cutters in a cheap set have exhausted their service life, they can be purchased separately and replaced with higher quality ones that will last longer.
It makes sense to purchase a router with several interchangeable bases - fixed, submersible and, in some cases, with a bracket-shaped handle. Place one base on the table and use the other for manual routing. Add a large, inexpensive set of cutters and you're good to go.

Most measurements and markings can be done using a tape measure, combination square, steel ruler, compass and mechanical pencil. For more complex work, you will need a hammer, digital calipers, a protractor and a drawing square.
Tools for measuring and marking
The accuracy of processing directly depends on the accuracy of the marking, so you should definitely purchase several basic measuring and marking tools, choosing the highest quality ones. There are many clever devices, but you don't need to pay attention to them. Just a few basic ones are enough, which are shown in right photo above.
A work surface is essential

The workbench must be level, stable and durable. You can make it yourself by adding a commercial vice and bench stops for convenient clamping of parts.
Now that you can turn the boards into pieces for your project, you need a place to work with them. Massive carpentry workbench would be an ideal workbench, but you can do a lot with a small folding workbench, a door resting on a sawhorse, or the simple homemade workbench shown in photo above.
You can't do without good clamps
Woodworkers often say that you can never have too many clamps, but just a few are enough to get started. Rack and pipe clamps are considered the champions of versatility, and they are especially useful when gluing panels together. Buy half a dozen pipe clamp heads, several lengths of pipe threaded on both ends, and couplers. Then you can always have clamps of any length on hand. Quick-release one-handed clamps are very convenient, so it is useful to have at least a few with a jaw width of 300-600 mm. Over time, when funds allow, add new clamps to your arsenal.

The soleplate of the eccentric sander rotates and makes oscillatory orbital movements, due to which individual marks merge into a continuous pattern that covers the entire surface.
Don't forget about sanding
If you can only afford one sander, let it be a random orbital sander. With coarse discs it will aggressively remove material from the surface, and with fine-grained discs it will provide a smooth base for finishing.
A drill press should be next on the list.
Modern electric drills amaze with their power and convenience, but for maximum accuracy and accuracy you need drilling machine. In 90% of cases, a relatively inexpensive tabletop model will suffice, saving you over $100 compared to a larger floor-standing machine. Use the savings to buy sets of twist drills, Forstner drills, and some sanding drums. In addition, you can use a slotting attachment for selecting sockets, which is bolted to the quill neck.
Some may require a planer

Even if you don't take full advantage of a planer, it can help you quickly prepare rough boards for further processing and get perfectly straight edges for gluing.
If you often have to deal with rough boards, you should think about buying a planer and planer. Perhaps in other cases you will be satisfied with the possibility of jointing the edges using a router. However, planers are not overly expensive machines.
With its help, you can remove burn marks from a saw blade, ideally joint the edges of boards for gluing panels, and some models allow you to select folds. Most importantly, the planer is the only machine capable of perfectly leveling the face of a board.
IS THERE STILL MONEY LEFT? THINK ABOUT THESE PURCHASES
With the equipment listed on the previous pages, plus a jigsaw and drill, you should be able to make most projects. However, over time you may need a couple more machines.
Add a thickness planer to the additional list

It will help you save on purchasing lumber, since you will process rough boards yourself to the required thickness. In addition, you can obtain blanks of non-standard cross-section, which cannot be found on sale.
Be prepared for the fact that these machines produce a huge amount of chips and dust. However, in some modern models There's a built-in dust extraction system that makes cleanup easier, and this will help you put off purchasing special equipment if it's not in your budget.
A band saw wouldn't hurt either.

The band saw excels at curved cuts, but it can also be used to rip boards to width and thickness, cut crosswise, cut circles, and even turn small logs into boards.
Carpentry does not always require only straight cuts. A portable electric jigsaw can do a lot of things, but in some cases you can't do without a band saw. In our opinion, 14-inch models make the most sense in home workshops.
With all these machines, tools and equipment, you will be ready for almost any job. Then, as needed and budget permitting, add specialized tools to your arsenal. Read the section to see a list of what you may need in the future.
IT'S TIME TO GET ORDER IN ORDER
Work in the workshop will be productive only if each thing in it is immediately assigned a permanent place, and you regularly maintain order. But you shouldn’t go to extremes, thinking that the furniture in the workshop must certainly be fashionable or expensive. Efficiency is based on completely different principles. Try the following methods.
Store your tools in cabinets
You can organize storage for your treasures without spending a penny if you take a look at your unnecessary kitchen cabinets. Your relatives, friends or neighbors will often be happy to get rid of them after renovation.
Once you get your cabinets into your workshop, get creative with their placement. For example, the drilling machine shown in photo at the end of the article, installed on two wall-mounted kitchen cabinets. They raise the machine to a convenient height for work, and inside there is a lot of space, closed from dust by doors.
Make cabinets more functional by adding drawers and extra shelves, and attaching holders to the inside of the doors. Paint old cabinets with a light enamel to freshen up their look and make your craft room smarter.
Store boards compactly
Boards leaning against the wall and stacked on the floor quickly become a source of clutter and are often damaged when dropped. Store them properly by securing them to the wall with inexpensive metal brackets, as shown in photo at the end of the article. Place them at intervals of about 200mm in height and place particleboard shelves on top. Each shelf can easily hold 6-8 boards.
With such small stacks, it's easy to select the board you want, especially if you label each one.
ADDITIONAL WAYS TO MAKE THE MOST OUT OF YOUR BUDGET
How to save on clamps

Want to reduce the need for clamps? Try replacing them with several hairpin nails when gluing.
A small compressor and pneumatic nailer will cost about $200, which is no more expensive than a few good rack clamps. If you already have a compressor, purchasing a nailer will only cost $40-50.
Buy boards by the cubic meter
Purchasing lumber is not part of setting up a workshop. But all the work in a carpentry shop involves boards. Why not save on this too by buying them in bulk? If the professionals do this, then you can do it too by teaming up with a group of friends and buying boards together. You might be lucky and be able to get an additional discount.
Next steps
Other tools and accessories help make carpentry work easier, faster and better. Once you have the machines and tools we've included on the main list, you might want to consider purchasing the following items.
HAND TOOLS
- Chisels
- Planers
- Kiyanka
- Japanese hacksaw
- cycle
POWER TOOLS
- Lamellar router
- Belt sander
- A circular saw
- Second router
MACHINES
- Chip blower and air filter
- Miter saw
- Combined Belt and Disc Sanding Machine
- Spindle grinding machine
- Jigsaw machine
- Lathe
EQUIPMENT AND ACCESSORIES
- Mobile platforms for machine tools
- Roller support
- Jig for drilling oblique holes - pockets
- Tenon milling device
- Reismus

A neat, well-organized workshop is the dream of many DIY enthusiasts and professionals. A corner in a room or garage is all you need to start setting up your workshop.
If you plan to spend your time in it often, then it’s worth putting in some effort now so that you can work comfortably and safely later. The functionality of the workshop is ensured by sufficient space for work and storage, the availability of electricity, lighting and ventilation.
The layout of your workshop will depend on its intended use. For some, allocating space for storing tools and simple items is enough. repair work, others will need special equipment to practice their hobby.
Workshop space

If you're lucky, you may have a studio, shed or garage that you can use for your needs or hobbies. The space available will determine the content of your workshop, so it is necessary to plan very carefully how to make the workshop as efficient as possible.
If you're a car tinkerer, you'll need at least a one-car garage, but if you're a woodcarver, four to six may be enough. square meters in the corner of the spare room. In any case, it is important that the workshop has good organization, good lighting, good ventilation, ensured safety of work and ease of cleaning.
Workshop lighting

The workspace should be well lit, as poor lighting can lead to poor results. Windows in the south wall will provide plenty of natural light without direct sunlight, which is ideal for working with wood.
If there is no window, then a skylight made from flexible pipes with a reflective coating is an excellent and easy-to-install alternative. In cases where artificial lighting is required, it is better to use 150-watt halogen flood lamps; Fluorescent lighting, although popular, is not very suitable for workshops because it distorts colors and creates a so-called stroboscopic effect, which makes a rapidly rotating object appear to be stationary. This is a serious work safety hazard when variable speed power tools such as routers, drills and lathes are used.

Linear halogen flood lamps
Place the lamps so that they are either directly above the workbench/work table or on one side. Do not place them so that they shine into the eyes or from behind, which creates shadows on the objects being processed.
Workshop ventilation
Through (cross) ventilation will be the best option, so place your workbench between a door and a window if possible.
If the work is dusty or you will be using solvents or other volatile substances, cross-ventilation with air flowing from your back is preferable. This, together with an appropriate mask/respirator, will provide reasonable protection from airborne substances and particles.

Consider artificial ventilation using fans if adequate air circulation in the room is not possible. In cold climates, where windows and doors are kept closed and the room is heated, circulate air throughout the room using a fan air circulation system, preferably with a filter that is easy to clean. Adhesives and paints can produce fumes, so cross-ventilation is helpful in dispersing these fumes and also helps the adhesives and paints dry.
When working with wood, the air must be dry so that the wood does not warp or swell.
Workshop layout

First of all, you will need a sturdy, flat work surface in the form of a wooden workbench or table and enough space to assemble and move the items.
If your work area will be used for other purposes at the same time, consider a folding workbench and wall-mounted tool cabinet. In a limited space, a wall-mounted workbench or workbench with space underneath for storing various items will be more useful.
If you are the lucky owner of a large workshop, then a freestanding workbench will give you the most flexibility in its use. You'll likely need some sort of vise on your workbench, so consider where to make it and how much space you'll need to handle elements of your projects.
If you have machine tools, such as a cutting machine, drilling machine or lathe, try to place them so that it is easy and free to move between different work stations.
The floor surface needs to be given serious attention, especially if you will be standing on it for long periods; The floor should be such that it is easy to sweep and keep clean. Cover or eliminate low spaces under cabinets and shelving where dust can accumulate and enter small parts, which will be difficult to get from there.
Keep tools in close proximity to your work area, each in its place, so that you can always easily find the necessary tool.
The worst place to store tools is on a “big shelf,” that is, on the floor.

Most hand tools are usually stored on a wall panel. A low, open shelf under or nearby a workbench works well for storing hand-held power tools such as a drill or Circular Saw. The upper limit for tool storage is determined by where you can easily reach, and the most frequently used tools should be kept at or above the height of your workbench to avoid unnecessary bending.

Workshop layout example
The practical and user-friendly layout shown in the image above was originally designed for a cabinetmaker. Interesting points can be noted: a wall board with its tools, small closet and the various shelves are located close and conveniently relative to the workbench. The band saw, as the most commonly used machine, is also nearby. The windows are very well placed and provide maximum natural light, which is complemented by several halogen floodlights (not shown). The machines are located so as not to be exposed to direct sunlight. The space between the roller doors and the workbench is sufficient for the assembly of large products.
Electrical supply in the workshop
 Hanging universal electrical sockets are convenient and safe. Located above the workbench, they keep hand-held power tool cords off the bench and floor where they can be accidentally damaged or snagged, and also increase the tool's reach.
You may also need additional lighting, which should be positioned above work areas and properly aimed to avoid annoying shadows and unlit areas. Ask your electrician to ensure there is sufficient wiring capacity to accommodate the possible installation of additional outlets that may be needed later, and inquire about special outlets and circuits that may be needed if you plan to use machine tools or welding equipment.

Make sure there are enough outlets, conveniently located around the work area and equipped with residual current devices (RCDs) to ensure safe work. Small power tools such as jigsaws and drills require standard 220-volt single-phase power, but machine tools such as bandsaws, drill presses and radial saws may require three-phase power.
All electric installation work should only be carried out by a qualified electrician.
Work safety - how to ensure
Contain workplace clean and tidy, not only to create a pleasant working environment, but also to ensure safety and health protection.
Always follow good work practices, such as wearing appropriate work clothing and protective equipment and using tools for the purpose for which they are intended. Be careful and protect yourself, your family, friends and anyone else who may have reason to enter your workshop.
In all necessary cases Eye protection is required, for example when using a milling machine/machine, drill, power saw, lathe or any tool with a fast moving working part.

Noise-protective headphones or earplugs are very important when working with loudly noisy equipment; Hearing damage often goes undetected for several years after it occurs.
Safe, comfortable footwear is a necessity, and protective work clothing such as overalls or overalls is essential when conditions are or will be contaminated with dust or other contaminants.
Close-fitting clothing and a hair net will help prevent loose clothing or hair from getting caught in the machinery.
Machine tools and stationary machinery must have safety switches, such as circuit breakers and emergency switches. Automatic disconnectors automatically turn off the machine when the supply of electricity from the network stops, making it impossible for it to accidentally turn on when the power supply is suddenly restored.

Emergency stop button
The kill switch is usually a large red button that, when pressed, turns off the machine. As an added safety feature, many of these devices must be manually reset before the machine can be turned on again. Check these devices regularly to ensure they do not fail you in an emergency.
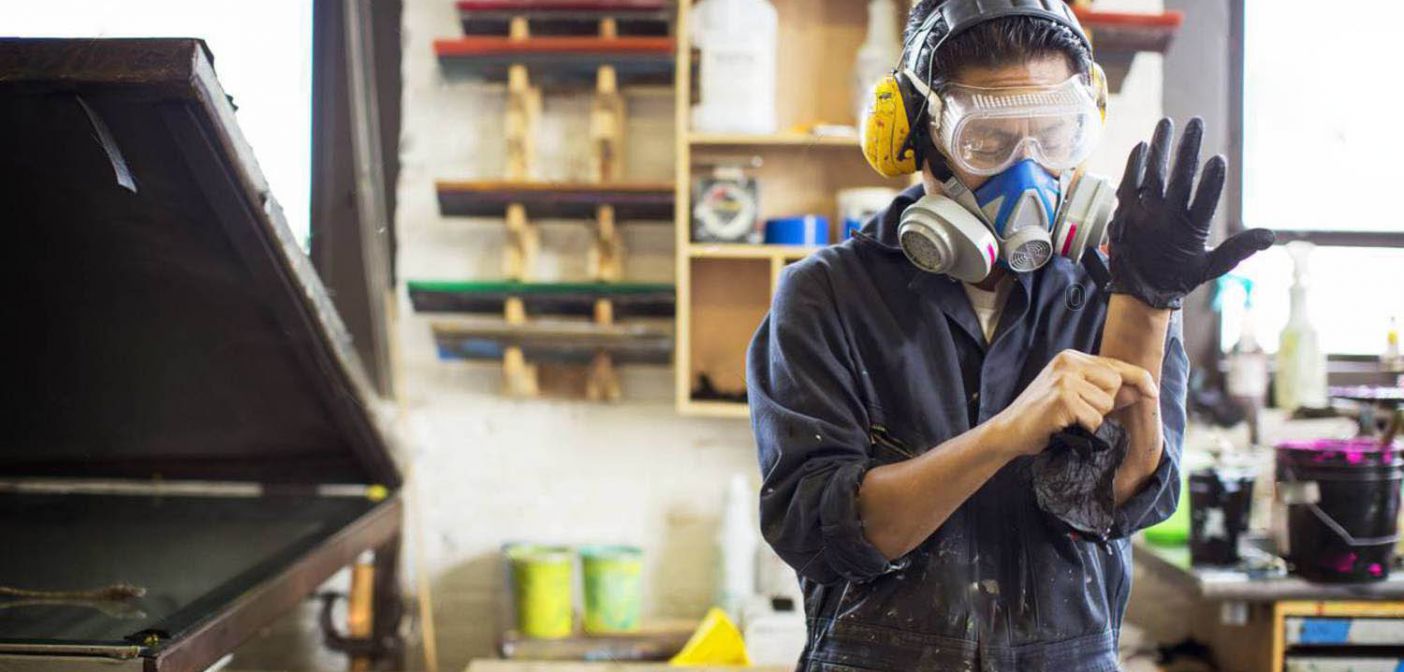
Disposable face shields/respirators provide adequate protection against normal dust, but if you work in environments with toxic fumes or very fine dust, respirators with replaceable cartridges should be used. When using a mask/respirator, carefully follow the manufacturer's recommendations and, if the work requires the use of toxic substances, carefully read the description of the substance to comply with the necessary precautions.
If your work produces a lot of dust, it would be wise to invest in a dust extraction system. All wood dust is potentially hazardous, especially from fiberboard (MDF, PSP) and chipboard. The simplest solution for a small workshop can be a household vacuum cleaner, but if there is a lot of dust or the work is carried out over a large area, then a system with dust removal pipes connected to each type of equipment would be best, or you can use a mobile dust collector that can be transported around the workshop to those places where where it is needed. For emergencies, keep a fire extinguisher and first aid kit on hand.
As a result, we can highlight several basic protective equipment that you need to have in your workshop:
- Protective glasses. When working with power tools, you must protect your eyes.
- Respirator with replaceable cartridges. More effective than disposable dust masks/respirators and suitable for working with toxic substances.
- Gloves. They provide some protection against accidental injury, but should not be worn when operating machines with rotating implements.
- Earplugs and headphones. Disposable earplugs provide good hearing protection. Some people find ear protection more comfortable and effective.
- Shoes for work. Durable, hard boots with non-slip soles.
- Jumpsuit/robe and hair net. Wearing close-fitting clothing helps prevent loose clothing and hair from getting caught in the machine.
- Anti-dust respirator/mask. Disposable respirators effectively protect the respiratory system from wood dust.
Which workbench to choose

While an old table may be strong enough for small jobs, most carpentry projects will require a durable workbench.
The workbench should be approximately 850mm high and have spacers on the legs to ensure rigidity. The tabletop should be made of thick wood that can withstand impacts, especially at the front. Thinner wood can be used in the back or middle section to create a tray where tools can be safely placed.

If workshop space is limited, you can work with a portable folding workbench. When not needed, it can be folded and put away or transported to the construction site. Its tabletop is divided into two parts, which can be moved and extended, using as a vice.
Workbench accessories include adjustable bench pins for planing, bench stops for pepper cutting, a miter box for making bevels on parts, a pencil case for storing tools or hardware, and a carpenter's vice. The latter differ from a bench vice in that they fix the workpiece next to the workbench, and not from above, and also have wooden jaws to protect the products. Goats and various ladders will be useful.
Tool storage

Proper storage and care of your instruments will ensure they are in good condition. Shelves and shields for tools will protect them and help you always find them quickly. the right tool. A well-designed shield is a very useful thing in any workshop.
You can make your own toolbox to suit your tool kit and available space, and there are many special fasteners available for securing tools. Many tools are already sold in a storage container. Even if it's just a cardboard box, it will serve well for a while. If tools will not be used for some time, put them away, especially at the end of the working day.

Keep hardware and fasteners in their packaging until you need it - it is intended to protect and preserve the complexity of the products. Store screws and nails in a clearly labeled box.
Workshop tools
There are a huge variety of tools, but you can build your tool kit gradually, buying tools as needed. For best results, purchase only reputable brands. Here's a basic set of tools to get you started:
- hammer with nail puller (570 g)
- plane
- surface planer
- combined measuring square
- steel tape measure (3 m)
- three chisels/chisels (10, 18 and 32 mm)
- Cross saw (650 mm long)
- hacksaw with blade
- nail puncher (3 mm)
- set of twist drills set of screwdrivers (flat, Posidrive and Phillips)
- whetstone (grindstone)
- sanding block
- variable speed electric drill
- jigsaw
The need for a small carpentry shop for people who are closely involved in housework almost always exists. And if you don’t know how to build or choose a room for this object, how to plan it, and what to place inside it first, read this article to the end.
How to choose a room for carpentry
When creating a carpentry workshop within your own suburban area, it is a good idea to make sure that it is as far away from living quarters as possible. This will preserve the peace of the rest of your family and will not prevent your guests from enjoying a relaxing holiday.
The ideal location for setting up a carpentry workshop would be a separate barn, garage or specially built room. You can consider an option in which the carpentry workshop will be located in a building block container (a used product is quite suitable for the workshop, since new block containers are quite expensive). The area of the block container is a little more than 14 m². Therefore in his usable space It will fit not only a workbench and a shelf with tools, but even several small carpentry machines. There will be enough space for storing wood and organizing a small painting area.
The option with a block container can be considered if you take a fairly serious approach to the arrangement of the workshop and if you have serious intentions related to the volume of work performed here. If your carpentry work is on a modest scale, then an alternative in the form of an empty garage or shed is quite capable of meeting your needs.
In order for a home workshop to meet the minimum requirements for comfort and safety, its area must be at least 6...10 m² (it all depends on the amount of equipment you plan to place in the workshop). This should be taken into account if you are going to build a special room for a workshop. If you plan to adapt an existing building of suitable size for a workshop, then use it. M a scarlet carpentry workshop can be quite convenient. N and six squares can accommodate not only the carpenter’s main tool – a carpenter’s workbench, but also a couple of the most popular machines: sharpening machine for tools, as well as drilling - for wood processing, etc. And 40-50 sq.m. - this is practically a workshop.
This is what a regular FORUMHOUSE user writes about the size of the carpentry workshop.

AlekX member of FORUMHOUSE,
Moscow.
10 squares is enough... To arrange and work comfortably - from 25 squares, comfortably and impressively move with a cigar from machine to machine - from 40-50 sq.m.
And here is a photograph of the interior of his workshop, which measures 11 m².

Basic requirements for a carpenter's workshop
It is not enough to understand how to build a carpentry workshop or how to choose the right premises. When setting up a carpentry workshop, you need to remember five important factors, the presence of which guarantees convenience and safety while working inside the future premises:
- fire safety;
- effective sound insulation;
- high-quality lighting;
- proper ventilation;
- efficient and safe heating.
Let's talk about all this in more detail.
Fire safety
To ensure fire safety, the workshop premises must have grounding. All machines and equipment should be connected to a common grounding circuit. A powder fire extinguisher, which is an essential element of a carpentry workshop, must be installed in a well-accessible place. The fire extinguisher must be rated ABC (for all flammable materials and electrical equipment) and have a capacity of 4.5 kg (10 lb). A container of sand, equipped with fire extinguishing equipment and installed near the entrance to the workshop, will give you an additional guarantee of safety.
Soundproofing
If the carpentry workshop is located near residential premises, sound insulation in it is of great importance. To ensure this, you can use standard means, which consist in the use of special finishing materials, double-glazed window and door structures.
Lighting
Good lighting is half the success of your carpentry workshop! This is not only comfort for your eyes, but also a necessary condition for work safety. Indeed, in conditions of insufficient visibility, injuries when working with electric and other woodworking tools occur much more often. And in order to avoid them, in addition to general lighting in the workshop, it is necessary to use additional lighting for the workplace (machine, workbench, etc.).
When working away from natural light, it is better to use a combination of lighting fixtures of different spectrums. Neon fluorescent lamps - for general lighting and incandescent lamps - for additional illumination of the workplace. According to doctors, the use of the same type of lighting devices does not always have a good effect on the condition of the visual organs.
 Do-it-yourself carpentry in the garage.
The electrical cable that you run into the workshop to connect electrical equipment and lighting fixtures must have a suitable cross-section to withstand heavy loads. Wiring should be placed in metal conduits or pipes to help prevent fire in the event of a short circuit.
Ventilation
Even the simplest forced ventilation installed in a carpentry workshop will make your work much more comfortable and safer. Ventilation prevents you from breathing in wood dust that can cause irritation. respiratory tract and even their diseases.
If you plan to install woodworking machines in the workshop, then installing a suitable chip ejector is an issue that requires a mandatory solution. Otherwise, the room will always be a mess, and all efforts aimed at ensuring fire safety will not have the desired effect. After all, wood dust, scattered in the air in large quantities, can ignite like gunpowder from the slightest spark.

Heating
If you plan to work in a future workshop all year round, then heating a room is an issue that should be taken very seriously. The warm air in the workshop will have a beneficial effect on your well-being, performance and the condition of the power tool. And only in such conditions is wood able to retain its best qualities.
It makes no sense to connect such a room to centralized heating (with rare exceptions). Therefore, installing an oil heater will be considered a completely worthy way out. As an alternative, you can use heat fans or more modern infrared heaters. These devices will quickly heat a small room and, if the room is well insulated, will create a cozy microclimate inside the workshop.
Carpentry workshop layout
If, before creating a room for a carpentry workshop, you took into account the minimum requirements regarding the internal area of the facility, then you will definitely have enough space to organize its main zones:
space for machines;
space for a workbench and assembly table;
racks (shelves) for tools;
space (corner) where equipment for cleaning the workshop is stored;
container for waste and garbage (wooden box, etc.);
attachments for storing hacksaws, tape measures and other tools;
hanger (wardrobe) for workwear;
wall cabinets for small tools, fasteners and other parts;
storage space for wood and finished products.
An assembly table, like a workbench, is an essential element when planning a carpentry workshop. Here's what one of our forum participants thinks about it.

Yuzef member of FORUMHOUSE
An assembly table is a must. The simplest one is one chipboard sheet split in half (according to the layout - lengthwise or crosswise) and fold two thicknesses (fasten with screws).
It is advisable to mount large items and equipment on walls or install them near them. This will free up some of the internal space for freer movement. In order to calculate the minimum area of free space near a machine or workbench, it is necessary to multiply the area occupied by this device by 2. Tools and equipment used together must be located next to each other.

In order to save free space in workshops, some of their owners resort to little tricks: they build convenient folding workbenches. The working surface of such a device is mounted on the wall, and its unscrewing legs are stored in any convenient place. On the bottom surface of the workbench you can easily make mounts for storing a wide variety of tools.
This is the workshop layout suggested by user Sitnikoff.


I figured out the live arrangement in Visio, without the exact dimensions of the machines and equipment for the 5.6*6.2m option. Everything fits in and even more.
The room shown in the diagram has impressive dimensions, and not everyone can afford such dimensions. The general concept of arrangement of equipment and accessories shown in the figure will be clear to all interested.
Here is more detailed information about the proposed project. Everyone can find something useful in it. You will learn what to make a floor from in a carpentry workshop, what to build walls from, what the foundation will be like, etc.

Sitnikoff member FORUMHOUSE
For now, I’ll write about the design of the building for the carpentry workshop:
The structure is a frame made of boards 150x50 mm. HSD 2.8m x 5.6 x 6.2. The height of the attic is 1.2 m.
Build on strip foundation shallow depth.
Insulation - mineral wool or basalt 150 mm thick.
Cover the outside and inside with OSB board.
The outside of the slab is covered with clapboard.
Floors - concrete, then EPS (50mm), warm water floor in a concrete screed.
Floors – ceramic tiles.
Heating is from a stove (I don’t know whether to buy a metal one or install a small Dutch oven), it is possible to connect a heated floor to the route running from the house to the bathhouse.
The roof of the attic will be insulated in the same way as the walls, since there will be no ceiling (in case something will have to be hung or placed within reach), i.e. I am planning a dome in the workshop.
The roof covering is metal tiles (especially since there is some reserve left after the house and bathhouse).
The door is a metal double-leaf insulated door with a width of 120 cm (80 + 40).
Window - plastic double glazed windows size 150 x 60 cm under the ceiling - 6 pcs.
Window opposite the door 100x150 cm – 1 pc.
I do not rule out the presence skylights in the ceiling (I want light) – 4 pcs.
Electrical equipment - 220 V in plastic boxes.
Dust removal and ventilation system (you will probably have to place several boxes around the room to connect the tool to the dust removal system).
Basic rules for organizing space in the workshop
Each machine, workbench and other equipment must have free access from three sides.
The free space of the workshop should prevail in quantitative ratio over the space occupied by machines, cabinets and other items.
The floor in the workshop must be smooth and dry, and under no circumstances should slippery materials be laid on its surface.
The waste container must have 2 compartments (the first is for storing wood waste, the second is for storing other waste).
A small supply of drinking water, as well as a fully stocked first aid kit, should be kept in a visible place.
Remember, while working in the workshop, do not neglect by individual means protection - overalls, safety glasses, respirators, and so on.

Those who want to watch a video on how to combine an ordinary garage with a carpentry workshop can familiarize themselves with the material prepared by a professional carpenter and a regular participant in our forum. A video about how to properly equip a cabinetmaker's workplace is advisable for everyone who is planning to make a comfortable and multifunctional workbench with their own hands. You can find fresh ideas regarding arranging a carpenter’s home workshop in the “…” section. And you can participate in the discussion of issues related to the manufacture of wood products by visiting the forum section "".