There is no doubt that properly executed kitchen lighting sets the tone for the entire interior. A chandelier can become the central element in this cozy and warm room.
Using available materials - or even waste - you can make a lampshade from threads, an eco-style lamp from jute twine or plastic bottles, or you can make a real masterpiece - beautiful chandelier from wooden or glass beads.
You can also not only hang a lamp made by yourself in the kitchen or dining area, but also give it to your loved ones as a gift.
Method 1. From scrap materials - anyone can do it!
The simplest DIY lamp is made from threads. Indeed, even a child can handle such a design. So, to make a chandelier from threads, we will need:

- Threads - you can take regular jute twine or thick cotton threads with a total length of at least 100 meters, the color is chosen based on your imagination and the existing interior;
- PVA glue and brush for applying it;
- Petrolatum;
- 2 balloons - one for work, the second for testing; It is better to take a round ball, not an ordinary one, then the shape of the lamp will be the correct shape.
Advice! A children's or rubber beach ball will also work. For very large lamps, a fitball, for example, is suitable.
Work on creating a ball of thread is carried out in the following sequence:
- Inflate the balloon to the required size. Do not forget that the resulting lampshade made of threads will repeat the shape of the ball. Using a marker, draw one or two circles at the top and bottom (more at the bottom).
- Pour glue into a container and carefully process the threads. And the ball itself can be coated with Vaseline with a brush.
Advice! You shouldn’t apply glue to all the threads at once - it’s better to move along the winding area.
- Next comes winding the threads around the ball, taking into account the drawn holes - the density of the winding determines how your lampshade will turn out in the end.

- After the ball is wrapped, you need to leave the future chandelier to dry for at least 24 hours.
- The ball bursts and its remains are easily removed from the robust construction. The result was a lampshade made of solid threads.
- A hole is cut at the top to accommodate the cartridge.
- You need to check the strength - another ball is inserted into the lamp and inflated. This will demonstrate the flexibility of the design.
In this way, you can also create local lighting in the kitchen by creating several lamps from threads with your own hands. Or you can hang it in the dining area, as shown in the photo.


Do not forget that for a ball of thread you can make additional decor in the form of interesting coloring, beads, butterflies or artificial flowers, or you can make a whole bunch of balls of different sizes.

Using the same principle, you can come up with your own unique lamp design. For example, made of lace, or a ceiling lamp as in the photo below.


Method 2. Creating a masterpiece - you need to try!
You can get excellent kitchen lighting if you make your own lamp from beads or fabric. You will get a lamp in style or a real candelabra chandelier.
For this job you will need:
- An old hoop, garden basket, hanging metal planter, or wire to create a frame;
- Decorative chains;
- Beads, beads, ribbons, strong threads;
- Lamp socket.


The lamp will be a two- or three-level structure of rings located one above the other and connected by chains or wire.
Rings can be taken in different sizes, creating a lampshade in the spirit of a vintage classic, or the same size - this is exactly the kind of lighting that is done in.


The base of the lamp is certainly painted, wrapped or decorated, after which they begin to string the beads.

The consumption of beads in this project is as follows:
Bottom part: beads with a diameter of 16 mm, 15 pcs. on a thread;
Upper part: beads with a diameter of 12 mm, 31-32 pcs. on the thread.
Here you can vary the degree of tension and the number of threads.
Advice! The work should be carried out by first hanging the chandelier and inserting a socket into it.
By analogy, you can create a chandelier from artificial fruits for the kitchen. And subdued lighting will be achieved if you use fabric to cover the frame. As a rule, such a lampshade is made for country and country styles.
Method 3. Lamps made from waste materials - for a modern kitchen!
Most original lamp can be made from such waste material as plastic bottles and disposable spoons are beautiful, cheap and environmentally friendly!
We make a lampshade in a minimalist style and - no additional decorations from threads or beads, only matte white or colored plastic. To make such dim kitchen lighting with your own hands, we will need:
- Base made from a 5-liter plastic bottle;
- Cartridge with wire and lamp;
- Glue for high-quality fixation;
- Lots of disposable spoons.
To make a chandelier with your own hands, cut out the bottom of the bottle and cut off the handles of the spoons (not completely, so that a small handle remains). Using glue, we fix the cut spoons on the base bottle. They need to be placed evenly, in a row, then the lampshade will look attractive.
Advice! Each next row overlaps, without gaps.
The resulting chandelier will resemble fish scales. However, it should be remembered that this design is quite dense, which means that additional lighting will definitely be needed in the kitchen.
The shape of the lamp can be different, for example, in the shape of a lotus.

You can also make such decorations from disposable spoons.

A lamp made from plastic bottles, or rather from their bottoms, made with your own hands, may seem like lace or consisting of many small flowers.

Advice! Such a lampshade can be made not white, but colored - which means you need to take colored bottles or paint it with paint of the original color: copper, gold, steel, pink, black, etc.
The resulting lampshade can be hung in the kitchen or above the dining table.
Let your kitchen be cozy and bright! We wish you creative success and present some more wonderful ideas for making kitchen lamps with your own hands from improvised materials.


When you want to change the decor in your apartment and add a little originality to it, start with the little things. Try changing the lampshade, and you will be surprised at the transformation of your family nest.
And if you manage to find an original model that differs from analogues, then the changes will impress not only you, but also your guests.

True, unique lampshades cost a lot of money, because you can’t buy one-piece works by famous artists for pennies.

But no one is stopping you from creating your own unique masterpiece from cheap and sometimes even waste materials, which will look much better than the samples presented in the store.

All you need are simple materials, a little patience and a flight of imagination, and we will tell you how to make a lampshade with your own hands.
Materials
You can create a masterpiece from everything you have at hand: fabric, paper, thread, twine, wire, plastic bottle, beads or beads.

In general, absolutely everything is suitable, even what you usually throw in the trash bag.

Don't believe me? Just look at the photo of the lampshade.

Frame
If you have a frame from an old lampshade, then that's just great.

However, don’t be upset if you don’t find one, because you can create a frame yourself from ordinary wire.

Copper, aluminum, steel - anything that you can independently combine into a single structure will do.

Metal carcass A classic lampshade consists of three rings and six bridges between them. The small ring is a holder, which is connected by three jumpers to a ring of a larger diameter.

The same, in turn, is connected by jumpers to the last ring. The following photos will help you understand the design.
From fabric
When you have a frame for a lampshade, the easiest way to create your masterpiece is to wrap the base in fabric. For this you will need:
- paper (newspaper);
- scissors;
- textile;
- chalk or pencil;
- threads

Wrap the frame in newspaper so as to form a pattern out of it. Then transfer the resulting shape onto the fabric using chalk, adding 1 cm to the seam on each side.

Make a pattern, cut off the edges and sew the sides, forming a cover for the base of the future lampshade. We bend the upper and lower edges of the “cover” in such a way as to close the frame rings and secure them with a seam.

Note!

Voila, your lampshade for the floor lamp is almost ready. All that remains is to add a few highlights to your taste, making it unique.
From threads
How to make a lampshade when there is no frame? As easy as pie.

Take a balloon without drawings, glue, thread, marker and start creating.

First you need to inflate the balloon and mark on it the upper and lower boundaries of your future masterpiece. Then take the threads and wrap them around the ball, trying not to protrude beyond the marked contours.

Apply glue diluted with water 1:1 to each layer of thread. When the density of the wound thread satisfies you, fix the cut edge and hang the ball to dry. After 3-4 hours the threads will dry. Then pierce the ball and carefully detach it from the walls of the finished lampshade.

Leaves and flower petals woven between layers of threads can add additional charm to a thread lampshade.
Note!


A ball decorated with sparkling drops of beads also looks original. In general, watch and be inspired.
From paper
Ordinary sheets of office paper, glossy magazines, a cheap newspaper, an unnecessary book or an ordinary notebook, a paper towel or napkin - these are all future lampshades.

It doesn’t matter whether there is a frame or not, the main thing is that you have scissors, glue and paper. A thousand and one versions of such lampshades can be described with the words “cut and stick”.

The main thing is not to forget a few simple rules:
- It is safest to use a paper lampshade together with economy light bulbs, which heat up significantly less than incandescent bulbs;
- the diameter of the lampshade should be large so that the paper does not heat up excessively;
- for a light room you can make a lampshade from thick paper, but for a dark room you need a thin one that transmits light well;
- be careful with color. For example, red or yellow paper will add warmth to the room, green and blue will add coldness.

Well, that's all. Charge yourself with new ideas, arm yourself with the means at hand and move forward to easy changes that will bring warmth and comfort to your home.

Note!

DIY lampshade photo


It is well known that any product made by human hands is much more interesting and beautiful than mass-produced products. This is precisely what explains the great demand all over the world for handmade products, which appeared in last years. Of course, you can purchase a finished piece of jewelry from a craftsman or order it according to your own sketch, but is it worth spending money on something that you can easily make yourself, receiving incredible pleasure from the process of work itself and, of course, from the finished result?
An excellent material for interior decor is rope made from natural fibers. Buying a rope made of hemp, jute or sisal today is not at all difficult and it costs very little, and you can make from it a huge number of necessary and very beautiful things that will decorate the interior residential premises, cafe or club. As an example, we can cite rope chandeliers - beautiful, light and invariably attracting attention. This chandelier will fit perfectly into an interior in a country or romantic style and can become a real highlight of the design.
Materials and tools
There are many options for chandeliers made from natural ropes. There are both complex designs, the creation of which requires certain skills and the use of many auxiliary materials, and very simple ones, which anyone can make. One of the simplest lamps of this type is the “Spider” - ceiling chandelier, which will perfectly complement the interior in the industrial style.
For work we will need:
- or hemp, with a diameter of 20-30 mm;
- Two-core wire, for example ShVVP 2x0.5 mm;
- Lamp sockets, according to the number of lighting elements;
- Incandescent lamps 40-60 Watt;
- The base is from an old multi-arm chandelier or a self-made bowl made of wood with holes according to the number of “horns”.
Let's get started
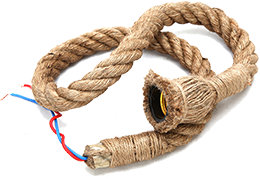 The most difficult part of the job is placing the wire inside the rope or rope. Of course, we will not unravel the rope and braid it again with the guide inside. To place a wire in a rope, you just need to grab the ends and start rotating them in different directions. In this case, the strands diverge and it is quite possible to place a small cross-section wire between them. After the wire is inside the rope, connect a cartridge to one end of each part. Our lamp will not have shades, so the sockets need to be decorated. One of the most simple options is to paint them in a color that matches the shade of the rope, but the most aesthetic option can be obtained by slightly unbraiding its ends and winding strands around the cartridge. In order for the winding to hold, it needs to be properly glued.
When all the elements are ready, you can start assembling a chandelier. We pass the wires through the holes in the base and connect them to the main cable through which power will be supplied to the chandelier. It is important to be especially careful here and observe polarity. All connections must be carefully insulated using electrical tape or. The ends of the ropes should not be thrown into the bowl in order to comply with the rules fire safety. Before fixing the chandelier to the ceiling, you can get a little creative by tying the ropes in picturesque knots.
The Spider chandelier is attached to the ceiling in several places - in the center, like a regular ceiling lamp, and also in the center of each individual rope element. To fix the product, you can buy self-tapping hooks. Separately, it is worth mentioning the lamps used with a rope chandelier. To avoid overheating, do not use too powerful lamps - it is enough to take lighting 40-60 Watt. The now popular Edison incandescent lamps with unusual stylized glass bulbs and intricately arranged spirals look great with such a chandelier.
Useful tips
Materials you will need for work:
Hanging flower basket - plant pot made of metal;
- Sisal rope used for decorative crafts;
- Rectangular cover for socket;
- A can of white metal spray paint;
- Mini pendant for the finished lampshade.
Manufacturing process
Step 1
At the bottom of the flowerpot, which will later become the top of the lampshade, you need to strengthen a rectangular overlay. Most often, the bottom is a lattice of crossed metal sticks. Make a hole of the required size with wire cutters, and then secure the overlay in this place. You can use a glue gun for this. Don’t worry that such a mount will not withstand the load, it won’t, hot glue serves only to connect the parts of our structure.

Step 2
The next stage is painting. The metal frame that serves as the basis for the new lampshade is best coated with white paint intended for painting metal surfaces. This is worth doing for two reasons: firstly, if it is visible somewhere through a layer of rope, it will not attract much attention to itself and be conspicuous, moreover, especially if White color The pendant for the lamp will also be painted. And secondly, the paint will protect the metal from moisture if, for example, the lamp is located in the kitchen or other room with high humidity.

Step 3
Now let's start weaving the basket. To do this, the rope must be carefully passed between the rods of the flowerpot in the chosen direction. The layer of rope can be very dense, the weaving can be tight, in this case, quite a lot of sisal will be lost. If you make the “basket” free, you can save on the rope. It all depends on how you want to see the end result. You can weave in one direction or change it as desired.

Step 4
After you finish weaving, tie the rope inside in a tight knot. In the same way, fasten the ends of the sisal if you have to switch to a new skein.

Step 5
Attach a pendant with a cord to the trim on the “roof” of the lamp to secure it to the ceiling.
Materials: scissors large and small, pliers, tweezers, candle, matches, egg containers, plastic bottles, coffee beans, tangerine skins, pasta, beads, jute twine, PVA glue, balloon, base of an old lamp, for coloring flowers - acrylic paints, glass paints, stained glass paints, nail polish, hook, glue gun.


So. There were the remains of an old lamp lying around. It's a shame to throw it away. I started updating. I inflated the balloon to the desired size. I tied it so that it would be easy to untie. I tied a weight to the end of the rope (in my case an iron rod) for stability, and put it in a jar. I smeared it with PVA glue and wrapped it with jute twine on top. Then I thoroughly blotted the entire structure with PVA. It is best to do this with a sponge so that the entire twine is saturated with glue. That's it, we forget about the ball for exactly one day.


Let's prepare the decorations.
 I make orange spirals like this - I peel the insides of the orange along with the zest, cut the orange peel into strips and roll them into spirals, secure with toothpicks and also forget for a day.
I paint the noodles with paint and nail polish.
Let's move on to flowers.
I'm collecting bottles and egg containers. 


The bottom and neck of bottles can be used for flowers. for leaves - the middle. The egg container is the most convenient for making flowers. You just need to cut out the cells and cut through the petals.
Further. If there gas stove- this is the most the best option! I have not it. I will bend the petals over the candle. Using trial and error, I calculate the required distance so that the petals do not melt completely, but simply bend and begin to look like flowers. 


When all the blanks are ready, I collect flowers from them - several blanks, inserting one into the other and gluing them with a hot gun. Then I take the above paints and nail polish and start painting my flowers. This is what comes out. 


The ball has dried up, I untie the string and put the ball away until the next job. What remains is a beautiful ball of twine. I cut out the bottoms. One larger one will go on the leg of the lamp, the second one will not be needed in this product. I braid the base of the lamp with jute twine, and with the same twine I attach the resulting lampshade to the base. I crochet three chains. Two for decorating the bottom cuts on the leg and one for decorating the top cut of the lampshade. I sew the top one. I glue it on the leg with a glue gun. 

I make a composition of flowers, leaves, beads, coffee, pasta and spirals. I glue everything with a hot gun. The lamp is ready. 