Installation finishing panels siding with your own hands on wooden house is not difficult even for those who do not have professional construction skills.
Modern way cladding with wood, metal and vinyl siding allows you to protect the structure from the harmful effects of the environment and significantly improves its appearance.
Siding consists of separate Wall panels, fastened with a special locking system. This cladding option has a large number benefits:
- does not require additional coloring;
- has a long service life;
- lightweight and easy to install;
- easy to care for.
Correct calculation facing material can be done independently, but with the obligatory consideration of some nuances:
- External corners jointed with reserve are used if the height of the walls of the building exceeds 3 m;
- calculation of internal angles is carried out similarly to external elements;
- finishing the eaves of the roof with siding also involves installing internal corners;
- if the cornice trim is already present, then a finishing strip is installed;
- the length of the starting bar depends on the length of the perimeter of the building minus the width doorways and pediments;
- areas of connection with extensions and differences in height are formed with a J-profile;
- window openings around the perimeter are sheathed with joined window strips and flashings;
- the perimeter of the base is equipped with a drain strip, and if necessary, the width of such a strip is increased by ebb;
- finishing panels are joined using an H-profile.
Formula for calculating the number of finishing panels:
where K is the number of finishing panels,
S 1 - area of all walls of the house,
S 2 - area of windows and doors,
S 3 - panel area.
The calculation result requires add 10% for losses from pruning and defects.
Installation is carried out mainly with galvanized self-tapping screws with a rubberized head, 2.5-3.5 cm long, with a standard consumption of two fasteners per meter. Purchase fasteners necessary with reserve.
Technology for installing siding on a wooden house
Standard installation technology do-it-yourself siding on the surface wooden house identical for any type of finishing panels.
Main stages cladding consists of preliminary preparation of walls, as well as vapor and waterproofing films. There is no need to install the sheathing in the following cases:
- the presence of a flat base of the sheathed surface;
- small area for cladding;
- clearance is provided for ventilation.
Important: in the absence of sheathing for siding, thermal insulation of the walls is not provided, but surface preparation must be carried out.
Preparing walls and materials for lathing
High-quality installation of finishing panels requires proper surface preparation:
- dismantling of all elements protruding on the surface of the facade;
- repairing chips and cracks using tow;
- treating the surface with antiseptic solutions against pests;
- deletion drainage system, fasteners for lighting devices, canopies, antennas and canopies.
Besides finishing materials are used grinder or scissors for working with metals, tape measure and square, hammer.
Installation of sheathing for insulation
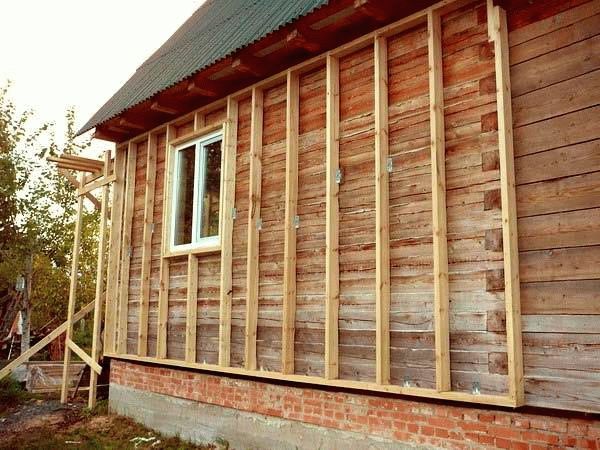
Lathing under the panels is a kind of frame fixed to the surface of the walls of a wooden house:
- the thickness of the wooden blocks for installing the sheathing should be selected depending on the width of the sheet insulation;
- the pitch of the horizontal guides is determined by the dimensions of the insulation;
- depending on the density of the wall, plastic or impact dowels are used to fasten the slats;
- the lower horizontal rail is attached in a horizontal plane.
Advice: during installation metal sheathing It is possible to exclude the installation of a vertical frame under the siding. The console must be mounted on the wall with a distance between the brackets of 50 cm and a pitch of at least 40 cm.
Installation of siding frame
Most often used metal frame made of a U-shaped profile with a cross-section of 2.7 x 6.0 cm and a length of 3.0 m. This version of the lathing has curved edges, giving the required level of rigidity to the frame.
The profile is fixed using hangers made of galvanized steel plates with perforations. Increase strength metal frame possible through additionally secured jumpers.
Installation of accessories
 Installation of frame base begins with a starting strip, which sets the direction for the entire skin. In addition to the starting strip, the installation of the frame includes the installation of J-profiles around the perimeter of window and door openings.
Accessories in the form of slats and profiles are fixed in increments of 40 cm. To install metal siding, you need to reduce the distance between fasteners to 25 cm.
Installation of siding panels
Cladding panels need to be installed through "hooks" or special lock systems. Every two rows the horizontal and vertical lining is checked.
Fasteners are installed strictly in the center factory perforation so that there is a thermal gap of 1-2 mm from the head to the surface of the finishing strip.
Installation of siding panels on the walls of a wooden house will not require special knowledge and skills in the construction industry, as well as the use of sophisticated equipment, therefore it is the best option self-cladding.
Watch the video for the technology for installing siding on a wooden house yourself:
Find out everything about siding material from the video below:
Finishing siding on a log house: features, recommendations and our experience
If you are the (hopefully) happy owner of a log home, then you know that these homes are special, and when protecting such a home from the elements with “vinyl armor,” this must be taken into account.
In this article we will look at what are the main differences between siding a house made of round timber, and what you should pay attention to.
Why decorate a log house with siding?
A wooden house, in addition to its undeniable advantages, has a number of disadvantages.
It's cold in the house
Log house, like timber house, consists of “crowns” - horizontally stacked tree trunks (logs or beams).
Because of this, the thickness of the wall is uneven: in the middle of the crown it is maximum, in the place where the crowns are connected to each other (between the logs) it is minimal.
Heat is like water: it flows where there is the least resistance. Therefore, the thermal conductivity of the wall is determined by the thermal conductivity of the “coldest” section.
In a house made of logs, there are exactly the same number of such areas as the number of crowns that make up the wall. The thicker the log, the fewer crowns. The thinner the more.
If we take the most common thickness of a log house log (25 cm), it turns out that a wall 2.5 m high will consist of 14 crowns (including a bowl in each crown).
Even if your log house was made by masters of their craft, it is still impossible to achieve perfect contact between the crowns. To reduce heat loss in the cracks between the logs, the house is insulated with inter-crown insulation and the cracks that formed during the shrinkage of the house are caulked.
But, whatever one may say, it is impossible to completely solve the problem of cracks. Therefore, a log house, like a timber house, loses heat much more than, for example, a frame house.
If a house loses heat, then it must be insulated, otherwise it will only be warm inside in the summer. And the simplest and effective method to insulate a log wall means installing insulation on the outside and covering it with siding.
The house has “lost its appearance”
Logs are a very beautiful material. Of course, there will be people who disagree with this, but there are fewer of them than who agree.
A new and fresh log house looks great: golden-yellow trunks, natural wood pattern pleasing to the eye.
But if the house has stood for 20-30 years, then its appearance is no longer so pleasing: somewhere it has turned black, somewhere it has turned green, somewhere dust has eaten into the wood.

When a tree is alive, it is covered with bark, and its vital forces help fight external influences. But when it is cut down and “stripped”, it becomes defenseless to the changing seasons, rain, sun and dust.
Therefore, the old log house no longer looks so festive and pleasant, and is not pleasing to the eye. I want to cover it with something.
Once again, vinyl siding comes to your aid and solves this problem quickly and easily.
Exterior cladding increases the lifespan of a home
A tree deprived of natural protection quickly becomes unusable. And if you want your log house to last you longer, you will have to help it.
In order to increase the service life of a log house, you need to take care of it: treat it with special compounds on the outside, caulk the cracks, and immediately remove fungus and mold.
It's not the most enjoyable job, and it takes time and effort.
Another option is to encase your home in “vinyl armor,” which will protect it from the elements and UV rays.
The main advantage of such protection is that you don’t have to take care of it: just trim it and forget it.
In addition, if the cladding is professionally installed, it will provide everything the necessary conditions: protection from external influences and proper ventilation of the outer surface.
This will make your home last longer.
Why do some people think that a log house cannot be sheathed with siding?
Among amateurs wooden houses, as well as log house builders, there is a widespread opinion that a log house cannot be sheathed with siding.
They usually say that “the log under the siding does not breathe, so it rots.”
And this is true if the people who install the siding do not understand the technology.
Properly installed siding provides all the necessary ventilation for any house: log, timber, aerated concrete or frame.
In order for the house to “breathe”, it is necessary to observe technology: order and correct fastening membranes and insulation, as well as a ventilated gap under the siding.
From our experience working with vinyl panels since 2009, we can responsibly declare: a log house properly covered with siding does not rot and lasts longer.
What is the main difference between the walls of a log house when finishing with siding?
The surface of the log house is uneven. Of course, if your house is not built from a gun carriage, hewn on both sides. But then it will be more suitable for you, because the walls made of carriages behave like those of a timber house when installing siding.
The surface of “round timber” is entirely made up of waves, and this distinguishes it from other materials. It is more difficult to attach insulation and membranes to it than to a flat surface.

There are no more differences. Everything is the same: films, frame, panels and accessories.
Features of installing siding on log walls
Due to the unevenness of the wall, there are a number of features for installing the frame and insulation if the walls of your house are insulated.
Let's look at the most basic features so you know what to look for when you order siding for your home.
Installation of the frame on a log wall
Due to the wavy surface of the wall, installing the frame on which the vinyl panels will be attached becomes more difficult.
The logs in the crowns of your log house can be of different thicknesses or have convex and concave areas in the most unexpected places. This leads to the fact that the frame has to be aligned with the most “protruding” crown.
As a result, it may happen that one log in the middle of the wall will become a supporting one and will determine the passage of all the sheathing posts.
If the house is insulated, this is not so noticeable, because the insulation will partially hide the unevenness of the facade.
The next factor that complicates the alignment of walls is the presence of outcrops of logs (they are also remnants, they are also corners).
If in the case, for example, frame house, we first set the corners, and then align all the other frame posts with the corners, but here we simply do not have outer corners due to the protruding ends of the logs.
The only way to level a wall in a vertical plane is to align the outer boards on the wall, secure them and push off from them as a base.
Bypassing siding of log outcrops (corners, remnants)
Another difficulty with cladding a log house lies in these very remnants of logs: in order to make warm corner with a strong lock, the logs are adjusted to each other in a special way.
There are about 30 forms and names of these castles, and we are not so well versed in log construction to consider them all. And there are construction methods in which there are no corners:

But most castles have one obvious property in common: when the logs are placed one on top of the other, cross-shaped joints are formed at the corners of the house, which cannot be sawed off to level the facade.
Such angles complicate siding and lead to higher prices for materials and work.
To get around the corners of a log house when installing siding, we use three methods.
Method number 1. Box on the corners
With this method, we make a box in which the takeout is completely hidden.
In this case we use:
- external on the side of the wall;
- external on the corner of the box.
It turns out that for such a walk we will need three external and two internal corners on each corner of the house.

Many customers do not like this method, because the house becomes bulky in appearance.
Method number 2. Walking along the surface of the log
In this case, we go around all the outlets, as if covering them with siding from the outside.
For one corner we need:
- internal angle between the wall and the extension;
- external from the wall side;
- external from the corner side;
- internal between perpendicular extensions;
- external on the second extension from the corner side;
- external from the side of the second wall;
- internal between the second extension and the second wall.
This bypass method is the most material-intensive, but it has its advantages.
For example, a house sheathed in this way retains an appearance close to the original: the cross-shaped corners are preserved.
In addition, this covering allows you to make the stems less bulky and conspicuous.
Method No. 3. Preserving raw corners
In some cases, customers ask to preserve the stem without covering it with siding.
We approach the corner along the wall and finish the siding with J-profile. The stems are left "as they were" and the customer usually paints them in a color that matches the color of the panels or roofing.
The disadvantage of this approach is that the corners of the log house continue to be exposed to the environment and are not protected by vinyl.
Another disadvantage is that the corner remains cold, and if the walls are insulated, then heat will flow away there.
But from the point of view of material consumption, this method is the most economical.
Method number 4. Sheathing “flat”
If the ends of the logs do not stick out very much, then sometimes they can be hidden with a frame so that from the outside it will not be clear whether there were corners or not.
In this case, after the cladding, the house looks as usual: no boxes or leftovers.
Insulation of a log house under siding
If a log house is insulated during finishing, then the “pie” of this insulation is no different from the standard “pie” that we use on other houses.
First, the log house is covered with a vapor barrier, and it is mounted closely, enveloping each crown.
Then hangers are mounted on the vapor barrier, on which the frame will be attached.
After this, insulation is placed on the hangers, which is then pressed against the first layer of the frame.
In some cases, the customer believes that without a vapor barrier the house will “breathe” better. People who read construction forums, where users of varying degrees of sophistication share tips, especially often think this way.
We have nothing against sharing construction experience, but we ask you to take into account that anyone can write an intelligent and confident post on the forum: a professional with 20 years of experience, or just a person who does not understand anything about construction , but likes to give advice.
And you won't be able to distinguish one from the other. So be careful and listen to those who are responsible for their recommendations with money.
In addition to insulating walls, remember that heat leaks through corners and openings: windows and doors. And, of course, through the roof or ceiling in a cold attic.
So, even insulated walls do not always guarantee that the house will become warmer. Heat is like water, it flows away where there is less resistance, remember?
And if you decide to insulate a log house under the siding, approach this task comprehensively. Better yet, turn to professionals.
That's all.
Call by phone in St. Petersburg 956-17-30 or click on the button on the right " CALCULATE AN ESTIMATE«.
Walls and corners, especially those of a log building, need maintenance. They must be insulated from the outside. Let's consider how to cover a house with siding with your own hands in combination with insulation measures. Let's say a few words about the features of finishing a garage or other outbuildings.
Why was siding created?
This construction material is in great demand. It is unpretentious in maintenance, it is not afraid of the vagaries of the weather, and the slabs themselves are light in weight and easy to install. This is a convenient way to decorate a shed or garage. But why do they cover houses, schools and kindergartens with them? This is because the rise in electricity prices has affected everyone, and kilometer bills are becoming increasingly difficult to pay.
What to do? Naturally, it is necessary to insulate houses and it is better to do this outside, especially if there is not too much living space. Almost all insulation materials are susceptible to exposure to sunlight, excess moisture and other natural phenomena, and some cladding materials, such as natural wood, become wet from rain.

Siding panels do not have these disadvantages. They will perfectly protect the walls and the insulation attached to them from negative influence weather. Vinyl, metal and other types of siding are used to cover not only houses with and without insulation, but also garages, warehouses, sheds and others. utility rooms, because their walls also need protection from the vagaries of the weather. Sometimes only the facade of a building is decorated, because this material also copes remarkably well with this function.
We are sheathing a shed or garage - why metal?
We will look at detailed instructions on how to work with the most common type, vinyl siding, a little below. Moreover, many panels are needed for the walls and facade of the house; it will be somewhat cheaper than other materials. But a garage or shed can be sheathed with metal. If possible, then it is better to purchase material from polymer coating. It will be more wear-resistant, and its service life reaches 50 years. Another undeniable advantage is fire resistance, which is so important, especially if it is necessary to decorate the walls of a garage or warehouse in which flammable substances are stored. In addition, due to their excellent strength, such panels are in demand for cladding shops, gas stations and even factories.

Having made the necessary calculations and purchased the material and components you like, you can begin installation work. We remove all elements from the walls of the garage so that they are as free as possible. Then we clean them of dirt and, if necessary, prime them. Next, we assemble the frame from the profiles, maintaining a distance between cells of at least 60 cm and no more than 1 m. Do not forget to leave a technological gap for ventilation, 5–10 cm is enough.
Since this type of siding has a long service life, the frame should be made only from galvanized profiles. Don't use it for him wooden slats, they will rot much earlier than the cladding material becomes unusable. And if, for example, you have a wooden shed (often these utility rooms are made of timber), then such lathing will also allow you to level the surface.

You need to wear gloves when working, otherwise you can get hurt on the sharp edges of the planks, and you should wear safety glasses when cutting the panels. Metal strips are assembled in the same way as plastic ones, from bottom to top. At the bottom there is a starting bar, and at the end there is a finishing bar, and during their installation a gap of 5 mm should be maintained. To protect the insides of the facade from precipitation, you can stick a special seal on the frame around the openings and then press it metal sheets. In all other respects, the process of covering a garage, warehouse or shed occurs according to the instructions described in the next paragraph.
How to work with panels correctly?
To protect the walls, and especially the facades of stone and wooden houses with insulation, by covering them with siding, you will have to spend a lot of time, since there will be a lot of calculations and fittings, because we decided to decorate the house with our own hands.
How to cover a house with siding yourself - step-by-step diagram
Step 1: Calculations
Absolutely any construction work begins with preparation, because this is the key to speed and quality of the result. First produced. It is best to schematically draw the building and indicate all dimensions (walls, facade, window and door openings, etc.). Next, remembering our 5th grade math lessons, we perform basic calculations. Openings are subtracted from the total area, but if there are few of them and they are small in size, then this action can be ignored. Then you will buy a little extra cladding material, and you will have the opportunity to replace damaged panels in the future.
Step 2: Selecting Material
Siding differs in color, material, size, there are many configurations and, of course, main parameter– this is the quality of the product. The vinyl version is in great demand for cladding facades or private buildings around the entire perimeter. The slats of this hard plastic are very strong and durable. Other advantages include durability and ease of maintenance. Simply wash the coating and it will be as good as new. A huge range of colors and a variety of designs will allow you to choose a material to suit every taste. When choosing a product in a store, inspect all the elements. Defects are unacceptable; panels over the entire area must be the same thickness. The presence of a special lock against hurricanes and double-sided painting indicate good quality. Ask sales consultants to present a certificate for the product.

Step 3: Tools and Supplies
Having purchased a set of vinyl, wood or other siding with which you are going to cover the building yourself, you can begin to prepare the tool and better select it depending on the type of house - whether you built it from timber or brick, made it with or without insulation. We will need profiles, corners and components. If the latter did not come with the panels, then they should be purchased separately. Also prepare a building level, a corner, a hammer, a long tape measure and a pencil. It is convenient to cut the panels with an electric saw, but you can also use metal scissors. Don’t forget the hammer drill; without it, the installation of the sheathing cannot be completed, especially when the house is not made of timber, but something harder. When selecting fasteners, make sure that they are not afraid of corrosion, because we are talking about outdoor work.
Step 4: Surface Preparation
We dismantle all removable parts, these include drainpipes, canopies, trim, shutters and other elements that may interfere with work. There are especially many of them on the facade, so you can start from this part of the house. Having freed up the area as much as possible, we proceed to the walls. If they already have any protective covering, then it should also be removed. Next, check the plane being processed with a level. The difference should not be more than 15 mm, otherwise the unevenness will be noticeable even after cladding.
If you are going to sheath a wooden house (for example, made of timber) or a log barn, then be sure to treat its walls with a primer, which will prevent them from rotting. Reinforced concrete and stone surfaces are coated with special antiseptic agents, often used in garages. If the weather outside is rainy or high humidity, it is better to postpone the work until later, since the surface to be treated must be completely dry.

In the fall, store the panels in the house or other warm room, since being in the cold, they become excessively fragile, which will complicate installation.
Step 5: Installing the Sheathing
You can attach protective material without a frame, but this will significantly deteriorate the quality of the work, so it’s better not to be lazy and make a lathing. Construction profiles are perfect for it, but it is allowed to use wooden beam(profile approximately 50x50). There are just a few reservations about this kind of sheathing. It is desirable that the length of the beam be greater than the height of the building. And if you still decide to give preference to natural wood, make sure that it is dry, otherwise the frame will move over time, this will be most noticeable on the facade, where there are many joints and transitions.
We start installation from the left corner. We install each new batten perpendicular to the supporting strip in increments of about 35 cm. Be sure to tie all openings with the supporting profile and leave space for communications and outdoor lighting. The profiles are mounted on special fasteners-hangers. There should be at least 4 of them per 3 m long rail. Under one hanger we drill two holes directed towards each other and hammer them into them plastic stoppers and install the fasteners, fixing them with self-tapping screws. Be sure to check the vertical and horizontal of the “skeleton”; for this we need a level with a plumb line.
 Foundation sheathing
Now we come to the most exciting issue - attaching the protective strips. The lower part of the house is sheathed with plinth panels, which are characterized by increased strength. Next, retreating 10 mm from the basement siding, a starting strip is installed on the wall. It is mounted to vertical posts using self-tapping screws. Use a level and keep an eye on the horizontal, because the overall appearance depends on how correctly this element is positioned. Don't forget about the corners; the panels can be placed on top of each other. If there are window openings, then connecting profiles should be mounted in their center.
Step 8: Installation of panels
Next, everything is quite simple. The planks are easy to cut with a grinder; it is advisable to use thin discs. Each row is inserted into the previous one from bottom to top. Constantly check the level for horizontal position. The panels are fixed with special self-tapping screws and press washers. The fasteners are screwed in strictly in the middle of the perforation, and it is better to underpress them a little (by about 1 mm). Be sure to pay special attention to the panel joints. The planks should not be offset relative to each other.

Step 9: Door and Window Openings
Siding will also serve as an excellent material for framing houses. If you want buildings covered with these plastic panels, had an original appearance, which is especially important for the facade; you can experiment with colors. For example, it is beautiful when the frame around the openings and the plinth panels are several shades different from the main color. Sometimes the bottom is made dark, and the framing elements, on the contrary, are chosen white. Special J-shaped profiles are mounted around the openings, and the resulting frame is sheathed with near-window strips. Finally there is a special finishing strip.
Finishing siding on a wooden house or cottage with your own hands is a very convenient solution that allows you to give even the most ordinary object a very attractive look. Among other things, the cladding material comes in completely different types, which makes it possible to choose an individual option. Having durability, siding will last long years. It will also protect the house from environmental influences.
Installation does not require specialized skills, but if you don’t have them at all, you will have to understand the design a little. And then all the nuances of the work will become completely clear.
What is siding? This is one of the types of cladding, which can be in the form of a panel or board. The material itself is not used; before you start using it, you need to make a special crate. In addition, this technology allows for additional insulation of a wooden house.
Exist different types material, it is better to choose the one that suits the appearance, characteristics and price.

On a note! It should be understood that the installation of such a product requires compliance with many rules. Therefore, such work requires qualitative approach. You should immediately decide whether specialists will be invited or everything will be done yourself. But the services of finishing specialists are very expensive.
VIDEO: Types of siding and finishing technology
Carrying out work
Tool
The preparatory stage begins with the selection of the necessary tools:
- hacksaw and metal scissors;
- drills and screwdrivers;
- hammer and pliers;
- tape measure and level;
- rope and pencil.
It is more convenient if the work is performed with a partner.
Calculations
If you don’t immediately calculate the quantity required material and fittings, the work may take a long time. It’s better to create a sketch right away; it’s not necessary to make beautiful drawings, the main thing is to make it clear. The fact is that if you need to work on large areas, you have to resort to joining panels. Without calculating this in advance, you can end up with a connection in completely different places, which means visual perception will be lost.
We must not forget about other important factors. By purchasing panels gradually, you can run into a significant difference in shades, and also be faced with a lack of material.
Preparing the walls
No matter how much you would like to start sheathing right away, there is no need to rush. Do not work on unprepared wall surfaces. In principle, such requirements exist for any type of finishing.

- The walls are cleaned of dirt and dust. In general, it is necessary to remove all contaminants that may be found on a wooden house.
- The integrity of the coating is immediately inspected. Any cracks or holes are sealed using a special putty.
Advice! You can use polyurethane foam, it seals all the seams well. You should be careful when using it, because it expands significantly after application.
- Often such houses were previously decorated with plaster, but it fell into disrepair, which was the beginning of a new finish. It’s just that the entire old layer that is being destroyed must be completely removed.
- All external and adjacent elements are removed from the walls. This is done for greater convenience, then they are installed back.
- When working with a log structure, pay attention to the seams. It is better to fill them with putty and glue.
Lathing
Why do you need to do the sheathing? This is due to the fact that the walls have significant unevenness. It will be almost impossible to attach panels to them without distortion. For wooden structures They make the same frame. Anyone who has done work related to installing drywall will immediately understand the principle of the design.
The lathing is made with well-dried timber; it is better to choose a section of 50*80. The technology is not very complicated:

Renovating the external walls of a wooden house involves the use additional materials on their surface. Covering a wooden house with siding is the most practical way. In addition, siding is a modern, affordable material and looks beautiful from an aesthetic point of view.
Let's consider step by step how to choose the right material, calculate its quantity and carry out installation.
Material selection
The correct choice of material will affect the entire structure as a whole.
Siding in production is produced in different color ranges and texture. It is necessary to familiarize yourself with information about it, study information about its invoice.
To begin with, before selecting it, you should decide on the final look and color of the future home. Combined selection of textures is possible, color solutions. Then select siding in accordance with the planned result.
Manufacturing enterprises produce several types of siding ranging from 2.5 m to 4 m in length.
Plastic
- Advantages: the most accessible inexpensive type finishing, is light weight.
- Disadvantages: susceptible to mechanical damage.
Metal
- Advantages: durable, service life is long term. It is recommended to purchase from authorized dealers, who guarantee long-term absence of corrosion.
- Disadvantages: Requires periodic rust protection.

Wood
- Advantages: complements the properties of the original wall material. Environmentally friendly cladding.
- Disadvantages: increased price.
Fiber cement
- Advantages: non-flammable, highly durable. Diverse in color, style, texture.
- Disadvantages: heavy, difficult to install.
- metal galvanized, not subject to temperature changes 50×50, 60×27;
- Wooden.
A metal profile is most suitable for surfaces with uneven surfaces. It is strong enough to support the weight of any type of decorative cladding.
Metal profiles with different sections are selected.
Costs will be reduced when using a wooden frame, since there is no need to create protection for the section of the wall at the line of contact with the sheathing.

The wooden frame must meet the following criteria:
- no delamination;
- no deformation;
- no signs of rot or stains.
Before installation, the frame must be impregnated with antiseptics and fire retardants to create a protective fireproof layer, a coating against fungus or mold.
Bars of size 40×40, 50×50 or 50×80 mm are selected. When doing the work yourself, you should first study as much information as possible on this topic.
Equipment
A set of siding panels for cladding the facade of a house should be selected depending on their width and wall area.
The complete set of wall siding includes:
- panels directly;
- internal as well as external corners;
- the starting profile located first from the base;
- J-, H-, or T-profile;
- J-chamfer;
- casing 75, 89 mm;
- solid soffit;
- window profile;
- low tide;
- finishing profile.
Additional decorative elements help make the outside of the house look complete and beautiful.

Calculation of the number of siding elements
It is necessary to measure the length of the base of the building and its width using a construction tape. Based on these measurements, it is recommended to draw up a sketch of the house with a drawing of the necessary materials and additional elements, notes on their quantity and size.
Number of panels
- the number of planks can be calculated by dividing the total area of the walls by the length and width of the element.
The material should be purchased with a margin of about 10% of the final number obtained.

Number of corners
To calculate the number of external and internal corners, it is necessary to measure the height of all protruding and concave lines of the building. It is better to count the number of strips separately for each corner. You should take geometric shapes as a basis.
Total length of starting bars
The finishing and starting slabs must match the length of the side of the house.
Calculation of other elements
J-panels and window trims are calculated based on measurements of the perimeter of windows and doors. Window profiles are taken into account.
Step-by-step instructions for installing siding
Installation of siding panels begins with preparatory work.

Preparatory work
If there is old finishing, it is dismantled.
The base of the wall is cleaned of dirt and dust. After which, the cleaned surface is treated with antiseptics and also a fire retardant to prevent it from external, atmospheric influences and premature destruction.
Additional tools, materials for the frame installation process:
- construction corner;
- construction stapler;
- insulation;
- wind protection, waterproofing;
- wood screws;
- sealant that does not expand in air.
Before attaching the frame, you must make sure that there is no damage to the wall or that there are places with unstable elements.
Frame installation
The distance in the middle of the guides is calculated taking into account the thickness of the insulation if it is used.
The guides are fixed from each other at a distance equal to the width of the insulation minus 2 cm, approximately in steps of about 40 cm, 50 or 70. When using polystyrene, the fastening step is selected in exact accordance with its width.
In general, the pitch for the frame will be determined by the length of the siding panel.
To attach siding in a horizontal position, for example, on the upper part of the facade of a house, the frame must be positioned vertically. And, conversely, for a vertical arrangement of the decor, the sheathing is installed horizontally.
Fastening the frame begins from the corners of the house facade.
Around the windows, guides are fixed along their contour. The length of the slats should not reach the bottom of the wall at a distance of approximately 40 - 50 cm.
For correct use For any materials, please read the instructions supplied by the manufacturer.

Step by step guide for fastening the frame under the siding:
- It is necessary to install a special vapor barrier construction membrane along the surface of the wall using a stapler in strips with an overlap of 10 cm. It will create the movement of air flows through the wall. To fix it, use double-sided adhesive tape;
- Direct fastening of guides. You should check the levelness using a building level;
- then the insulation, if provided, is laid in the openings between the guides;
- When using it, a layer of special wind protection and waterproofing is attached on top of the insulation. It is better to use vapor diffusion windproof materials.
Nails treated with anti-corrosion zinc or aluminum compounds and self-tapping screws should be used to fix the frame.
Securing the starting J-profile
All operations during the installation of each panel are checked for exact horizontal or vertical position using a building level.
- the lowest point of the sheathing at a distance of 40 - 50 cm is marked by installing a loosely fixed screw or in another way and is further marked along the contour of the building for subsequent fastening of the siding directly along them. Horizontal accuracy is checked in all places using a building level;
- the construction cord is pulled along the lower markings along the self-tapping screws installed at a level of 50 cm from the base or ground;
- Next, fixation points are marked on the slats of the corner profiles. To do this, apply the profile to the slats located at the corners of the house;
- the starting profile is fixed at the mark using a rope, retreating 6 mm from the joint planned with the corner profile;
- subsequent first strips are fixed 10-12 mm apart from each other to prevent subsequent deformation from the effects of changes in external temperatures.
When the starting or first stripes do not have a gap from the line of the corner profile, the nail strips are cut on it. When joining the profile, trim top part to create a gap of 9 mm between the nail panels. The overlap is created at 25 mm.
At the end of the work, the accuracy of the position of the starting strips is checked using a building level.
Corner profiles
Before fixing the siding, corner profiles of external and also internal corners are attached to the frame slats.
Step-by-step instructions for installing external corner profiles:
- the extreme points of location of the material for lining areas near the roof - soffits - are marked;
- a guide is applied to the corner of the building facade;
- there is a gap of 3 mm between the roof line and the edge of the profile;
- At the bottom, the profile is fixed 6 mm below the line of the starting bar, forming an overlap. From the base of the facade, the profile is mounted higher with a gap of 6 mm and secured with self-tapping screws in its upper part;
- check the vertical position with a building level and adjust the panels as necessary;
- fasten the remaining free central part and the lower part with self-tapping screws, avoiding frequent placement of screws.
A gap of 3 mm is left between the end and the cornice.
The joints with the profile are created at the same distance, measured at each corner of the building. Subsequent joining is carried out with an overlap. The area with mounting holes at the top of the plank is trimmed, if necessary. Create a space of 9 mm from the top and between the bottom of the panel.
An additional strip will be required to cover the joints. The installation of concave corner profiles is carried out in the same way. Corner profiles can be replaced with starting profiles.
Opening frames
Work with openings has an increased level of complexity.
It is necessary to determine how the opening is located relative to the wall: “flush” or “recessed”.
The procedure for performing work on flush openings:
- waterproofing in the area along the window contour is required;
- J-type profiles or platbands are fixed: 2 of them are horizontal and 2 of which are vertical;
- profiles connect. It is necessary to bend the created bridge cut at the top of the profile to drain precipitation. Excess areas of material are removed;
- when connecting the side profile to the top, the bridges should be inside.
The work is carried out similarly with “recessed” type openings.
Installing the first panel
Work begins on the less visible side of the house.
Insert the first panel into the locking part of the corner profile. It is snapped into place, creating a distance from the lower section of the lock to the starting element to prevent distortion of the siding when expansion occurs due to exposure to temperatures.
Do not tighten the screws all the way to avoid deformation of the siding panels due to thermal expansion.
They are located in the central part of the area with holes for fastening siding perpendicular to the wall.
Installation of remaining panels
Subsequent panels are installed either overlapping or using an H-profile.
When installing overlapping siding:
- panel locks and mounting frames need to be shortened. As a result, the “overlap” should be 2.5 cm;
- gaps are created with a value of 0.3 mm from the edge of the soffit and 0.6 mm from the starting panel.
Installation of H-panels is carried out in the same way.
In areas of openings, excess planks are trimmed.
Under the roof, sheathing of siding panels is carried out taking into account the measurement of the distance from the lower key finishing part and the section of the penultimate plank. Add 1 to 2 mm to the resulting number. This is the width of the last siding strip.
The last part is being prepared. It is marked and trimmed at the top, and also hooks are made every 20 cm. For this purpose, cuts are made and folded to the side.
Insert the last panel into the lock of the finishing profile. It is snapped shut.
Installation of siding with insulation
Facing the facade of a house with siding can be done with thermal insulation. Especially to sheathe a house With insulation is recommended when choosing metal siding.
To understand how to do this correctly and correctly select the type of insulation and its density, you should clarify the information on the initial data about the materials already used for the construction of walls during the construction of the house and select materials based on it.
Types of insulation:
- mineral wool, which has good breathability and moisture resistance;
- polystyrene plate.
The use of insulation on the outside of the walls eliminates the reduction of the internal areas of the rooms.
IN middle lane In Russia it is enough to use insulation 100 mm thick.
The load on the walls or foundation from it is not taken into account, since the material is practically weightless.
The technology of covering facades with siding using insulation consists of placing it on hangers. A knife creates slots for fastening.
On average, one day is enough to complete this stage of work.
Installation of siding strips is carried out in strict accordance with the above rules. Price of work per m² of house 9x9 can be about 250 rubles. depending on the type of slabs and the amount of preparatory work.
You should remember about distortions, so you need to constantly check the horizontal and vertical lines with a building level.
In general, the work will be successfully completed with correct calculations and thoughtfulness of each step.